Category Archives: Gift

Giving Thanks

Standard

As mentioned last month, I LOVE FALL.  I especially love the Thanksgiving season cause it causes to take a moment to pause and remember the things in life for which we are truly grateful.  This year has brought LOTS of changes for me and my family… and through that, I am learning how thankful I am for my family.  Sometimes we seem to forget to look on those who are closest to us with eyes of gratitude…


So, this month, I have a daily reminder to GIVE THANKS!!  And, I need to remember that throughout the whole year…


Head on over to see what delights Anne and Cheryl have for you!


I’m leaving on a (infant friendly) jet plane

Standard

So…  We just got back from our summer mainland extravaganza.  It was exciting.  But,  I was a bit nervous taking the Littles on their 2nd airline flight.  (Their first was only HNL to Maui and they were only 2.5 weeks old… I think they forgot. ) Anyway… I wanted to make a little gifty favor for our seat mates.  Just a little something to break the ice and to get them to think the Littles were more cute than screaming airplane passengers.  So…  Here it is:

I used those awesome chevron printed bags and filled them with Blondie Bites and ear plugs.  Decorated them with one of my favorite sets: Zoo babies…   I wrote a little rhyme and signed them from Zeke and Hannah. 

Fresh baked cookies on a red eye help tremendously.  And there was a group of passengers that sat next to us on our connecting flight as well.   Those poor people…  
Anyway,  the Littles did very well.  Despite some major weather delays.  And I have to mention the wonderful flight attendants on American Airlines.  They were a tremendous help.  They went way above their job description to help us.  Service like that makes traveling so much more bearable.

Graduation

Standard
Graduation

There are many unique traditions in  different locals and Hawaii isn’t immune. One of the lesser known cultural traditions is that holidays and celebrations can last months. It is perfectly acceptable to tell someone Happy New Year in February or March. I vaguely remember giving and receiving a Christmas gift in April. And Graduation Celebrating can last all summer. So. In Hawaii, this post is right on time.  🙂

Anyway. I needed a graduation card.  One thing I do with my stamp customers is have monthly club meetings*. That’s where we get together. Eat. (Always eat…delicious, delicious food) and stamp! It’s a highlight of my month. And for the last 2 years, one sweet young lady has attended with her grandmother. I’ve always been impressed with this because…well… let’s just say we are a bit more advanced in terms of…a..hem… well. You get it.  But I’ve always enjoyed watching her and her grandma interact and just enjoyed the relationship they shared. I can’t speak for them, but I just imagine this was just a special time for them to share together.  Anyway….  this is who the graduation card is for…

image

And since this is part on an extended celebration…cause I’m known for my extended punctuality… this was my first creation with the new in colors. (They’ve been sitting on my stamp desk for a month.)

I love them.

BlackBerry and Hello Honey. Now doesn’t that just sound delicious??

Here’s the color combo: basic gray, sahara sand,

image

I used the Pomp and Circumstance that was in the Occasions catalog. Sorry… its unavailable now. But you could substitute just about anything. There is a great set in the current catalog called Bravo that would be perfect.

I used the banner framelits to do all the layering. And the DSP is from the Moonlight Prints Pack.  Lets discuss Prints Packs for a moment.  SU has just started these in the last couple occasions catalogs and they are wonderful. It’s a pad of 48 sheets of paper that are 4.5×6.5  You get 4 each of 12 double-sided designs.  It’s great for little pieces of DSP on cards when you don’t want to cut into a whole piece of 12×12.  I love it!  And, they’re only $6.95.

image

Of course, I needed an envelope.  Envelope punch board to the rescue!  I made this out of the Smokey Slate.

image

And I wanted to make a money holder cause I know that is the perfect graduate gift.

image

For the money slot, just cut a panel slightly smaller than your card inside and glue on 3 sides. Then punch any shape you wish…I used the oval…about half way. This gives a space so the bills peek out and you can grab them easily.  You could redo the sizing easily and make this fit gift cards as well.

image

And there you go!

image

Happy Graduation Jenna! Best of luck to you!


*We are forming stamp clubs that will begin in August! If you are on Maui and are interested in friends, good food, and stamping, contact me and I will give you details!

March Madness

Standard

March is HERE…  and that means at MOST… 9 weeks till the dynamic duo make their appearance.  So, madness is upon us in more ways than one.  (I used to refer to March Madness as the NCAA basketball tournament, but now it is that period of craziness right before twins are born and we decide to make major changes to the house…  so… madness…)

Anyway, you wanna see the March calendar!!  SO, HERE IT IS!!

image

I LOVE THESE COLORS.  Strawberry Slush, Coastal Cabana, and Daffodil Delight.  And the Flower Shop stamp set makes it a perfect way to welcome spring!!  (though from what I understand, a majority of the country is still experiencing winter….  and to you, my condolences…come visit us in Hawaii… perpetual summer…)

image

Here is a close up.  This was the fastest little calendar to make!!  And so much fun!!

Go check out what Maui Stamper and Create with Cheryl have for you…

Spread a Little More Joy….

Standard

Welcome back to the LAST installment of the Best of Blog Tour….  In January, the tour will change to a PIN-Worthy tour…  It will be fun.

This month’s tour focuses of Spread the Joy and Monster Maniacs.  Both sets were drawn and submitted by demonstrators (well, Spread the Joy was an SU employee, but not a designer).  They are fun to see and I’ve had tons of fun playing with them.

So, if you’ve read my blog in the past, you will know that I have an infatuation with Spread the Love.  Did a whole series.  For this posts, I recycled an idea that I had made in cards… and formatted them for gifts!!  And, what perfect timing… you can whip up several of these and they are perfect for teachers… friends… and they come together as fast as a card does.


20131206_194630

These are just the 5×8 junior legal lpads and a postit that have been decorated with paper.  The post-it includes a velcro closure.  The cardstock just attaches to the back of the junior pad and folds around to the front.  I included a pen to make it a gift-set.

20131206_194646

My participation in craft shows has taught me that cellophane goes a long way in selling items.  So, I make it a point to try to package all my gifts.  Even though it is nothing big, having the items in cellophane is the icing on the cake when it comes to creating gifts…  People seem to really like it.

For my nod to the Monster Maniacs, I used it to create the “FEBRUARY” in my little easel calendar.  These are also very popular gifts for people…  And, they are FUN to make…

20131206_194740


I generally don’t like to buy line-art stamps cause it takes time and energy to get them colored.  And, the solid images are just so much faster when doing multiple cards.  However, coloring these monsters was a BLAST.  I do enjoy coloring…

So, for December, I thought it fun to show  you some little ‘gifties’ for your Christmas List.  And, receiving a thoughtful, hand-created gift is just a wonderful treat.

Now you are off to see what Deb has for you:


blogtour-stampmonth-next


Nancy Amato           http://stampinallnight.blogspot.com
Melissa Bolinger      http://www.stampinup.net/blog/2089191
Susan Carlson         http://stampinmomoffour.blogspot.com
Crystal Kondo           http://www.card-ed.com
Deb Lehigh               http://thestampinhut.typepad.com
Anne Matasci            http://www.MauiStamper.wordpress.com
Audra Monk              http://thecraftyyogi.blogspot.com
Maria Pane               http://www.stampinandscrappinwithriri.blogspot.com
Andi Potler                http://www.absolutekreations.com
Michele Reynolds     http://www.inspirationink.typepad.com
Pam Staples             http://www.sunnygirlscraps.com
Janet Wakeland        http://www.remarkablycreated.com

Christmas Collectibles

Standard

Hello Again!!  Welcome to the next stop on the next Stamp of the Month Blog Tour…

This month, I have for you a few projects for your Christmas gift needs…  A card, goodie box, and a goodie bag tag!  All perfect for your gift giving needs.  And, take my advice (and this is totally a “do as I say and not as I do” piece of unsolicited Christmas prepping advice).  START NOW.  then you don’t get overwhelmed in December.  (check back in with me in December and see how well I heeded my own advice).

So, here it is:

First up is the Christmas Card.  And I must confess, I got the color scheme from Pinterest.  The polka-dots from the Christmas paper (Season of Style) and the Coastal Cabana (just fyi, I love this color so much I’m thinking of painting my kitchen a shade of it…).

20131011_184906

Very simple layout.  One of my favorite styles of cards (i.e. the 3×6).  Tag is cut from the Chalk Talk framelits set.  And, a piece of washi…  And, of course, after I made this and was so proud of myself, I realized that silver cord is retired.  But, we do have the perfect silver ribbon that would totally work.  I didn’t wanna take it off cause it’d never look quite right for me to re-do… and I didn’t feel like remaking everything… SORRY.  My apologies.

20131011_184900


And, next up is a little gift tag.  This would go wonderfully on a gift, a cello bag of goodies, or you could even layer it up and put it on the front of a card:

20131011_184915

I love how the coordinating punch works so well with this set.  And, you can punch a bazillion ornaments for all your ornament needs…  You could even make cute ornaments for your own tree.  The children would love to make it…

20131011_184920


Just another view…

And, last up, is the little goodie box.  SU has expanded their packaging line, to my utter joy and excitement.  I LOVE PACKAGES.  And, the best gift, given in a junk package is not nearly as brilliant as if it were packaged well…  so, there is NO excuse for ugly packages this year…

ANYWAY… these boxes are super cute.  They have a clear slide that allows a peek at what is inside.  Don’t get too excited.  I had no idea what to put inside at this point (It’s October, and I’ve already alluded to my procrastination problem…) So, all I have inside this one is the brown crinkle paper.  Which makes it look cute, but the gift receiver may not be very excited about the gift…

20131011_184837


The nice thing about this box is that you can put belly bands ALL the way around the plastic sleeve and its FINE.  Cause the plastic sleeve slides off the box.  So your design stays nice and you can still get into the box.   BRILLIANCE I TELL YOU…. PURE BRILLIANCE.

Here is the set together:

20131011_184828


Hope you enjoyed this installment!  Next, you are off to see Deb Leigh.  Click on the button below.  And, below that is the entire list of those in the blog… If you need…

blogtour-25years-next (1)


Nancy Amato           http://stampinallnight.blogspot.com
Melissa Bolinger      http://www.stampinup.net/blog/2089191
Jackie Bottomley     http://www.jackiebottomley.blogspot.com
Susan Carlson         http://stampinmomoffour.blogspot.com
Tamra Davis            http://www.thecardladies.com
Connie Deibler         http://www.conniestamps.com
Sherri Eddleblute      http://www.sweetestdesigns.blogspot.com
Crystal Kondo           http://www.card-ed.com
Deb Lehigh               http://thestampinhut.typepad.com
Anne Matasci            http://www.MauiStamper.wordpress.com
Robin Merriman        http://www.trinitydesignstudio.blogspot.com
Audra Monk              http://thecraftyyogi.blogspot.com
Maria Pane               http://www.stampinandscrappinwithriri.blogspot.com
Andi Potler                http://www.absolutekreations.com
Michele Reynolds     http://www.inspirationink.typepad.com
Pam Staples             http://www.sunnygirlscraps.com
Jeri St. John             https://jerrisgemtastics.blogspot.com
Jeannette Swain       http://www.stampsnwhatnot.com
Janet Wakeland        http://www.remarkablycreated.com

What do pumpkins have to do with paper?

Standard

The answer to this, I do not know.

But, what I do know is that you only have a FEW DAYS LEFT to take advantage of the Paper Pumpkin Promotion (say that 10 times fast).  This is the monthly subscription service that brings a glorious little orange little box to your door with everything you need for a 30 minute craft ‘timeout’.  Cause we are learning that time outs are sometimes necessary for our own sanity.

Paper Pumpkin is $19.95/month (plus tax) but if you sign up right now, (by August 31) you will get your first TWO months for $10.   Go to mypaperpumpkin.com and use the code PUMPKINDEAL.  This is a wonderful deal.  And, to sweeten the pot, I have a few things to show you.  First off, if you sign up and designate me as your demonstrator, you will get a little gifty from me…

20130817_132043

It’s a stamp case to store your paper pumpkin stamps and a tube of Tombow the Wonder Adhesive (as Anne calls it, and I agree).  Adhesive is the only thing that doesn’t come in the kit.

Here’s a close up:

20130817_132057

And, here is something I made from the first kit you will receive….  (Now, the card isn’t the one in the kit, but I’m using the same stamps….just to show you the versatility of it.  Cause after you make what is in the kit, you can make OTHER things too…)

And full disclosure.  I totally copied this card.  Out of the most recent Stampin’ Success.  Stampin’ Success is one of the perks of being a demo.  You get a beautiful magazine every couple of months that have LOADS of ideas.  Ideas you can use.  Right away.  Like I just did.  Cause I can.

20130827_182244

Your starter Pumpkin kit comes with that “hey there” stamp and the splotches stamp.  The stamps that look like washi tape come from a stamp set called “Tape It”.  (BTW, I LOVE that set too).  I used calypso coral, summer star fruit and pistachio pudding ink, and crumb cake ink (stamp off to make it appear lighter).  The cardstock is very vanilla and crumb cake.

Here’s another look:

20130827_182252

I’m experimenting with a black background for photos.  Let me know what you think.  Do you like it better than the white background??

Here is a close up of the embellishment:

20130827_182324

Some bling and linen thread and a couple of punches make the card just stand out.  This card comes together SO fast.  And it is another use for your starter kit!!

And, you can give paper pumpkin as a gift too.  It’s fun to get a coupe of kits and take them and put them together with a friend.  Even friends who don’t craft or are used to stamping.  It’s so easy to do and put together that they will have a good time working on it with you.

So, remember…. by August 31.  Mypaperpumpkin.com  code:  PUMPKINDEAL.

And I guess we can say pumpkins and paper mean an EXCELLENT time out.  Do you follow my logic???

For the Newlywed…

Standard

Welcome Back!!  This is the next installment of the BEST OF… Blog tour.  This month features a cute set called “Brides and Babies”.

For this month, I decided to make a little gift card holder that you might give a newly-wed couple for their wedding.  It easily could be turned into a baby gift card holder using the other stamps in this set.  This idea and set are VERY USEFUL (to quote my son’s THOMAS books…).  And, if you would like my 2 cents (if you would not like it, skip the next coupla lines)  I’ve decided gift cards are good for newlyweds or newly parents.  Cause it all costs money…  🙂

ANYWAY…. back to the card…  Gift card holder.  Well… as much as I’d love to take credit for this, I must tell you that my friend, and fellow Maui Stamper, Cheryl Hamilton made me a little holder like this with a tea bag in it.  After my back surgery…  She had a completely different design, but the overall folder was the same.  You should check her out sometime (createwithcheryl.wordpress.com).
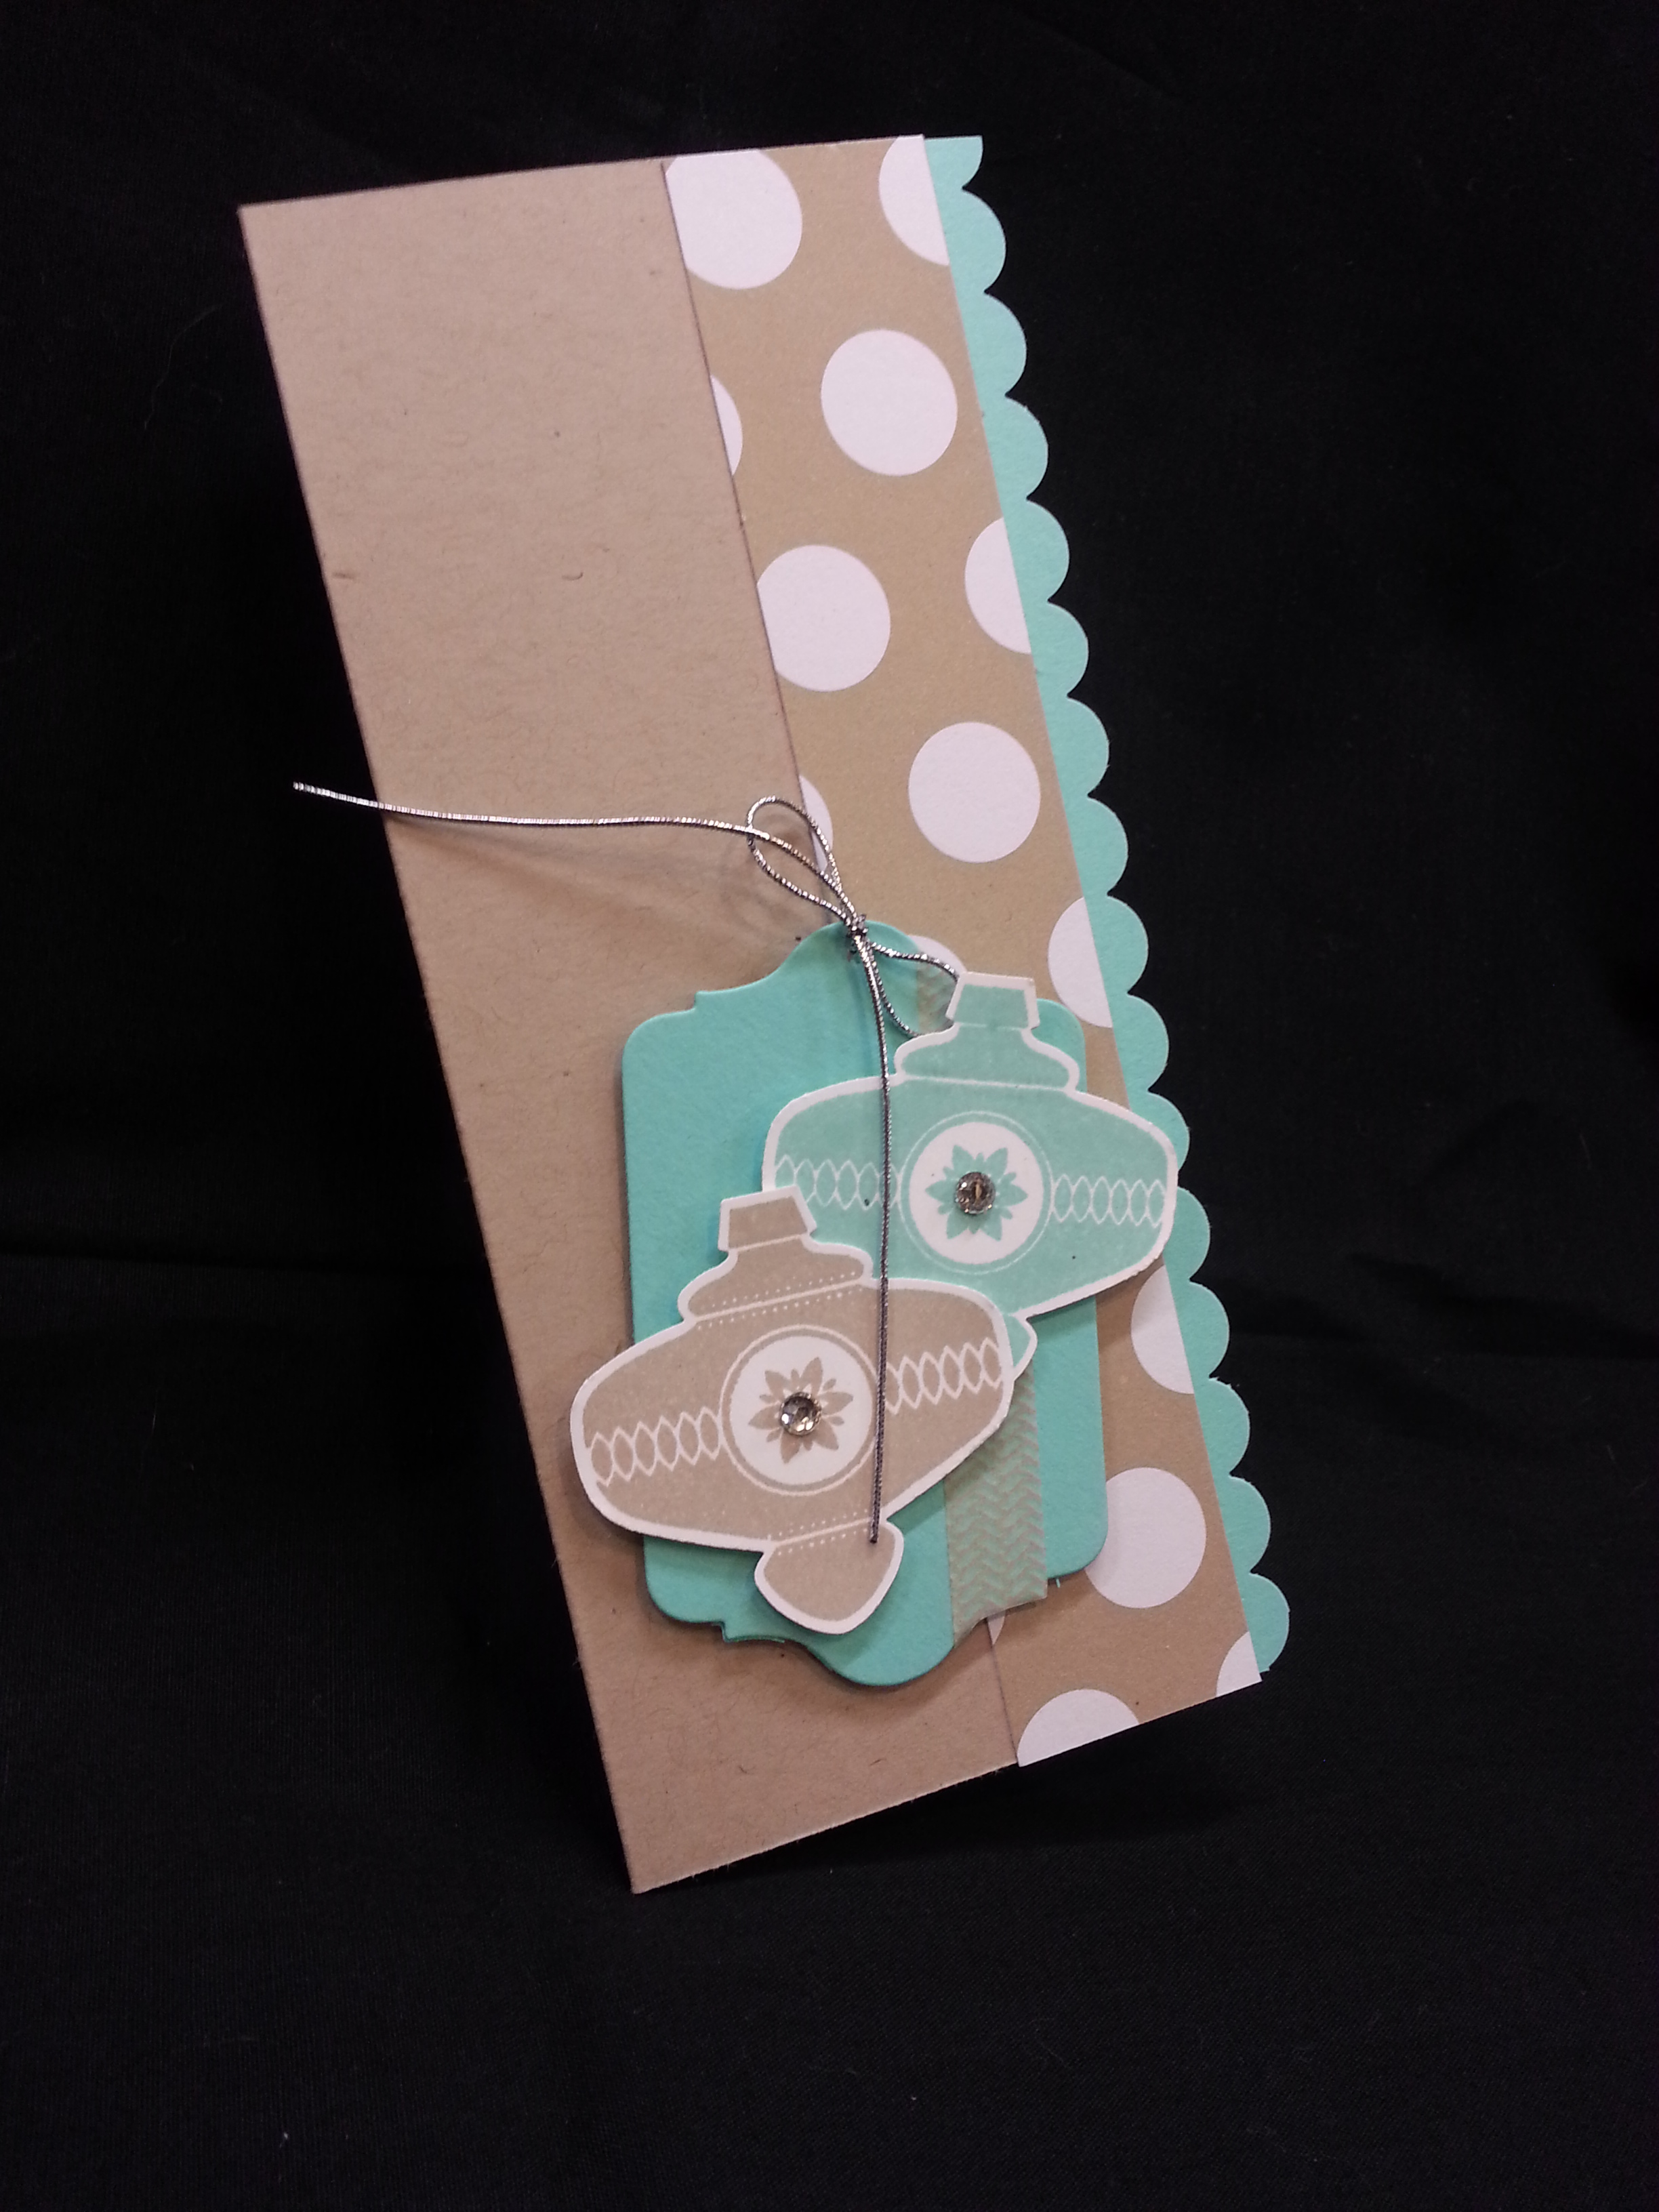
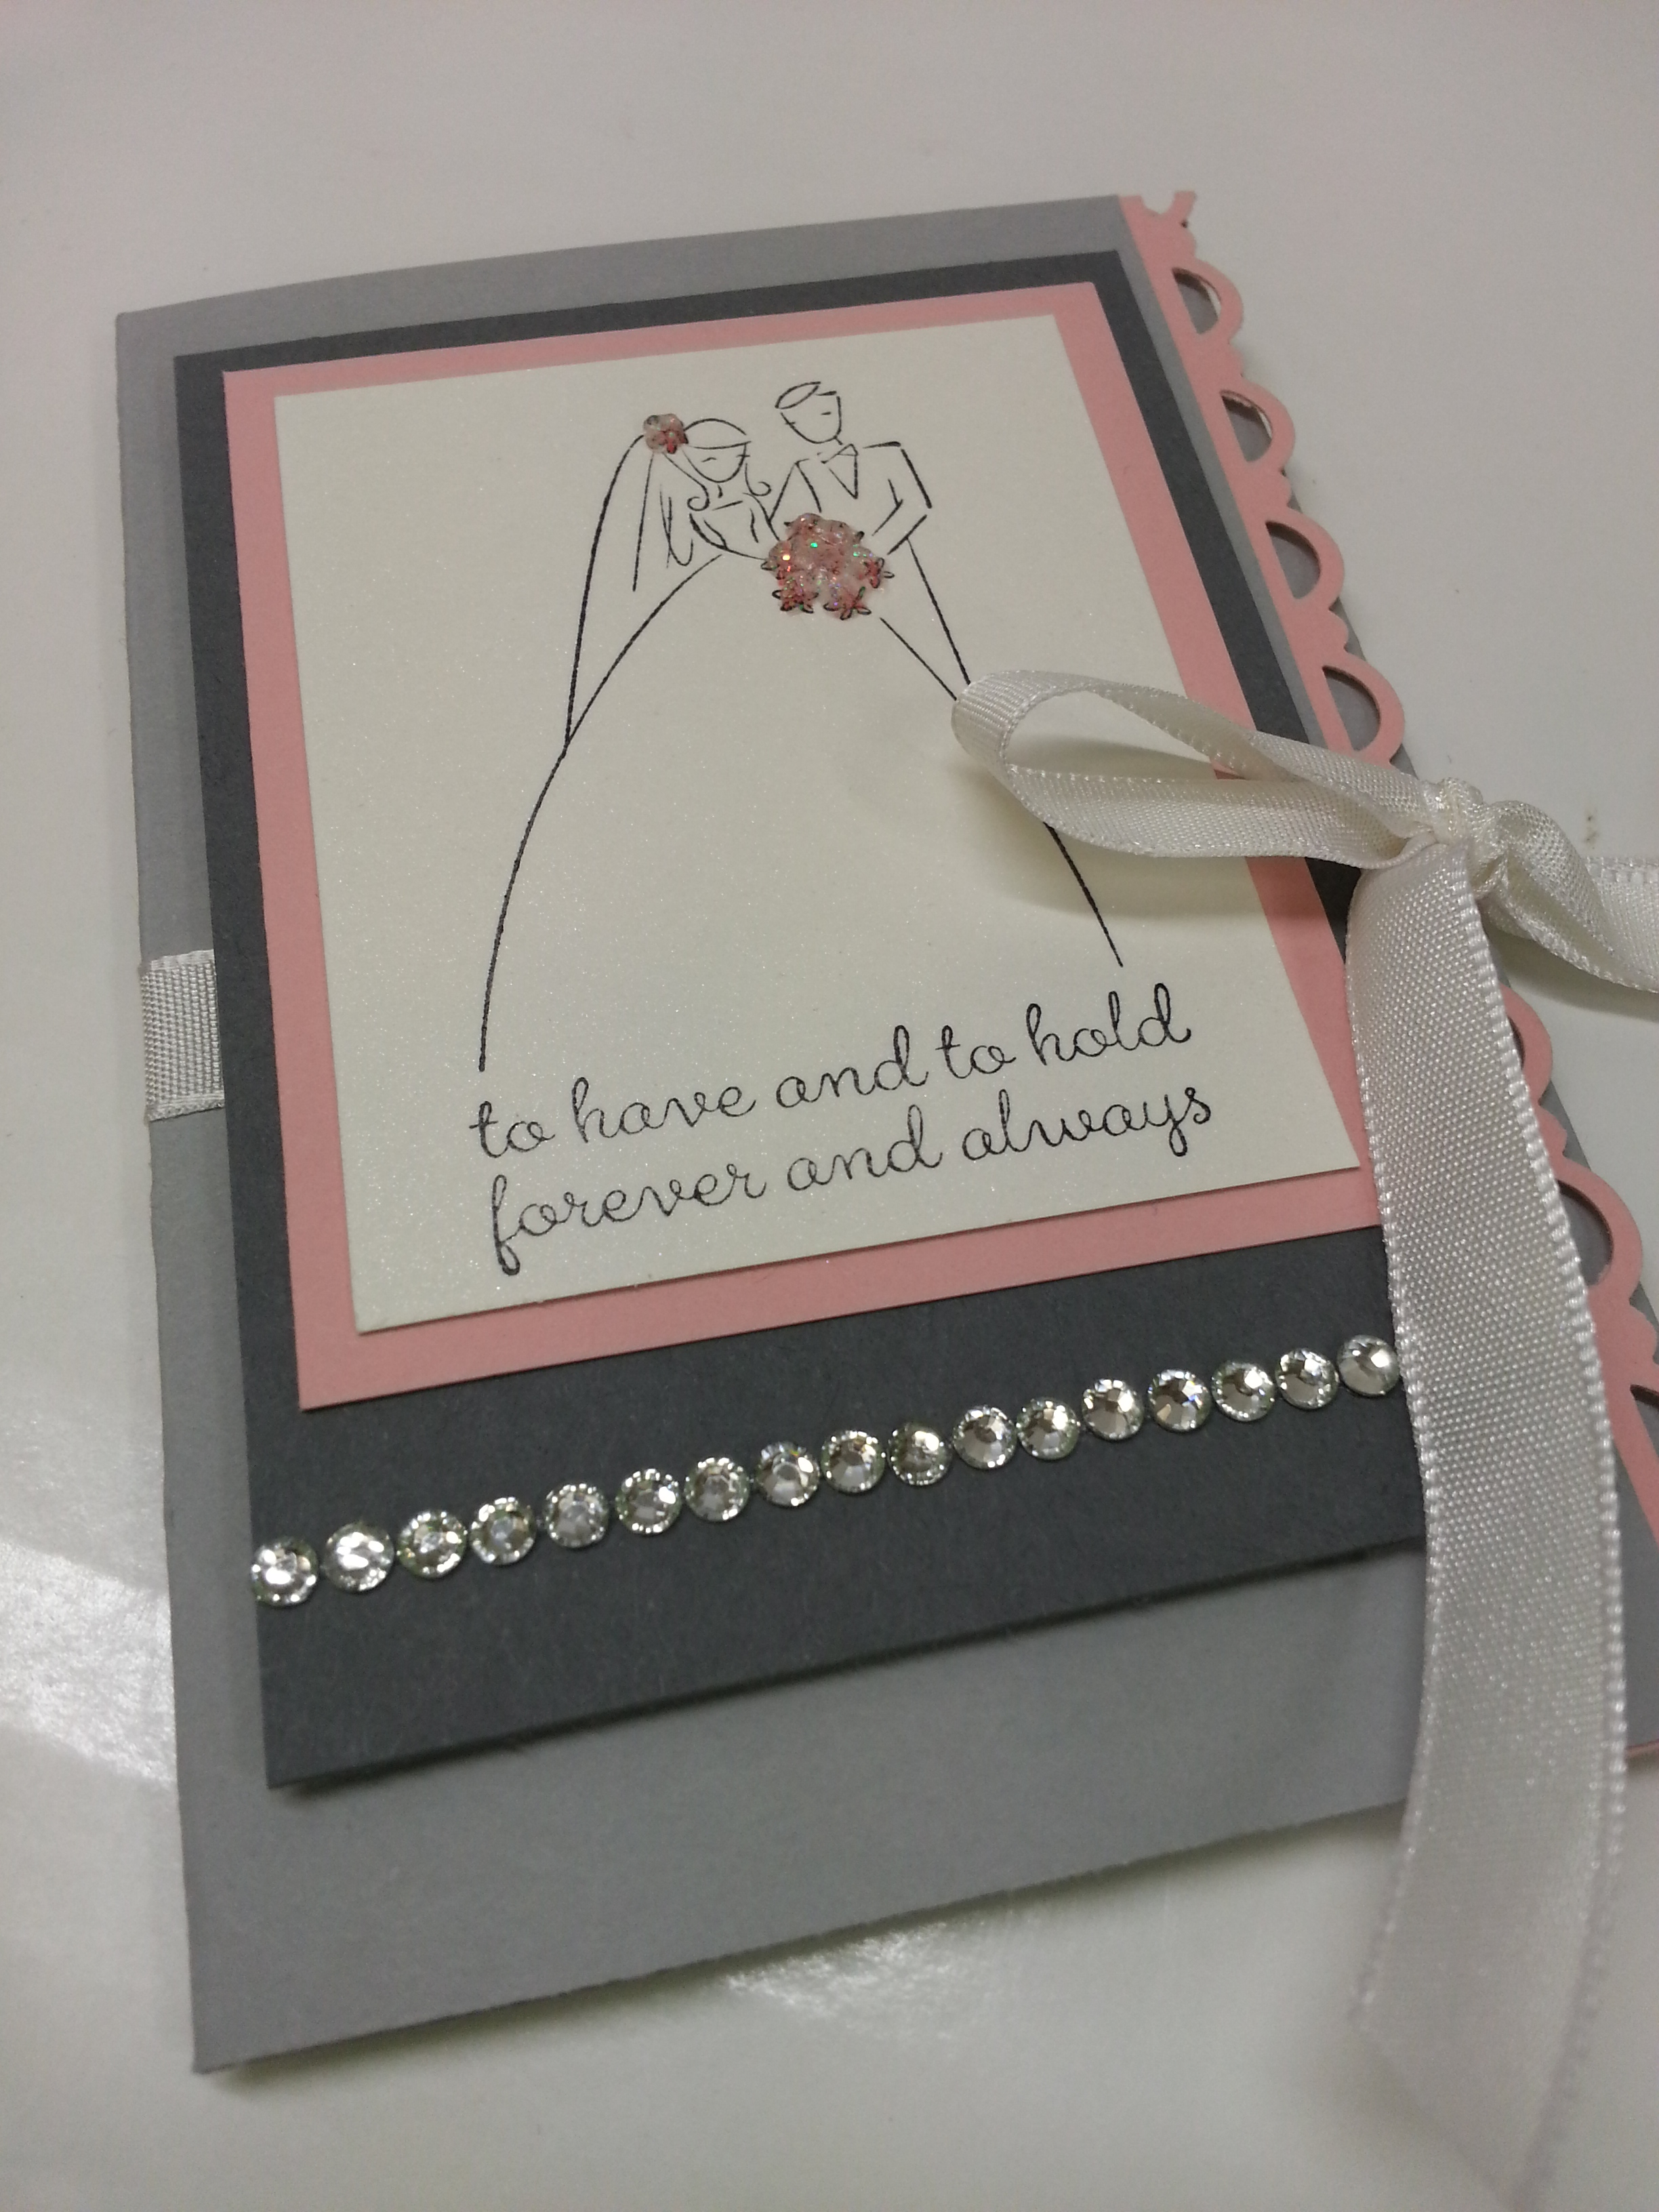
Here it is:

20130529_225848

So, the colors I used in this were the Smokey Slate (It’s a new one and I absolutely Love it), Basic Gray, and Blushing Bride (hee hee….get it… BRIDE???).  I used the white taffeta ribbon and a squish of the dazzling details glitter paint.  And, I thought this would be the perfect place to use one of those ROWS of the rhinestones.  Cause what do you do with those??  I always use my whole sheet up and have those 3 strips left.  I then wind up cutting them apart and using them all as singles.  I can’t remember EVER using a whole strip.  But, I did.  This time…

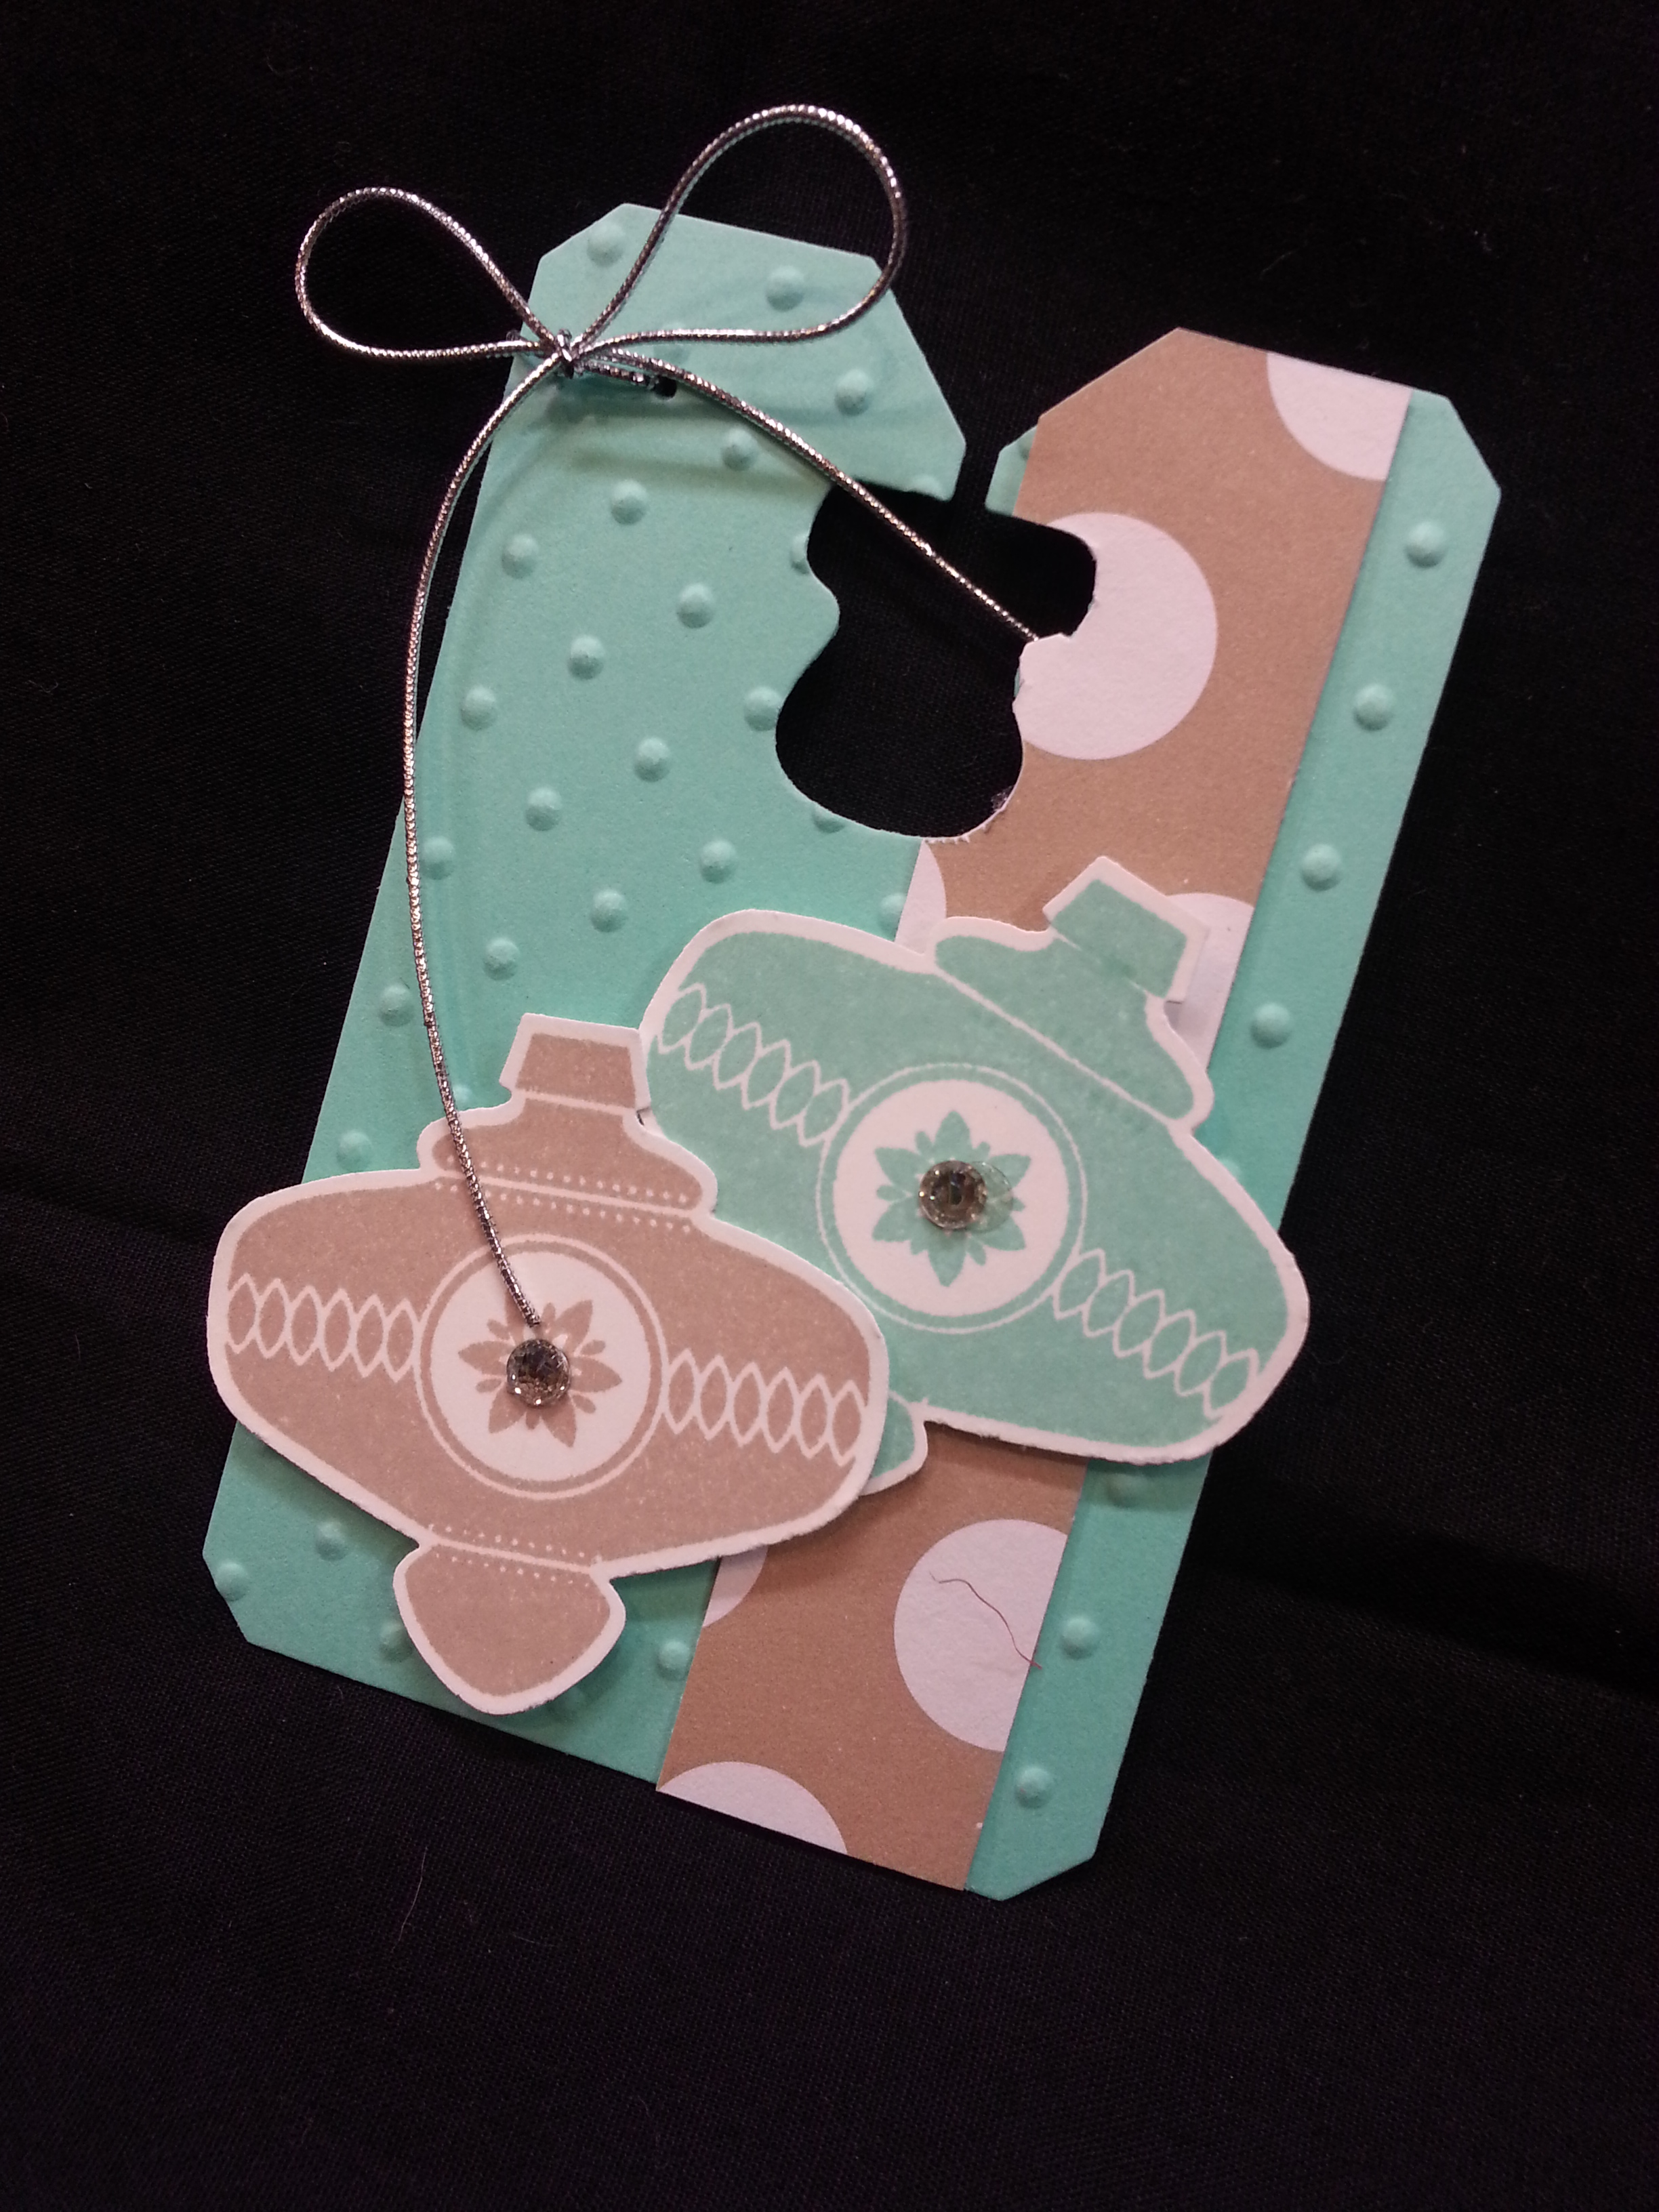
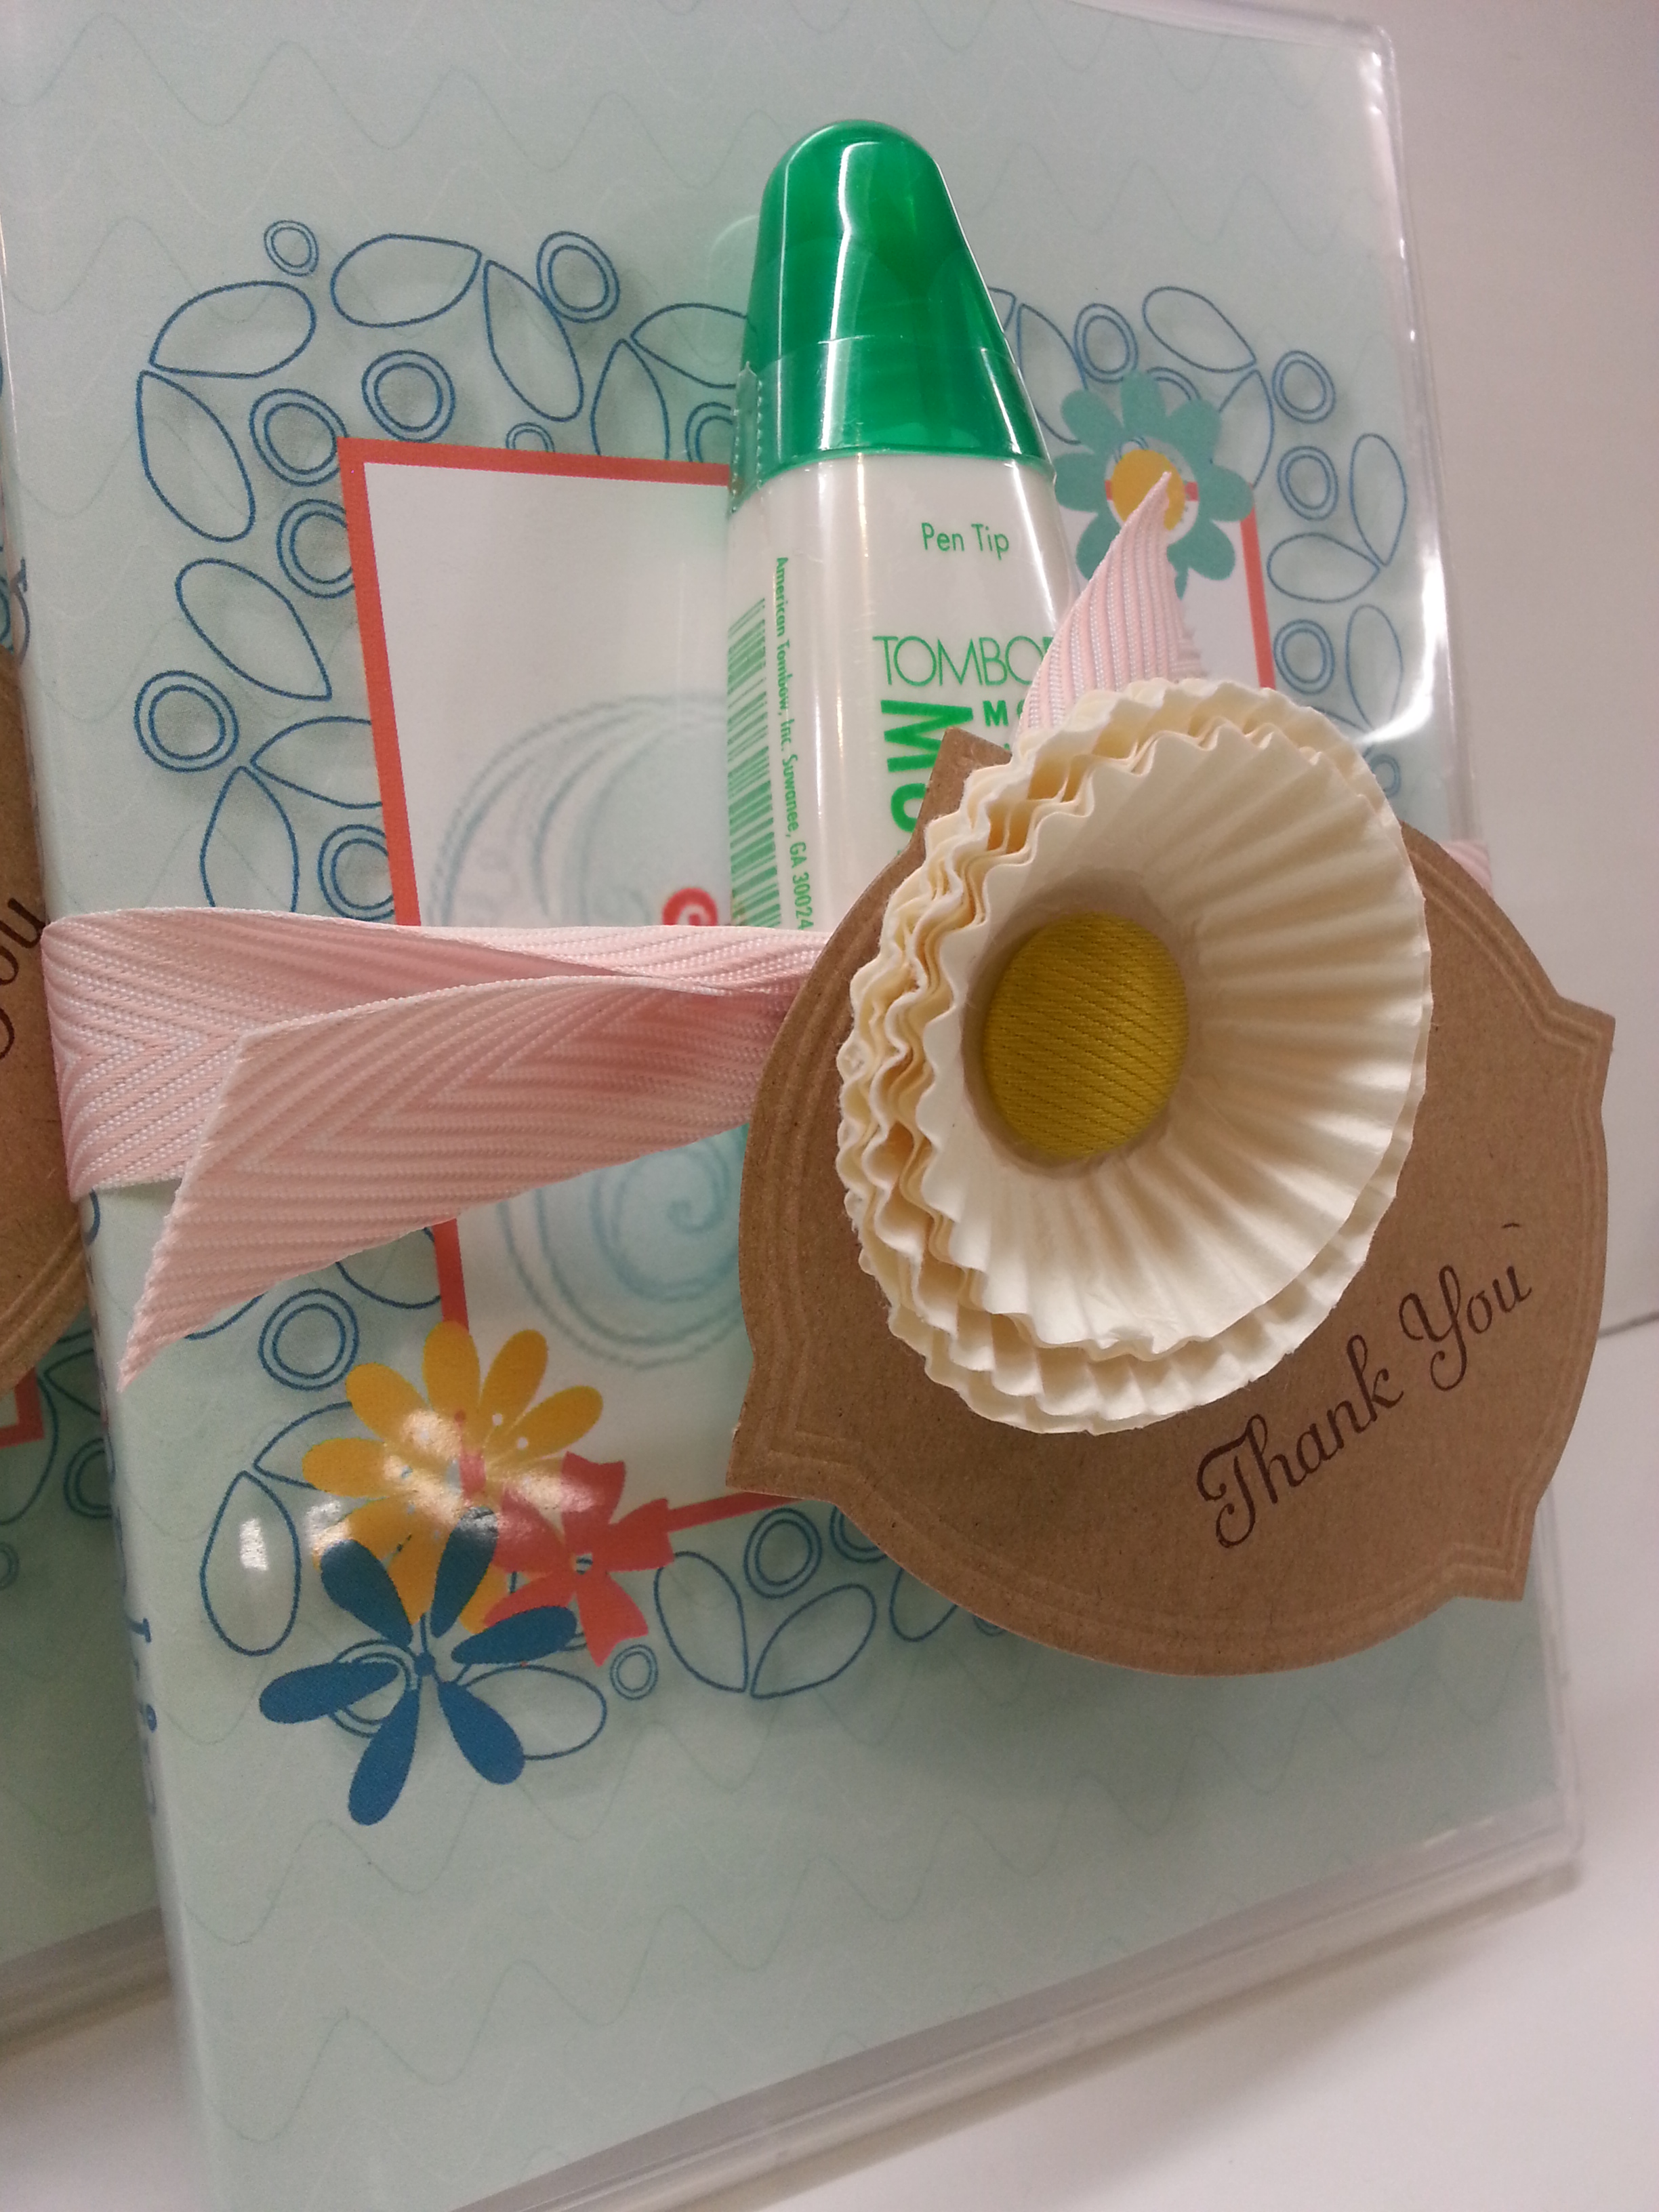
And here is the inside:

20130529_225503

That little pennant stamp comes from one of the new Hostess Sets (Banner Greetings).  SUPER cute.  Many Uses.  Anyway…

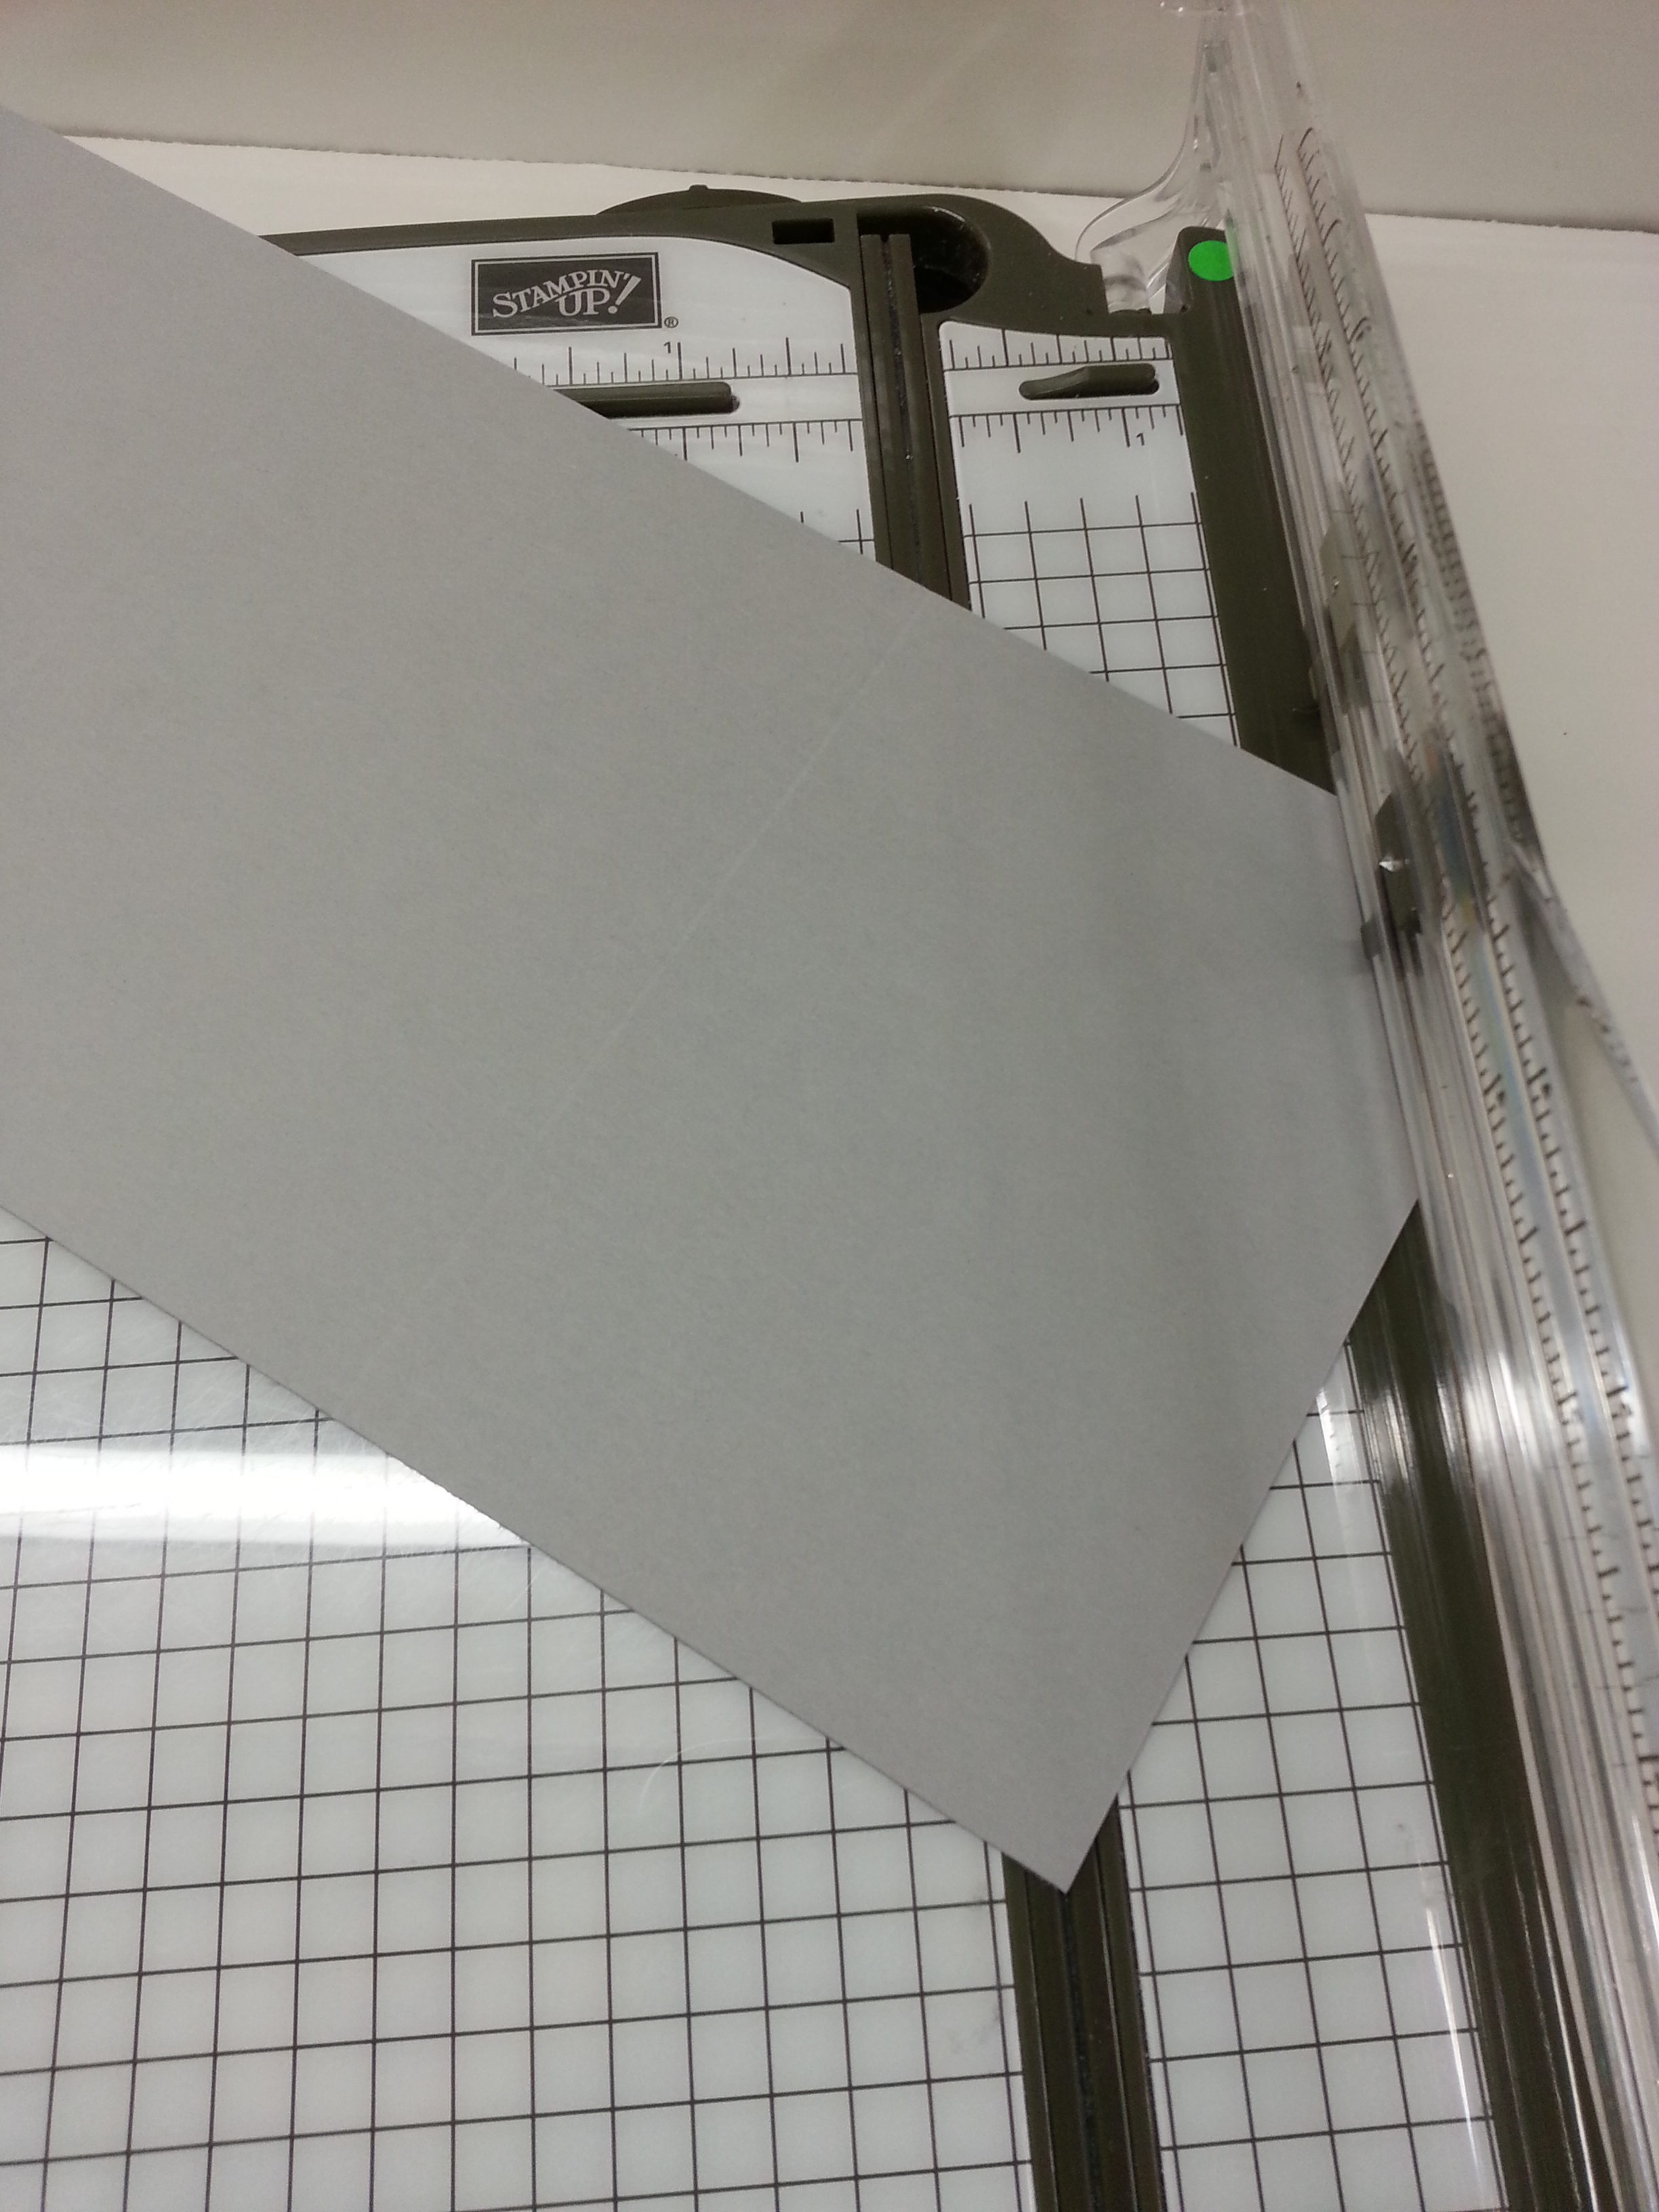
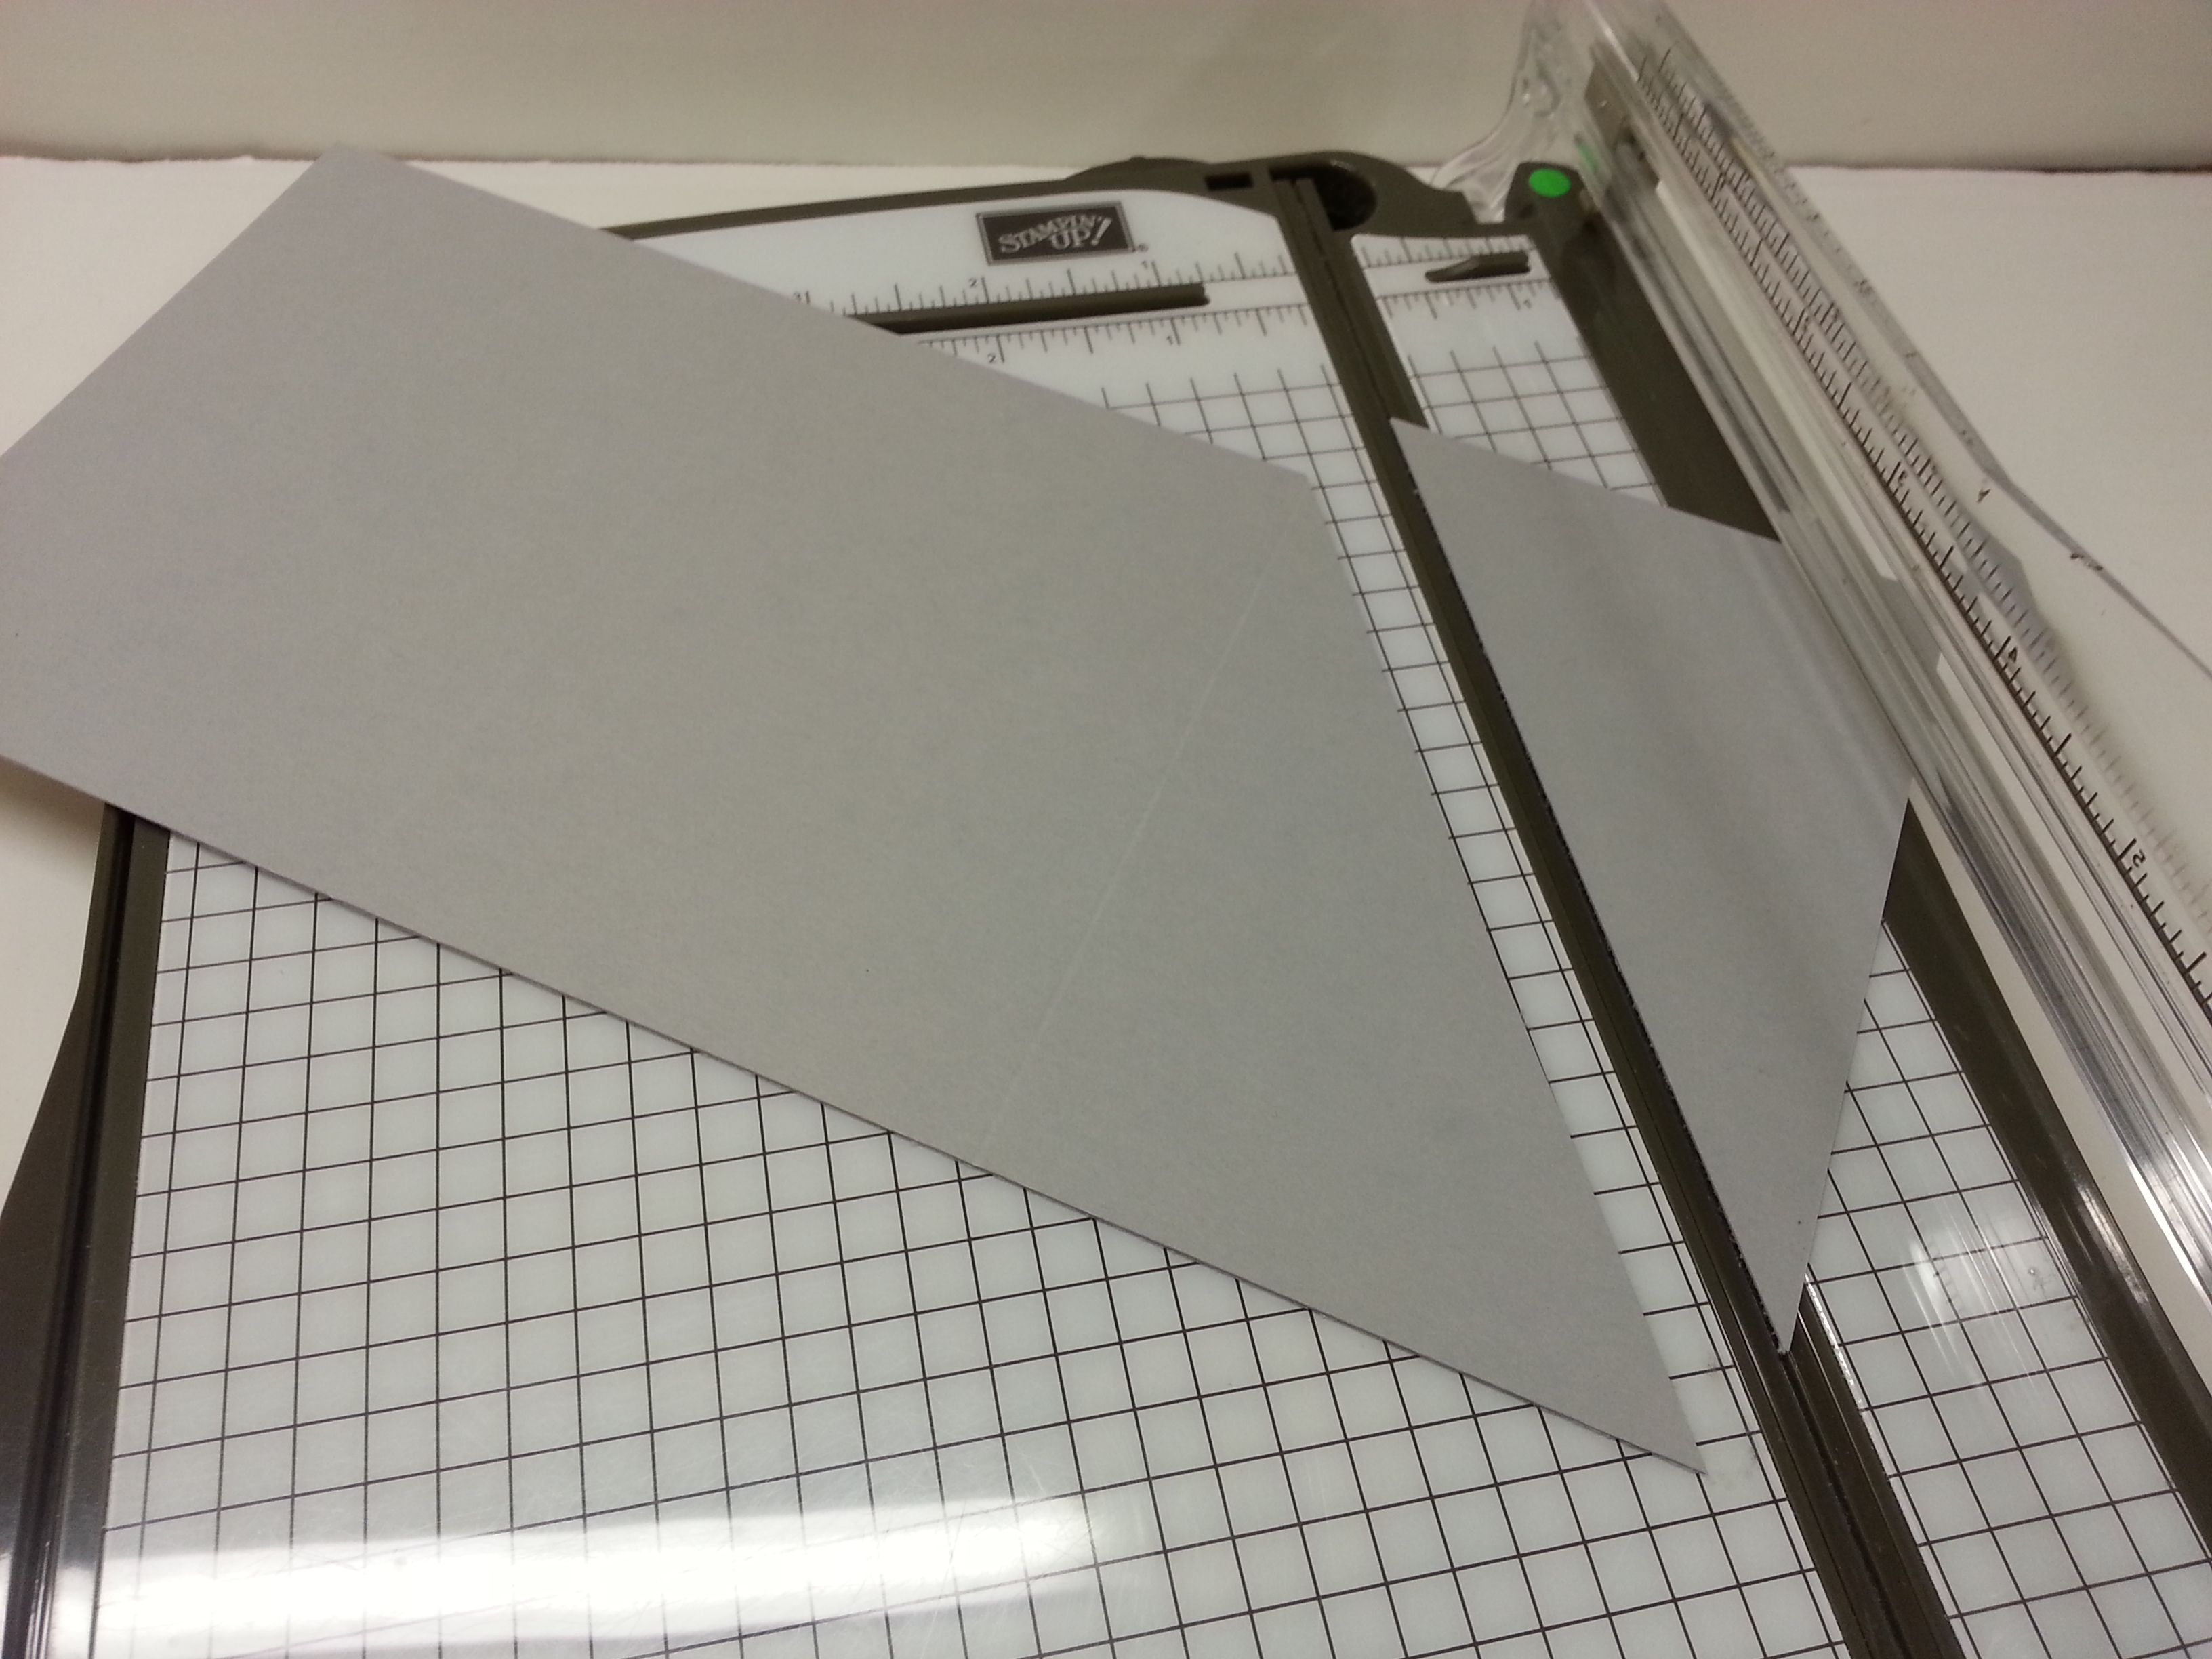
I cut the paper at 4.25 x 9 and scored at 3″ and 6″ down the 9″ side.  Then I cut the corner off…. maybe this makes sense:

20130529_221859

Can you kinda faintly see the score marks?

Here is how to cut…  Line a score mark up on the top part of the cutting surface of  your trimmer and the corner of the paper on the bottom of the cutting surface of your trimmer.

20130529_221933

Here is it cut apart…

20130529_221947

Fold on the score line.  Add adhesive on the bottom, straight edge of the paper and that makes the pocket when it is folded over.  If you want any trim work on the edge, you should add that before you glue the pocket down.  (I added that scallop trim border punch–but the edgelits we have would look fantastic too).

The size of this whole folder is predicated upon what you wanna put in side.  The tea bag folder I received wasn’t quite so tall.  I could see this made for a PAPER gift certificate (you know, those long ones that might fit in a #10 envelope).  The possibilities are endless.  A bag of tea is nice, you could make super tiny ones for like one of those individually wrapped life-saver things… pack of gum (You’d need to make a gusset on the pocket, but that’s only an additional score line…)

After you decorate it up, you have a super easy, fast little gift card.  And, it’s packaged SO nicely (cause, let’s face it, though gift cards are great gifts, they are BORING to give…)

Oh, I also used the shimmer white paper for the front.  It’s extremely subtle, and the pictures don’t really capture it’s elegance…  but it’s beautiful.  And, perfect for such an occasions…

20130529_231015

It kinda just comes off in this photo as shine, but it is very pretty… a little sparkly but not at all over-powering… I love this paper for  holidays and special occasions.

One last look…

20130529_225837

Well, I hope you enjoyed this post… next you are off to see what Deb Leigh has for you!!  Click the box below or use the list if the link isn’t working like it should…

blogtour-25years-next (1)