Monthly Archives: September 2013

Anne and Crystal’s Christmas Extravaganza

Standard

It’s that time again…. for Anne and Crystal’s Christmas Extravaganza!!!  (we call it ACCE, cause that’s a mouthful… a delightful mouthful).

If you are in or around the Maui area on October 12, we would love to have you join us for this year’s ACCE.  We have three exciting classes to offer.

The first one is the card class:

20130920_203428 (2)

You will be making 4 full sized cards and 4 3×3 cards.  These are designed simply to be reproduced in bulk, should you decide to recreate some for your own Christmas card list.  This class will run from 9-11.  The cost will be $10 and include the supplies needed (but bring your own preferred adhesive).

Next up is the Packaging Class:

ACCE2013Packages (2)

Here you will make 2 boxes, 2 gift card holders and a super cute Santa bag.  These are perfect for all of your little gifties for your friends, coworkers, and neighbors.  Also designed so that you could reproduce if you wanted more…  The cost of this class is $20.  It will run from 11:30-2.  And, supplies are included, with the exception of your preferred adhesive.

And, introducing a new, exciting art form to ACCE:  MIXED MEDIA.  In this class, you will expand your crafting skills, learn how to use stamps and inks in other ways than just on paper making cards.

ACCE2013Decor (2)

You will create this delightful home accent piece to enliven your space during the holiday season.  All supplies will be included.  The cost of the class is $25 and it will run from 2:30-4:30.

If you’d like to spend the DAY with us crafting, you can take all THREE classes and enjoy a $5 discount… ($50 instead of $55).   We’d sure love to have you!  If you are interested, you need to RSVP by Monday, September 30 to get a space.  Don’t wait too long!!  It will be a ANOTHER WHOLE YEAR until this opportunity comes around again…

Advertisement

Spreading Joy

Standard

At convention, we were introduced to a new card set designed by Emily Montoya. SU! had a contest that people could submit artwork that could possibly be turned into a stamp set. The first set chosen (I believe there will be more) was Spread the Joy created by Emily. When I saw it, I knew I needed it.

image

I just LOVE the hand-drawn line art look. And I love this particular image with all these words of encouragement. 

image

She commented on the SU blog (see Sept. 16) that her husband was the inspiration for the set. And how perfect because the images make just wonderful little notes to pass around to people who just need a little note!!

And of course, I had to make a matching envelope…

image

I just love the toast image. I think it’s my favorite.

Stay tuned for more from this fabulous set…

Defying Gravity

Standard

So the title really has nothing to do with this post except this month’s Best Of set…Best of Halloween…reminds me of the musical, Wicked. Well, the hat does. And I absolutely love the musical. And the song. I think it has something to do with the whole Kansas upbringing.  (For those of you who don’t know, Wicked is the true story of the Witches of Oz.)  I even just bought the most fabulous pair of red shoes…

Anyway… Wicked inspired the first card I made with this set. Though the stamps are super cute, I really wish the retired stamp we had with the legs in boots had made the cut…then I really could have a musically inspired card… but we can’t all have our druthers…

image

This year’s Halloween DSP, Witches Brew, is absolutely fabulous. This is a Summer Starfruit piece from the pack. The I wanted the girlie-ness from that piece of paper to liven up the card. Its 4.5″ square… but I trimmed off a portion of the front and scalloped the edge. I textured with chevron and stamped with the Gorgeous Grunge stamp set And the Illuminate ink. On the eggplant, it comes out a pretty silver. Thus the hint of brushed silver paper.

image

Now, I knew I wanted to glitter the hat with our black glitter. And I swear I had some of the heat and stick powder. But I think in efforts to simplify my life, I must have gotten rid of it. So. I had to stamp the image and then trace over it with crystal effects. But the result is still the same.

image

A few rhinestones and we are all “off to see the wizard”.

Card #2
When I saw the owl in the tree in this set, I just knew I had to make a window card with the sponging and all that business. So… off to figure that out.

Here is the finished product

image

I used the window framelits die and cut the window out of the layer of DSP that is on the front.  Then I placed it where I wanted it to be on the card and marked the insides so I knew where to line it all up.

image

Remove the DSP and with the help of the exceptionally wonderful magnetic platform, my window got cut out of the card base exactly where I needed it to be.

image

I put a piece of vanilla paper on the inside and then marked the window from the front of the card. This is so I would know where to line up the mask for my stamping and sponging.  I cut then same size window out of a scrap of paper and used it to mask the area. I stamped the owl/tree stamp and then sponged summer start fruit for the moon.

image

After stmping and sponging summer start fruit, I used the 1″ c ircle to make a mask to keep the start fruit clean as I sponged smokey slate, basic gray, and black.

image

Like my piece of Washi as a way to hold the mask down?? Its perfect for that cause it is removable.  And here is the finished sponge job.

image

Now, I couldn’t keep the insides that plain… and we have all that glorious Halloween washi. So…

image

Here’s another look at the front again :

image

And the whole thing…

image

Well. Thanks for stopping by for this month’s Best Of… you’re off to see what Deb Leigh has in store.  And here’s to a day of defying gravity. Plug that song in and go around singing it. I dare ya….

Click the box to go to Deb’s blog:

blogtour-25years-next (1)

Nancy Amato          http://stampinallnight.blogspot.com
Melissa Bolinger      http://www.stampinup.net/blog/2089191
Jackie Bottomley     http://www.jackiebottomley.blogspot.com
Susan Carlson         http://www.stampinmomoffour.blogspot.com
Tamra Davis             http://www.thecardladies.com
Sherri Eddleblute      http://www.sweetestdesigns.blogspot.com
Lynn Embrey            http://www.possibilitiestamperstudio.com
Kathy Hamrick          http://www.countryroads.typepad.com
Crystal Kondo           http://www.card-ed.com
Deb Lehigh               http://thestampinhut.typepad.com
Anne Matasci            http://www.MauiStamper.wordpress.com
Robin Merriman        http://www.trinitydesignstudio.blogspot.com
Andi Potler                 http://www.absolutekreations.com
Michele Reynolds      http://www.inspirationink.typepad.com
Sharon Tisdale          http://www.stampinup.net/esuite/home/coveredbridgesstamper/blog
Janet Wakeland        http://www.remarkablycreated.com

A Banner Building we will go

Standard

So…  I must admit.  When I walk into a retail establishment before Halloween and I see Christmas merchandise, I usually groan (and this year, I saw some around the 4th of July…)  And, so I know, people must be groaning…  BUT.  CHRISTMAS IS COMING, PEOPLE.  And, it’s always faster than we are ready for.  With that in mind, I had to get going on some of my Christmas projects.  And, this project is a fun one.  And, to my credit, I’ve included Thanksgiving.  Which isn’t that far away…

This is the Build A Banner kit that is featured in the Holiday Catalog:  But, I’ve taken it and turned it into a custom Thanksgiving and Christmas Banner.  The banner is amazing.  You get 18 banner pieces which are made out of the canvas that SU sells.  They have the retired jumbo eyelets (of which, I have a stash that I fiercely guard)  And, when you buy the starter set, you get all the stencils.  You can buy a refill of banner pieces as well.  I have a list of about 60 things I wanna make banners for…but these two got first dibs…

Here is the Thanksgiving One:

20130912_203339


And the Christmas one:

20130912_203133


So, I’m not going to go into too many details of how to make them because you can come to a class and get to make one or both of them FOR YOUR VERY OWN!!  I will have all the supplies, so all you need to do is come!

Friday Night September 27 at 6:30 or Saturday Morning at 9:00.  You can choose to make one or both banners.  They are $20 (for either one) or $35 if  you choose to make both banners.  RSVP to me if you are interested in joining the class.  Specify the date you prefer and the banner you’d like to make.  I need your RSVP by September 17.  (I need a minimum of 4 people in each time slot to run the class…)

In order to take the pictures, I wasn’t able to put them up on the string… but the kit will come with the twine that you string them on and hang them with.

Anyway, I’ll be sure to have Christmas music blaring.  So you can get ready for Christmas.  In September.

A Grunge Birthday

Standard

So…  When we returned from convention, mauistamper organized a stamp a stack for our downlines to play with new convention sets and talk about convention…  and all exciting new stuffs.  This was one of the cards we made:

20130904_191215


It utilizes the Gorgeous Grunge (which I LOVE) and a simple tag.  Could make this ANY kind of card by changing the tag.  So easy.

And, of course, I needed an idea of something for club to do, so I changed it a little and made this:

20130904_191155


Exact same thing.  Changed colors, added a candle made from the “Tape-it” stamp set (the candle idea was cased from Stampin Success).  Used the bird wing from the bird punch to make the flame.    Simple!!

I get a lot of requests for manly cards.  And I’m always at a loss for what exactly that means, I think this could qualify.  Could change the color to green or a darker blue.  Or black or gray… would be more manly..


20130904_191204


And, speaking of birthdays…. I kinda forgot about mine.  Not my ACTUAL birthday…but my Stampin’ Up! birthday.  I received this in the mail:

20130904_191115


Very exciting.  I knew it was coming, but it just kind of slipped my mind…  what a nice surprise.  And, who can believe it’s been that long!!??!!

20130904_191231

Stamp of the Month Tour

Standard

Hello!!  Welcome back to our stamp of the month tour.  This month actually features a choice between TWO stamp sets.  And, I could not choose so I did a couple of projects with both sets…

First off, I chose to use Halloween Bash to make a couple cute 3×3 cards.  I was in a 3×3 swap at convention, a little birthday card, that used the lattice die to make a pop up in the middle.  I apologize, but the card didn’t have a name in it.  I’d love to give credit to the brilliantly talented demo who made it… but anyway…

20130904_190712

The chevron embossing folder and LOADS of the awesome Halloween Washi tape makes the front (and all of the card) so fun.  All these images come from the same stamp set ($15.95) and I used the coordinating punches to punch them out.

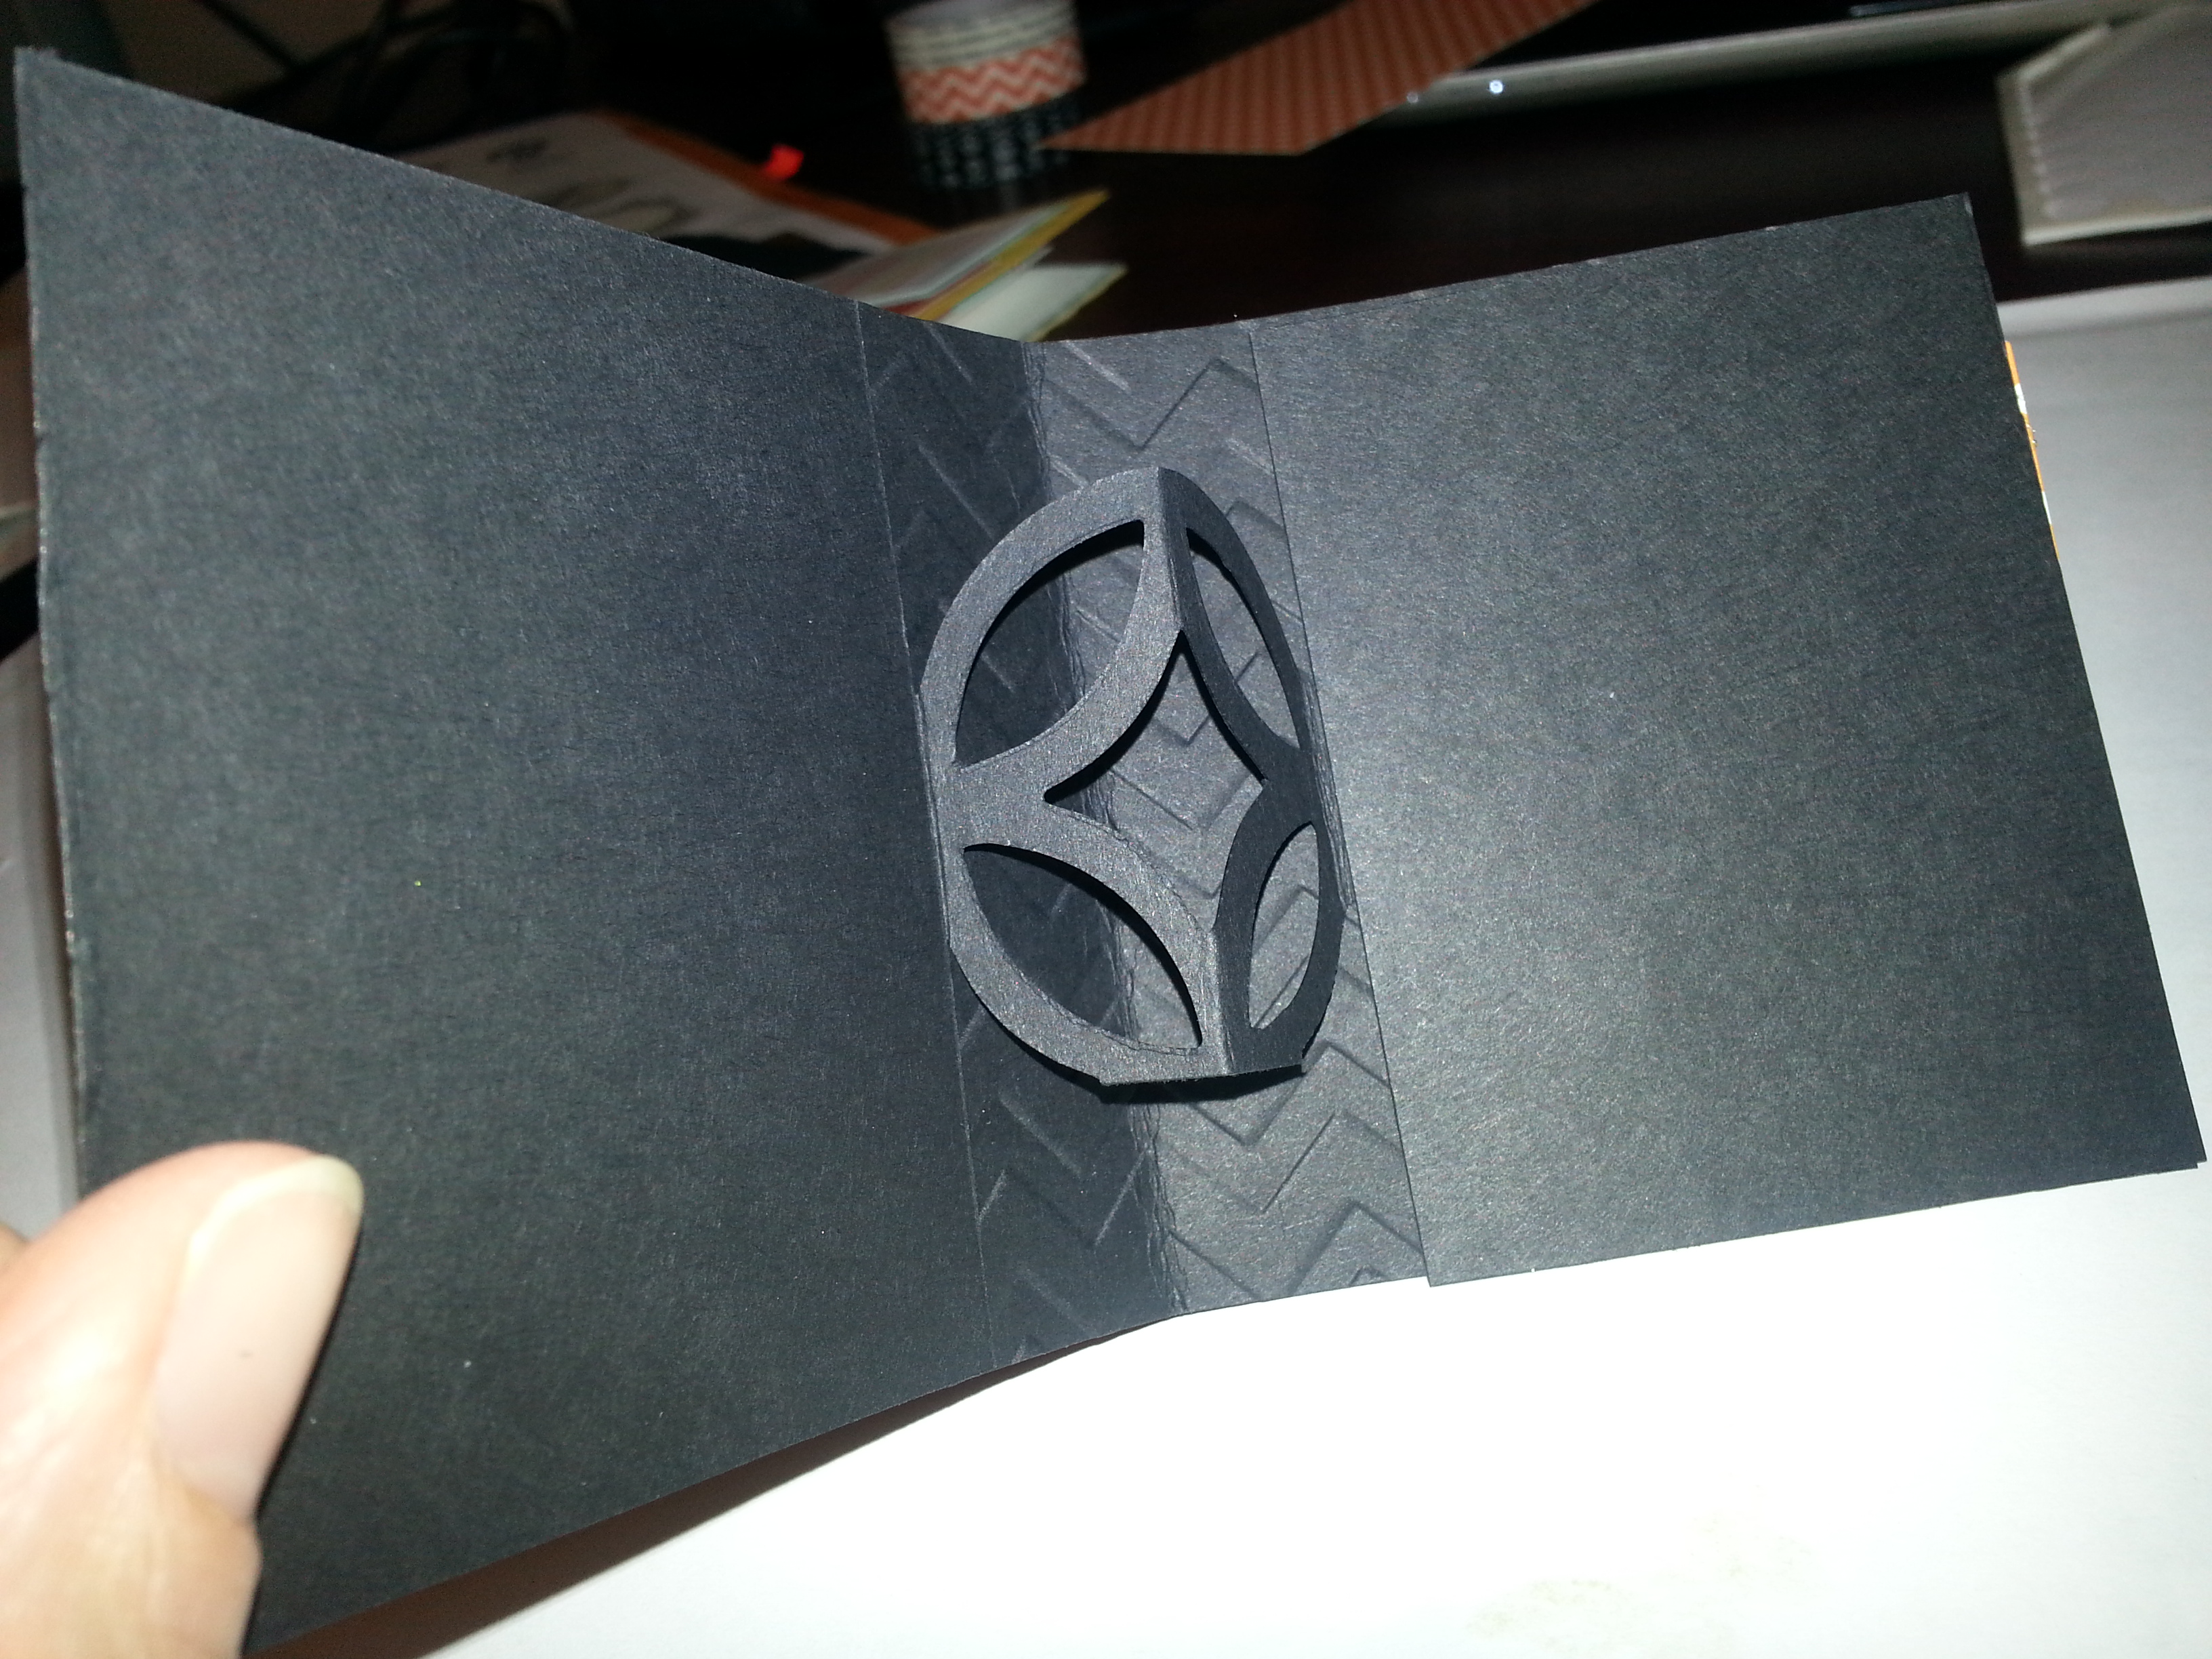
Here is a look at the inside:

20130904_190658

You can see that there are panels covering the top and bottom of the card.  This is attaching the top and bottom of the lattice die to the card which then holds the pop out in the center…

20130904_190500

I had to score this one to get it to fit in the card.

You can kind of see how the lattice works here:

20130904_190627

I cut the lattice die in half, and scored it at every intersection… then glued the end pieces behind the panels and left the center to fold out…

20130901_151420

Lattice die, that I cut in half…

20130901_151425

and scored.

20130901_151517

I glued the ends to the panels that hold them to the card (3×2.25)

20130901_151616

So, this is what the final inside panel looks like.  Then, you glue the ends of the black panels to the card (top and bottom) and you get this…

20130901_151709

This is what you stick the pop up on.  And, you can use this for ANYTHING.  Not just Halloween.  What a fun surprise!!

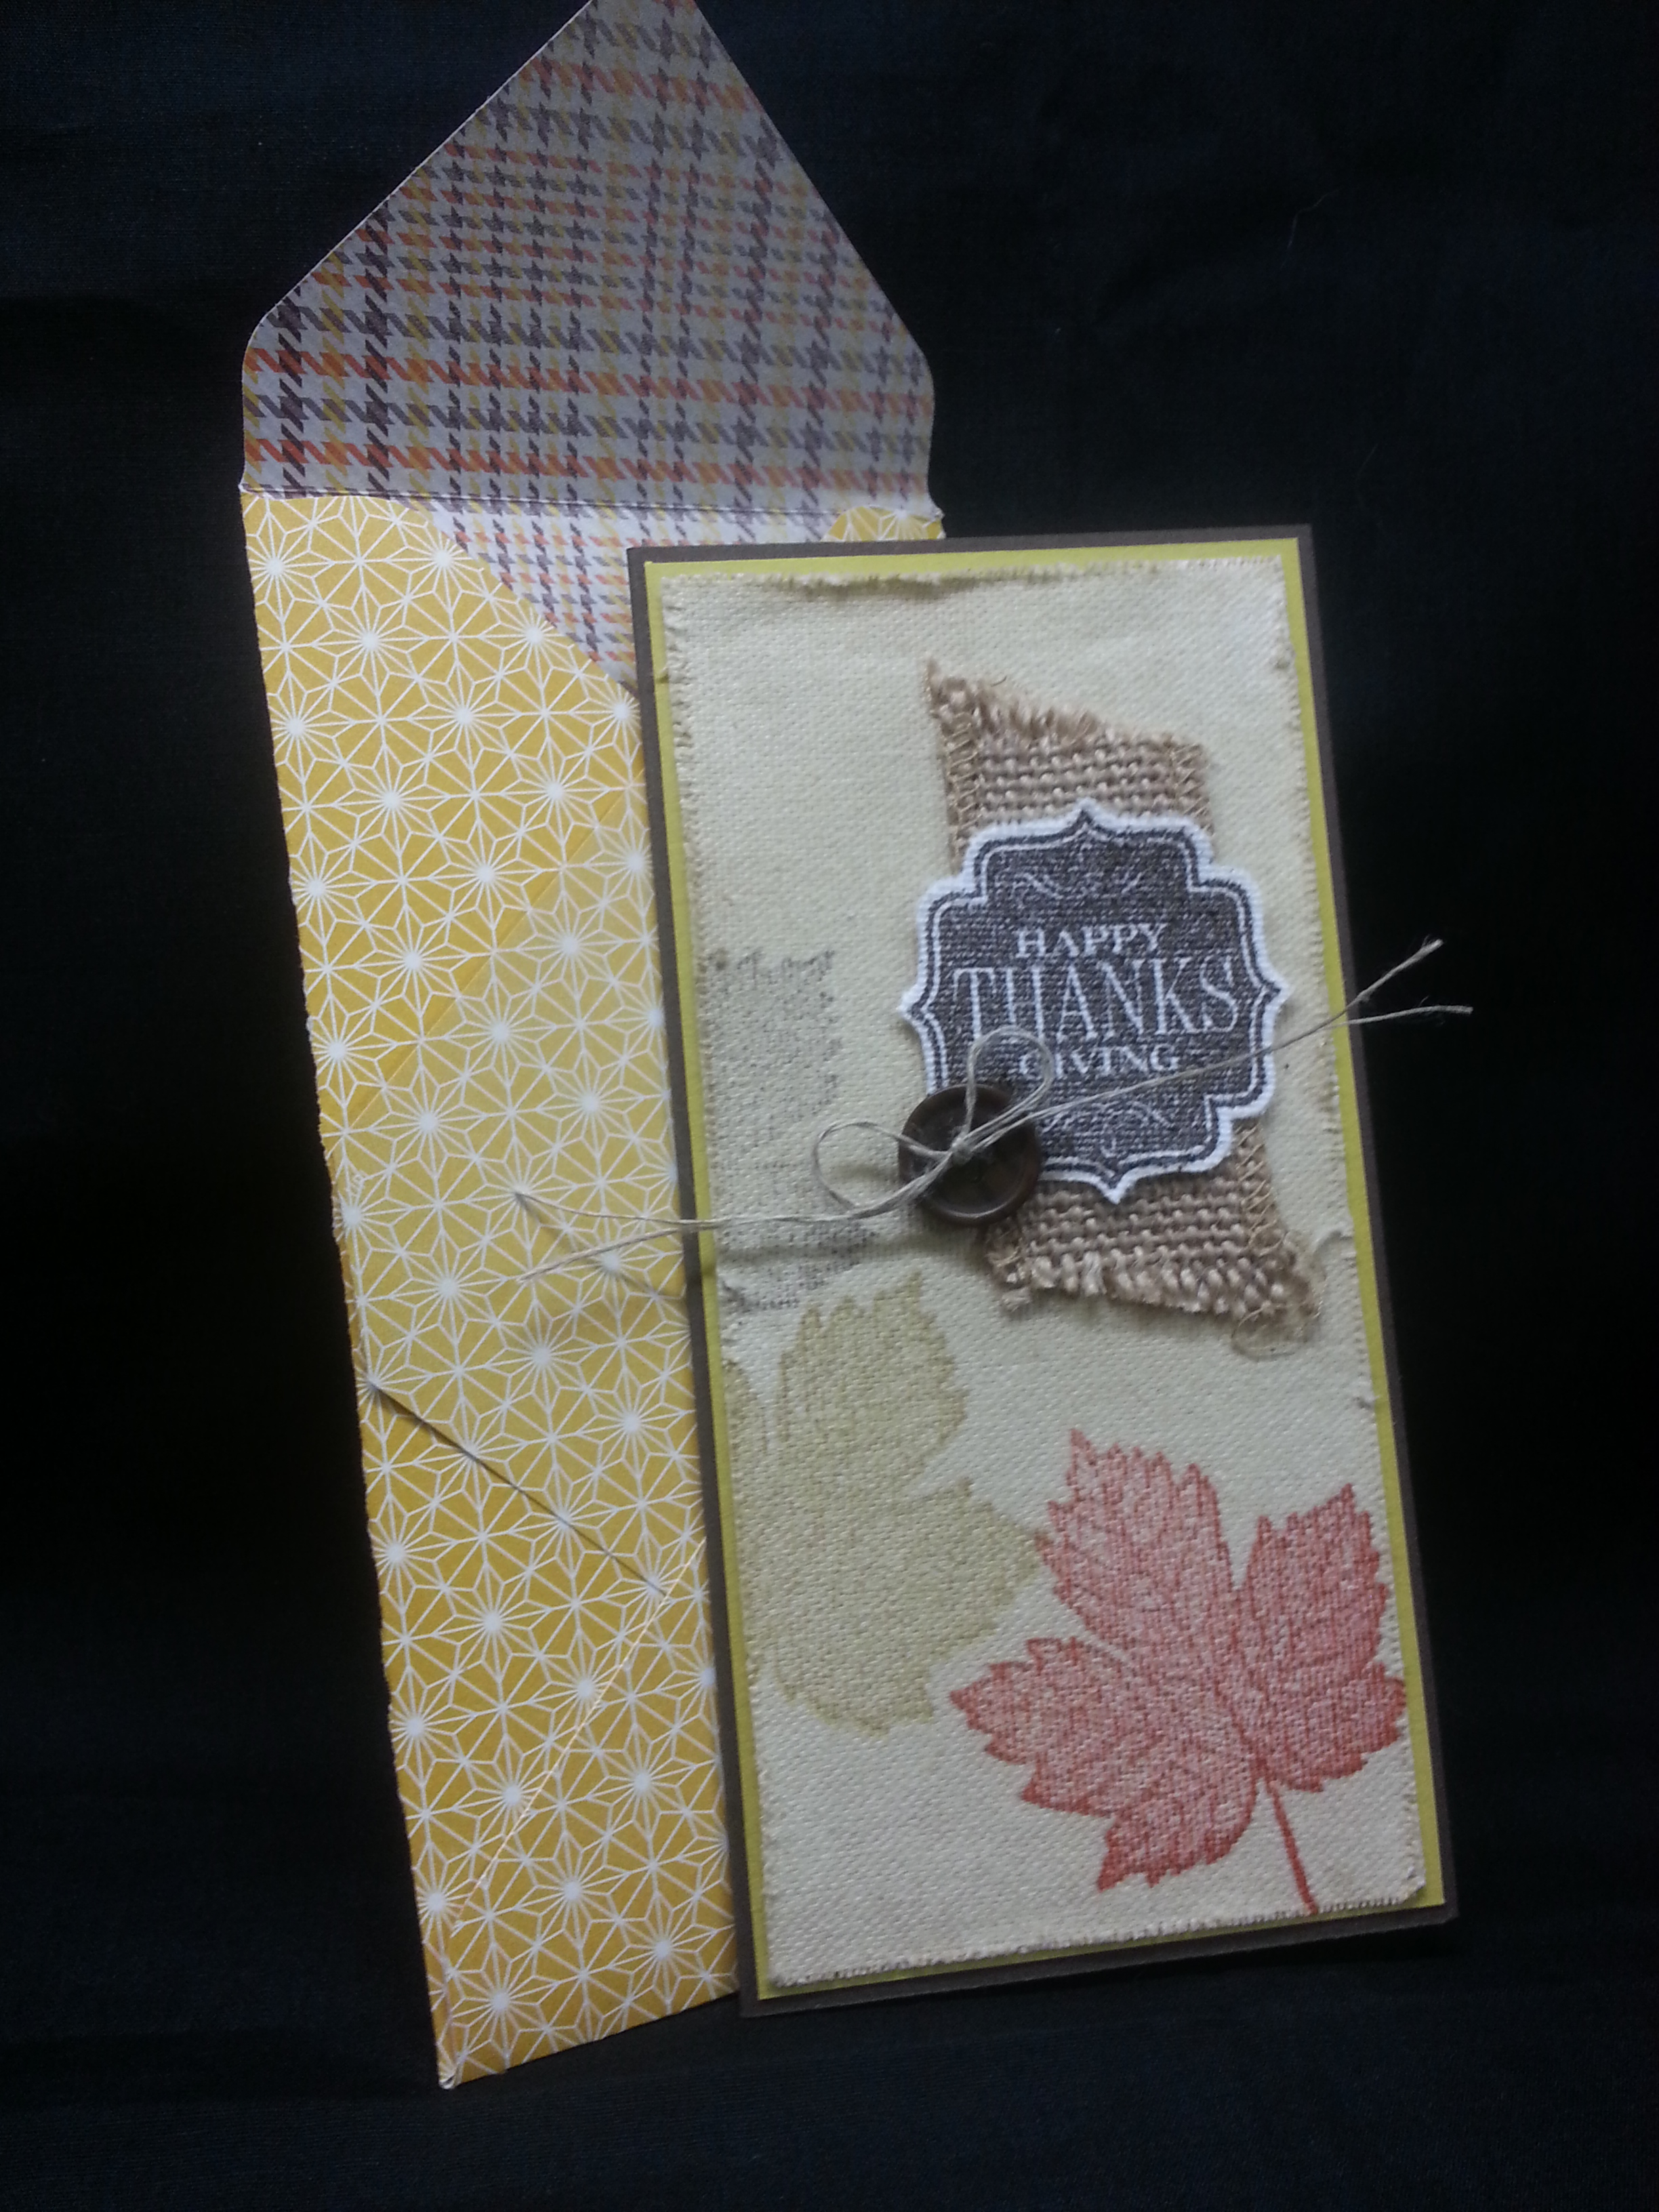
AND, when I was making these, I received my envelope board.  So, I had to make matching envelopes.  Though these are 3×3 cards, I decided to make envies for 3.5 cards (which is a little big) because I was worried that the thickness of the card would not let the card fit into the envelope.

One last look:

20130907_164838

20130907_164825

Now… On to Thanksgiving!!

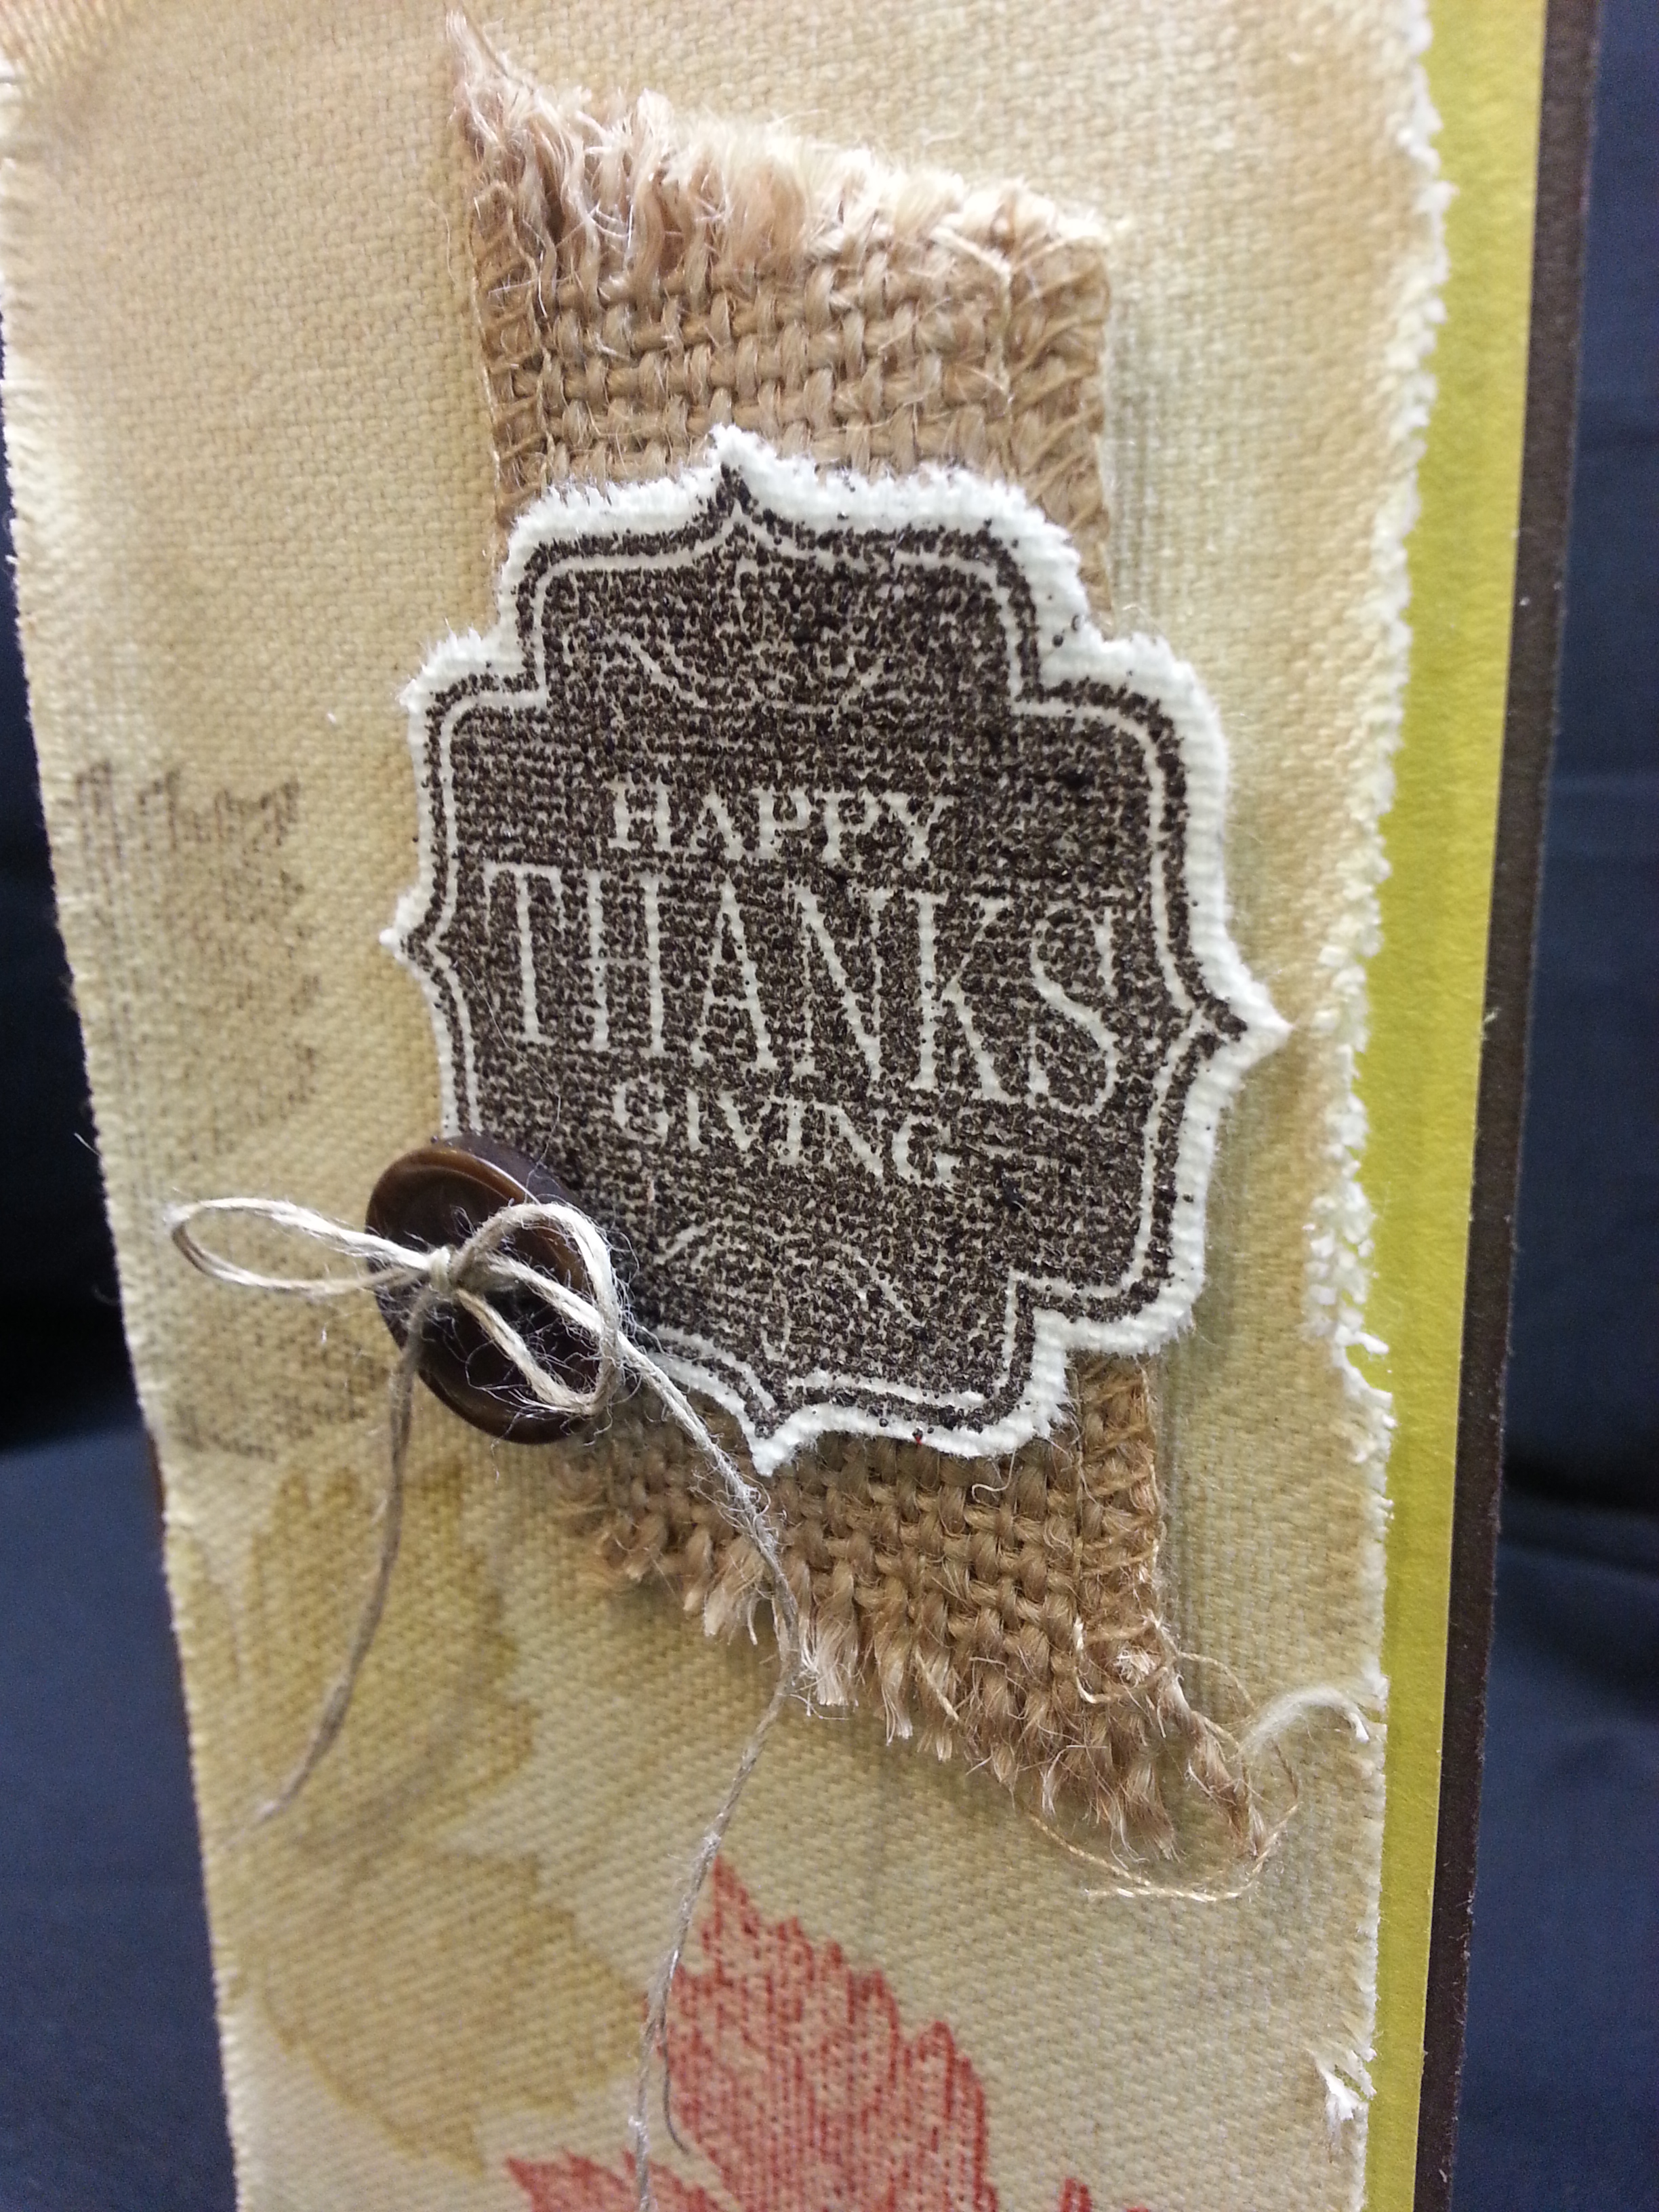
This card uses Magnificent Maple.  For this Thanksgiving card, I really wanted to focus on TEXTURE.  So, I chose to use the burlap ribbon, and the canvas paper…

20130904_190733

The canvas paper is a pretty stark….well…not quite white, but certainly not cream.  So, I spritzed it with a mix of Baked Brown Sugar and alcohol.  I stamped the maple leaf in Cherry Cobbler, Summer Starfruit, and Early Espresso.  I used an espresso card base and starfruit panel under the canvas.  I distressed the edges of the canvas and burlap just to add more texture.

20130904_190745

I used the Tags For You stamp set and coordinating Label Bracket Punch.  And, just a note… I actually stamped the label with versamark and embossed it with the Espresso powder.  If you notice the Espresso leaf, how it isn’t very bold…  this is a property of the canvas.  It kind of soaks the ink.  That’s why I embossed it.  But, Be prepared, it doesn’t make the nice, smooth, glossy embossed texture because it’s on the canvas.  I just did it to make the color stronger.  Remember…I’m going for texture….

20130904_190805

That button is from the Naturals Designer Buttons.  It nice cause it looks like wood.

And, of course, I had to make a matching envelope:

20130907_164808

Well, I hope that got you in the mood for the upcoming “HALL OF HOLIDAYS”.   It seems like it comes quick and goes fast….  You are off to see what Deb Leigh has for you.  Click the button below.  Or, use the list if you need.

blogtour-stampmonth-next

Nancy Amato           http://stampinallnight.blogspot.com
Melissa Bolinger      http://www.stampinup.net/blog/2089191
Jackie Bottomley     http://www.jackiebottomley.blogspot.com
Susan Carlson         http://stampinmomoffour.blogspot.com
Tamra Davis            http://www.thecardladies.com
Connie Deibler         http://www.conniestamps.com
Sherri Eddleblute      http://www.sweetestdesigns.blogspot.com
Crystal Kondo           http://www.card-ed.com
Deb Lehigh               http://thestampinhut.typepad.com
Anne Matasci            http://www.MauiStamper.wordpress.com
Robin Merriman        http://www.trinitydesignstudio.blogspot.com
Audra Monk              http://thecraftyyogi.blogspot.com
Maria Pane               http://www.stampinandscrappinwithriri.blogspot.com
Andi Potler                http://www.absolutekreations.com
Michele Reynolds     http://www.inspirationink.typepad.com
Vicki Soni                  http://www.paperinkle.com
Pam Staples             http://www.sunnygirlscraps.com
Jeri St. John             https://jerrisgemtastics.blogspot.com
Jeannette Swain       http://www.stampsnwhatnot.com
Janet Wakeland        http://www.remarkablycreated.com

“Tag-It” Cased!

Standard

So. Here is another example of the Ronald McDonald House Charities Stamp Set: Tag it.  And it came straight from the pages of Stamp in’ Success.  This is the glorious little piece of mail that graces my mailbox every couple of months. That reason alone is reason to sign up.  Anyway, its a simple card. I added the use of washi tape. Cause I’m in love with washi.  Anyway… here it is…

image

I changed some of the colors and stamped the image in a single color just to make it easier. But, I added some dazzling details on the balloons just for dimension. 

image

And a little touch of the chevron ribbon…. LOVE THE RIBBON…  just stapled on…  so easy.. 

image

A fun, fast, easy card. And that 3×6 size card is one if my favorites. It is different from a normal card but doesn’t require extra postage like a square card does. And now with our new envelope punch board…. you are gonna have to stay tuned. I’ve got lots to show you with that… 

The Swap That Wasn’t

Standard

So.  I had a swap idea that didn’t make the convention. I’m sure it felt super lonely. I just ran out of time. And since one of my swaps got cancelled, I just didn’t need it.

But it was a good little swap….

image

This is it!  Pretty simple. But nice…

image

The thing I like about the floral framelits… well…. framelits… is that you can cut holes where you want. So infused it to cut the center out. And I used the daydream medallion sets in the cut out. 

The swirls on the outside come from the Creative Elements stamp set and the sentiment is from A Round Array.  Butterflies come from Papillon Potpourri… which btw is on sale this month…. stamp set and matching punch is 15% off!

Here is a look at the inside…

image

And one final view of the front.  

image

So sad for the not-a-swap. But I still like it. This means it will be a card that gets sent to someone special. Which is a more noble calling….