Hello!!
Today’s post is very special… I was invited to be part of a ‘Creative Blog Hop’. The rules are, post and then link to 2 people who post a week later…. And use Stampin UP! products. Then, after the bulk of my post, you will find my answers to questions about my ‘creative process’. I was invited my my friend and downline, Anne Matasci. You can go see what she posted HERE.
So..
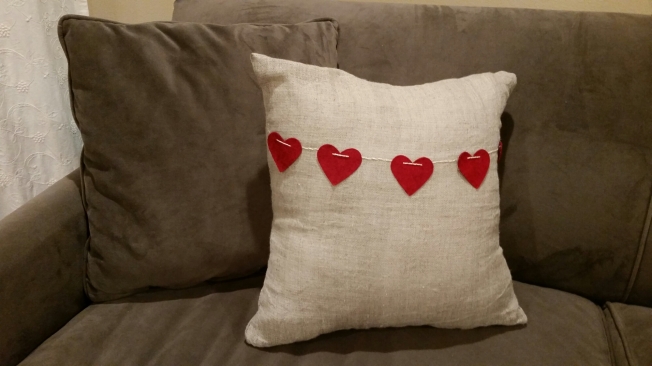
Here is my first project…. This pillow with the heart garland. I happened to see his pillow on etsy and though, “HUH. I could make that.” So, I did. I bought the fabric from a local fabric store. I like it cause it is burlap like, but not as rough and smelly as burlap. I LOVE decorating with burlap. But, hate the feel and smell… So… This is a close second. It’s way softer and not at all stinky… When I saw the pillow on etsy, I immediately wondered if the framelits could cut felt. WELL. They can!! (fyi: This is not a manufacturer suggested use for framelits). However, I had no problem cutting mine. And, the magnet platform for the big shot made it a breeze. I used the silver baker’s twine to make the hanging string… Was going to use black, but then thought the little thread of silver would be a nice pop… (and, if I had it to do over, I’d probably just buy a premade pillow case instead of making one…just cause the fabric was super stretchy which made it WAY hard to work with)

Here is a close up….

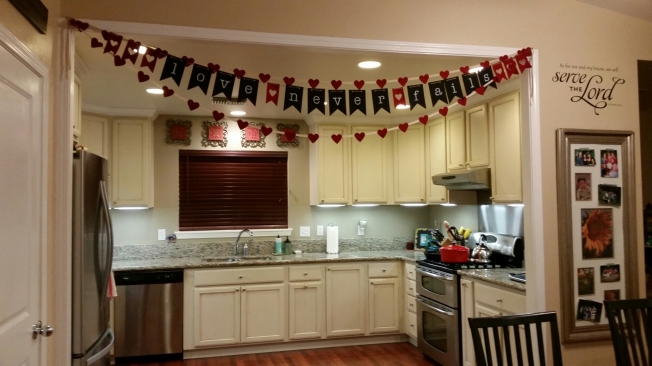
The next project I made was this Valentine’s Banner. I decided to use the “Love Never Fails” phrase from I Cor. 13… Just cause I thought it would be something different to hang up, but still Valentiney… I used the chalk board banner kit…WHICH I LOVE. Everything is pre-made and ready to go… I had the stencils left over from the canvas banner kit so I used those to make the letters….And, I made the letters with the white chalk marker rather than chalk. That way, it was more vibrant.

You can see, I cut LOTS of hearts out of felt. And, I used the banner framelits to make the embellishments on the sides and between the words. The magnet die makes it SUPER easy to cut the heart out of the center of the banner. For the heart garland, I used TONS of felt hearts and got out the trusty glue gun and went to gluing… Here, I used the linen trim (retired), but any flat ribbon would work. The flat ribbon was great cause it was wide enough to keep the hearts from twisting all over the place. I originally wanted a silver button in the center of the hearts, but that made them fall forward.

Full Confession: I decided to do a little Valentine’s decor…becasue I never really got Christmas decorations up. AND, at this moment, I have a spring banner over the entry way mirror, a days of gratitude banner (thanksgiving) up on the back wall, and a ‘JOY’ marquee sign that never got taken down from Christmas, ALL gracing my living room. We like to celebrate all the holidays. At the same time. Or something.
And, I didn’t want to just leave you with Valentine’s decorations… so here are a couple paper crafts…
This one is a little treat holder I made with the gift card enclosures. Super fun… SUPER fast!! You can make up a pile of these in no time and pass out to friends and co-workers for Valentine’s!!

And, here is a card. Notice the heart. Again. I think that poor little framelit got quite the work out….

This is from the ‘Hello LIfe’ stamp set in the Occasions catalog… and that paper, is the DSP called ‘Typset”. It’s thinner than the usual DSP and makes crafting fun. It has a different feel but is gorgeous.
Now, on to the questions…
1. What are you working on?
Huh… well, I have a pile of mason jar drink cosies that need to be finished. But, the projects for this post consumed my weekend. I don’t feel like I ever have enough time for all my projects… the littles take up LOTS of it (The Littles: Zeke and Hannah, my 9 month old twins). I have a LIST of things I want to do…which include the Baby’s first year album for said littles, and a project life album. OH. Christmas Thank Yous. I need to get out the Christmas Thank you cards. Which may be combined into Valentine’s Cards. Valenmas Cards. There.
2. How does your work differ from other’s in your genre?
I like clean and simple. Honestly, I think I don’t do as much of it as I would like, just because I think it is TOO simple for most of my stamp customers. And, I’m constantly trying to explore how to use the tools I have in new ways (like the framelits for cutting felt to make some decor items…) I am currently in LOVE with layering white on top of white (talk about clean and simple) and deep mats on the layers (getting away from the traditional 1/4″ size difference between layers on cards and doing maybe a .5″ or .75″ mat…I know, pushing the boundaries, but still…)
3. Why do you create what you do?
The simple answer to this is that I have a need to have it… for example, I made the above items intentionally for this blog hop. It worked out well, cause I wanted some Valentine’s items to decorate with and that worked out perfectly. But, being honest again, it probably wouldn’t have been made if it weren’t for the deadline of this particular blog hop. It would have ended up like the Christmas garland I started. Which is still in a bag in the craft closet, half finished…. So, deadlines seem to necessitate my creations. I LOVE working with people to make invitations or announcements. It’s a puzzle, to figure out what someone wants, and to get it done! And, I love the process, and making people happy with what they get.
4. How does your creative process work?
Well, it usually starts with me seeing something and going, “HUH. I CAN MAKE THAT”. I inherited that from my mother. She does that too. And, so do all my sisters. Sometimes it looks like what I thought, sometimes it doesn’t. But, there have been LOTS of times when it doesn’t turn out how I originally saw it, but I love how it turned out anyway… And, being that I live 5000 miles away from my mom and sisters, I’m VERY thankful for MMS so that I can send pics of the projects to ask them questions. And, to brag when something actually works out…
Thanks for stopping by!! Thanks to Anne for nominating me!! Next week, Feb 2, be sure to check out Cindy Fodor at Stampthelove.com and Maria Pane at StampinandscrappinwithRiRi.com
And TODAY… go check out Cheryl Hamilton, createwithcheryl.wordpress.com and Andi Potler at absolutekreations.com


