Monthly Archives: June 2013

Graduation photo wallet

Standard

So… a while back I was approached by a project graduation committee (from a rival highschool…names have been changed to protect the innocent…namely ME for hobnobbing with the rival highschool) to create a little scrapbook memento that students could complete during the project grad party. I gave them a couple of samples to choose from. This is the one they did not choose…

image

This is the outside. It’s a little photo wallet with a belly band.

Here is another view to see how it opens:

image

Here are the insides

image

Each flap opens up with space to glue photos or have students sign. A simple easy little booklet.

I used the photo polymer stamps here and they are amazing. Haven’t played much with them but I do like them. Especially how well they cling to the block.

Stay tuned for the album they did choose.  I think you will like it.

Another card from our card class…

Standard

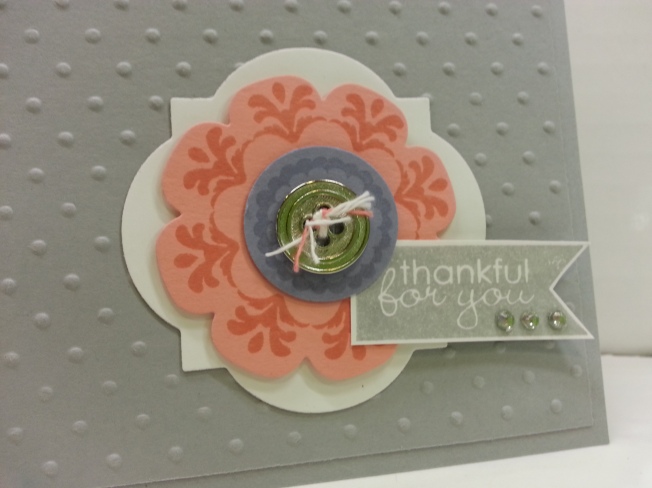
So, here’s the 2nd card that I designed from the New Catalog Card Class we had on June 1.  This card features the Hostess set, Happy Flowers from the new catalog.  And Smoky Slate  It’s a BEAUTIFUL color  I’m so happy to finally have a light gray…

20130602_201952

Smoke slate looks great with white.  Very clean and crisp.  And, I added some of the new In-Color… Crisp Cantaloupe, and a small scrap of Wisteria…  The white was cut out using the Window Frames Collection Framelits.  As, you can see, I love framelits.

The Happy Flowers Stamp fits perfectly into one of the Floral Frames Collection Framelits…

20130602_201956

And, that sentiment is from the Hostess Set offerings as well, called Banner Greetings…..  Sorry, but the button is from the Spring Occasions Mini, which is no longer available.  But you could use any of our awesome new buttons…  I just had a bunch I needed to use up.  Cleaning out…

Here’s one last look…

20130602_202106

For a look at our other cards we made for this class, head on over to Anne’s Blog to see the other cards we made in stamp class.  We used Mosaic Madness Set featuring Costal Cabana  Chalk Talk featuring Strawberry Slush In-Color, and the Paper Pumpkin Welcome Kit featuring Pistachio Pudding In-Color.  (Click on her name for her blog site, click on the other links to go to the specific cards we made in the class….)

For the Newlywed…

Standard

Welcome Back!!  This is the next installment of the BEST OF… Blog tour.  This month features a cute set called “Brides and Babies”.

For this month, I decided to make a little gift card holder that you might give a newly-wed couple for their wedding.  It easily could be turned into a baby gift card holder using the other stamps in this set.  This idea and set are VERY USEFUL (to quote my son’s THOMAS books…).  And, if you would like my 2 cents (if you would not like it, skip the next coupla lines)  I’ve decided gift cards are good for newlyweds or newly parents.  Cause it all costs money…  🙂

ANYWAY…. back to the card…  Gift card holder.  Well… as much as I’d love to take credit for this, I must tell you that my friend, and fellow Maui Stamper, Cheryl Hamilton made me a little holder like this with a tea bag in it.  After my back surgery…  She had a completely different design, but the overall folder was the same.  You should check her out sometime (createwithcheryl.wordpress.com).

Here it is:

20130529_225848

So, the colors I used in this were the Smokey Slate (It’s a new one and I absolutely Love it), Basic Gray, and Blushing Bride (hee hee….get it… BRIDE???).  I used the white taffeta ribbon and a squish of the dazzling details glitter paint.  And, I thought this would be the perfect place to use one of those ROWS of the rhinestones.  Cause what do you do with those??  I always use my whole sheet up and have those 3 strips left.  I then wind up cutting them apart and using them all as singles.  I can’t remember EVER using a whole strip.  But, I did.  This time…

And here is the inside:

20130529_225503

That little pennant stamp comes from one of the new Hostess Sets (Banner Greetings).  SUPER cute.  Many Uses.  Anyway…

I cut the paper at 4.25 x 9 and scored at 3″ and 6″ down the 9″ side.  Then I cut the corner off…. maybe this makes sense:

20130529_221859

Can you kinda faintly see the score marks?

Here is how to cut…  Line a score mark up on the top part of the cutting surface of  your trimmer and the corner of the paper on the bottom of the cutting surface of your trimmer.

20130529_221933

Here is it cut apart…

20130529_221947

Fold on the score line.  Add adhesive on the bottom, straight edge of the paper and that makes the pocket when it is folded over.  If you want any trim work on the edge, you should add that before you glue the pocket down.  (I added that scallop trim border punch–but the edgelits we have would look fantastic too).

The size of this whole folder is predicated upon what you wanna put in side.  The tea bag folder I received wasn’t quite so tall.  I could see this made for a PAPER gift certificate (you know, those long ones that might fit in a #10 envelope).  The possibilities are endless.  A bag of tea is nice, you could make super tiny ones for like one of those individually wrapped life-saver things… pack of gum (You’d need to make a gusset on the pocket, but that’s only an additional score line…)

After you decorate it up, you have a super easy, fast little gift card.  And, it’s packaged SO nicely (cause, let’s face it, though gift cards are great gifts, they are BORING to give…)

Oh, I also used the shimmer white paper for the front.  It’s extremely subtle, and the pictures don’t really capture it’s elegance…  but it’s beautiful.  And, perfect for such an occasions…

20130529_231015

It kinda just comes off in this photo as shine, but it is very pretty… a little sparkly but not at all over-powering… I love this paper for  holidays and special occasions.

One last look…

20130529_225837

Well, I hope you enjoyed this post… next you are off to see what Deb Leigh has for you!!  Click the box below or use the list if the link isn’t working like it should…

blogtour-25years-next (1)


Making Cards The OLD FASHIONED* Way

Standard

*Without a Big Shot.

Due to ill-fated planning, I at the moment do not have a big shot at my disposal.  And, it’s because I did not think ahead and waited to make this card till the last minuted, yada yada… YEAH, I KNOW.  BUT…  I’m whining to my mom cause I don’t a have a big shot and she tells me to make a card the old fashioned way.  SERIOUSLY.  HOW IS THIS POSSIBLE.  She’s a quilter.  That’s like telling her to quilt without a NEEDLE.  (either hand or machine…).  Still.  Can’t let the druthers get the best of us… so here ya go…

A card made the OLD FASHIONED WAY (snort.)  Welcome to this installment of the Stamp of the Month Blog Tour.

20130607_231928

This set is the ‘set of the month’ for this Blog Tour:  Mosaic Madness.  And, it has a gorgeous embossing folder that matches, but, ahem.  This is being made the old fashioned way.  Maybe that should be a challenge… what can you make without a big shot???  (as you can see, I’ve come quite attached to mine.

Anyway, enough whining… about this card…

To say I like the new color, Baked Brown Sugar, would be an UNDERSTATEMENT.  I LOVE LOVE LOVE it.  (and, if you know Isaac, you would know if you repeat the word three times, it’s the equivalent of infinity).

I kinda wanted to do something a little different than what I was seeing on pinterest and other places (they used LOTS of the embossing folder, so maybe it is good I couldn’t).  And,  I flipped the mosaic punch on it’s side.  Just for a different feel.   (okay, I didn’t literally flip the punch, it’s just sideways and normally you see it up and down)  And, I love the long stamps included in this set.  They make super nice borders.  And, they’re designed as such as that they can be continuous (which, I would HIGHLY recommend the Stamp-a-ma-jig for lining them up.)  Or, if you do a card like mine, you make the seam in the punch out and as long as you are close, It’s All GOOD.

20130607_231949


So, I also added a bit of the strawberry slush and daffodil delight inks.  And, wouldn’t it be nice if SU had a punch FOR EVERY SHAPE THEY HAD (there isn’t a craft room big enough on this planet… but it’d be NICE).  So, I had to cut the little medallions out by hand.  Not bad, they’re easy.  And, remember, we are doing this the old fashioned way.


20130607_232052


Here’s a closer look at the detail.  The top vanilla panel was cut 1/8″ shorter in each direction just to give a small frame.  I stamped and punched the top panel. I stamped the strawberry slush stamp THROUGH the punched out hole.  Then added the two small stamps with dimensional.   And, of course, a diamond. I added several dimensionals on the back of the top panel just so it would create a space for the cut-out section to stand out.

Hope you enjoyed a card made the OLD FASHIONED way.  (i.e. WBS…. without big shot).  Hopefully, next time we will be all back on track and without any hiccups in the whole card-making and mojo flowing, designing business.

You are off to see Deb Leigh and what she has for you!!  Enjoy the tour!!  To get to Deb you can click on the graphic below or use the links provided in the list.

blogtour-stampmonth-next


From the New Card Class:

Standard

So!!  It’s been a while…

School’s OUT!!  And, it’s glorious.  And, as soon as school was out, I was busy working on the cards for the 2-5-10 class that we held AFTER the first ever Maui Stamper’s Open House (Which was a HUGE success, so you will have to look for it next year).

Anne and I design classes together.  Cause why do all the work when you can split it.  And, she’s hilarious.  So, it works.  And, I wanted to share the cards I designed for this class.  They all feature new stamps and colors!!

20130602_202138

This card features the new Baked Brown Sugar (color for card base) and the new stamp set, Label Love (with coordinating punch!!).  It’s a super easy and fast card and you could make the same card with all the different label stamps included in the set…  this would give you a great set of cards to package together as a gift for someone!!


20130602_202152

I used the Designer Series Paper from the “This and That” bundle (the paper is also sold by it’self and is called Epic Day This and That).  And, the Modern Label punch just to add a layer.  The honey come TEIF (a FAVORITE) and scallop border punch add finishing touches.


20130602_202207


SUPER EASY!!  And, that Baked Brown Sugar ink and paper is glorious.  It’s lighter than Soft Suede ( could be it’s monochromatic cousin) but darker than crumb cake.  It will work in LOTS of places.


Anyway, stay tuned to see more soon!!