Tag Archives: Stampin Up

Best of Snow

Standard

Welcome back to the Best of Tour!!  This week we are focusing on the Best of SNOW.  Trying to create something with this set was a bit difficult in 80 degree Maui, but here is my best attempt… (and, I do genuinely feel sorry for you folks caught in the storms and hope you are safe, but, I gotta say, “nee-ner-nee-ner”)

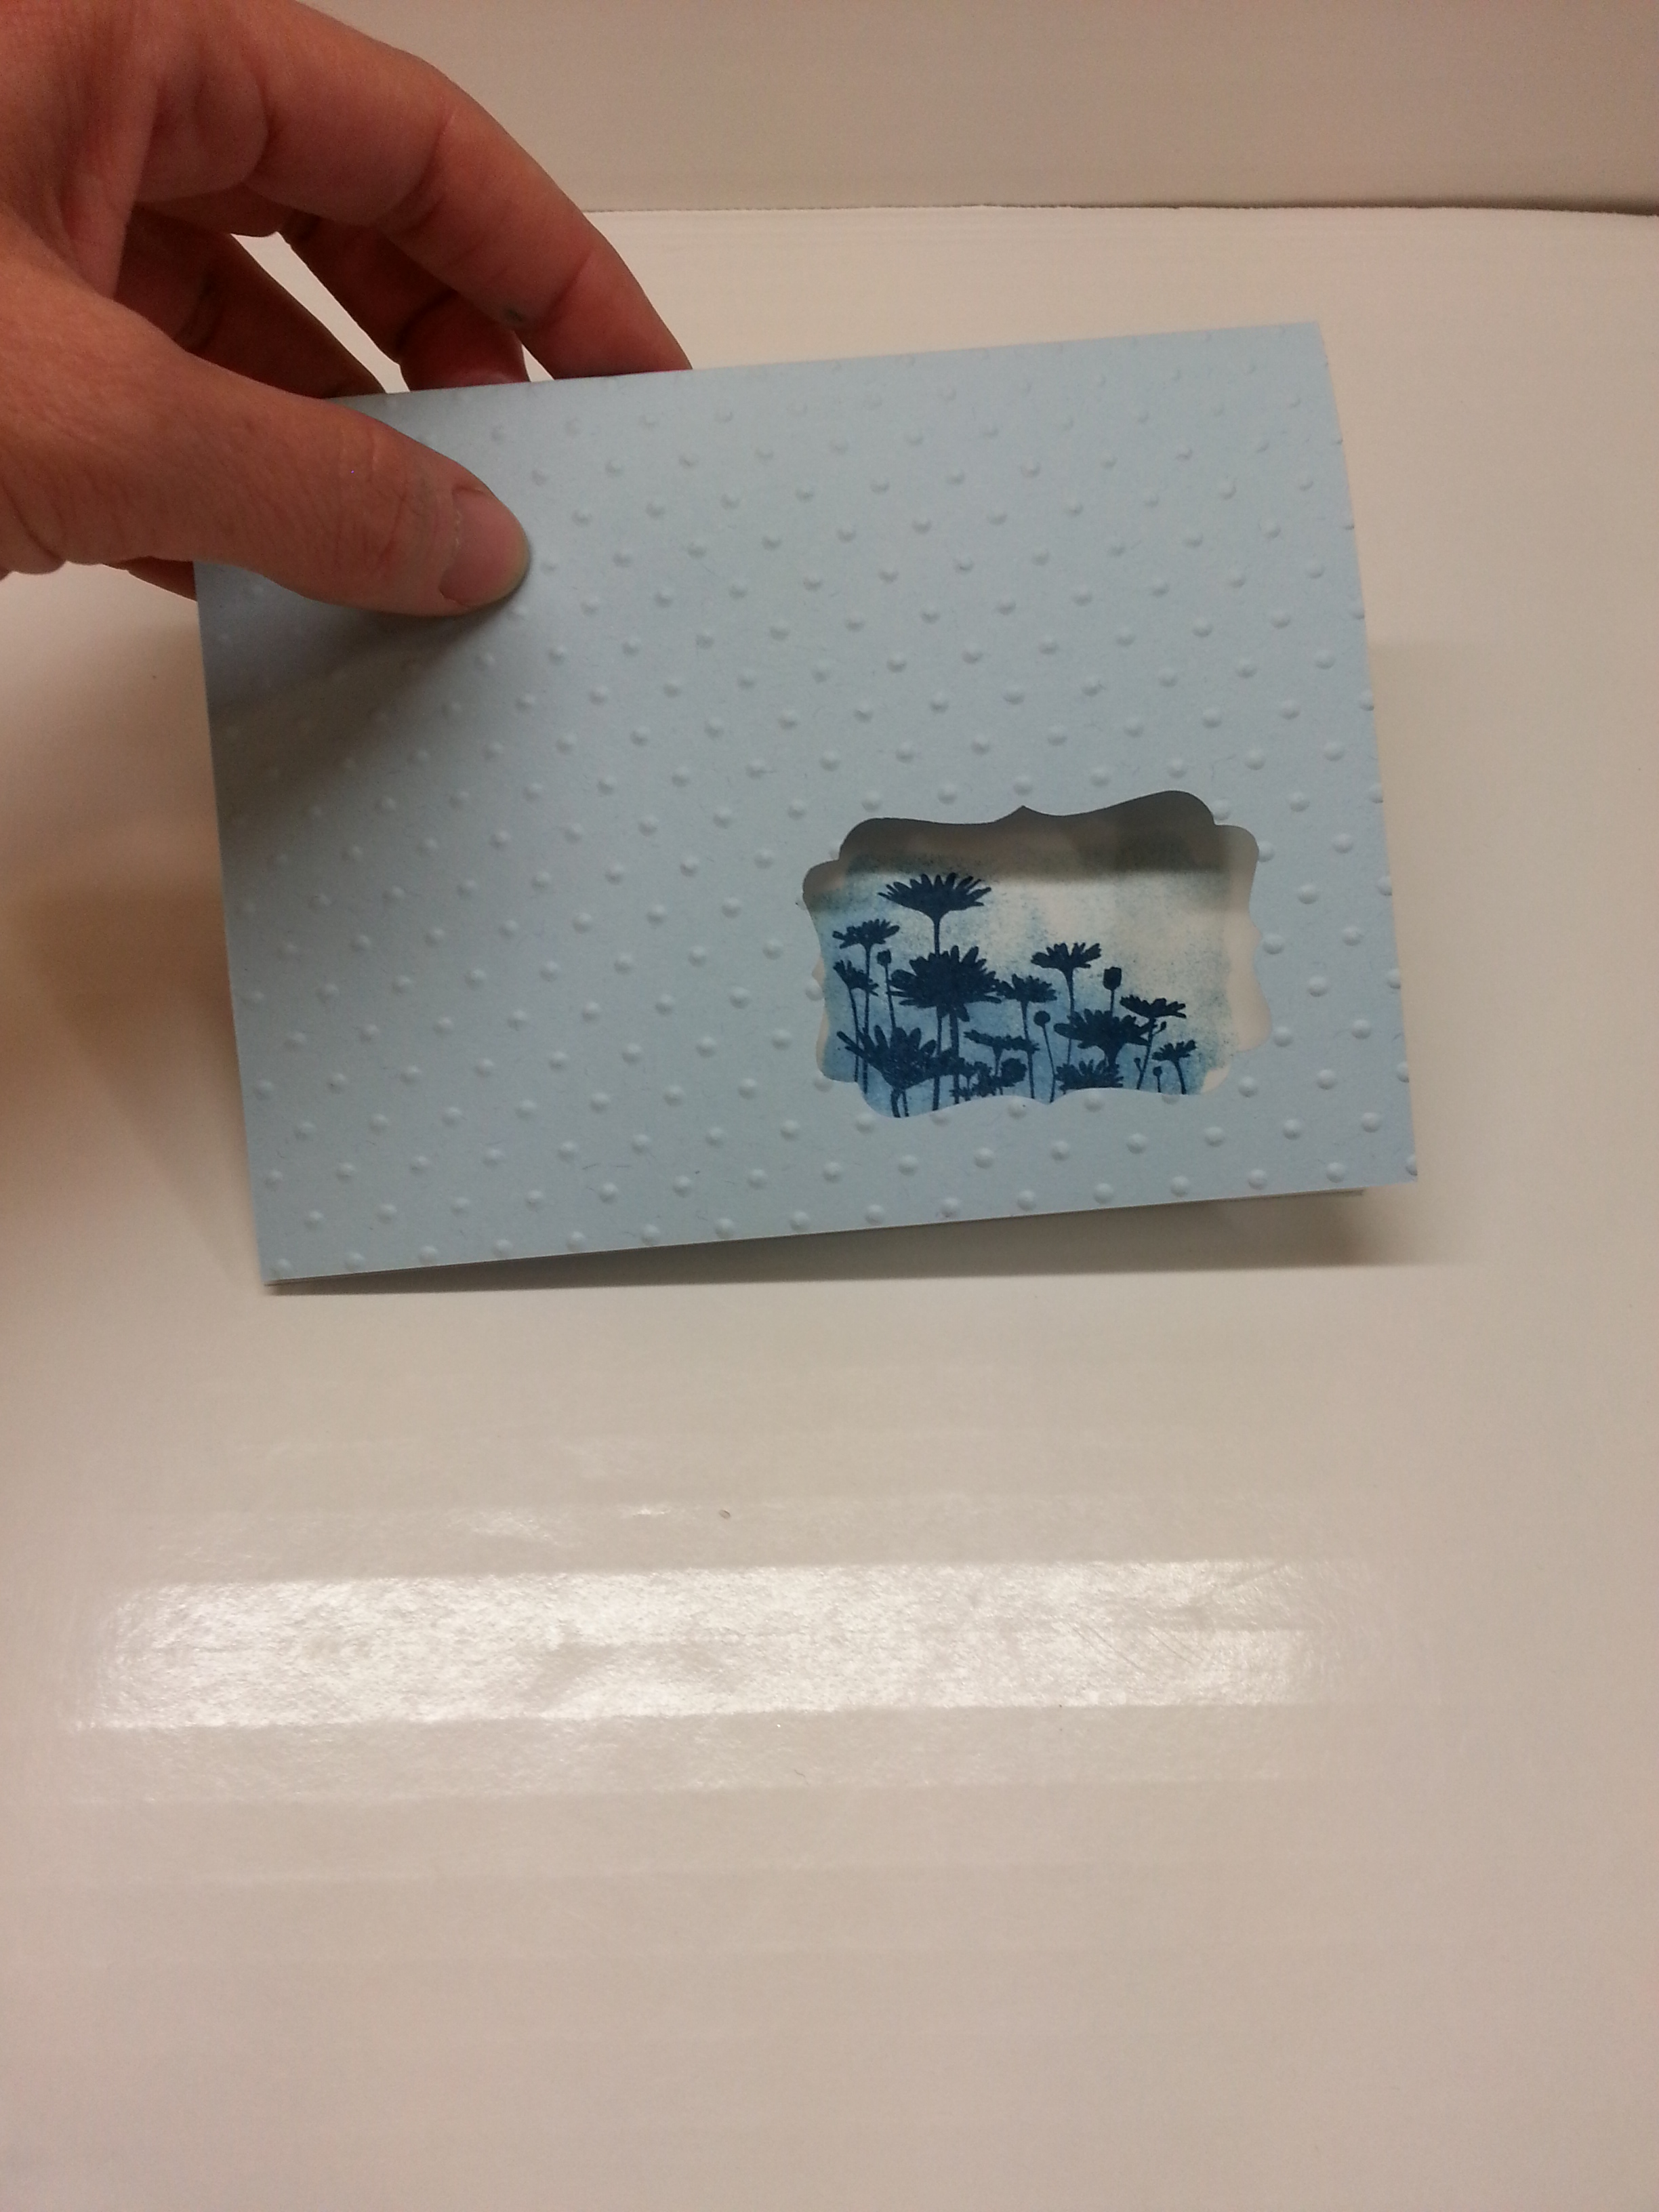
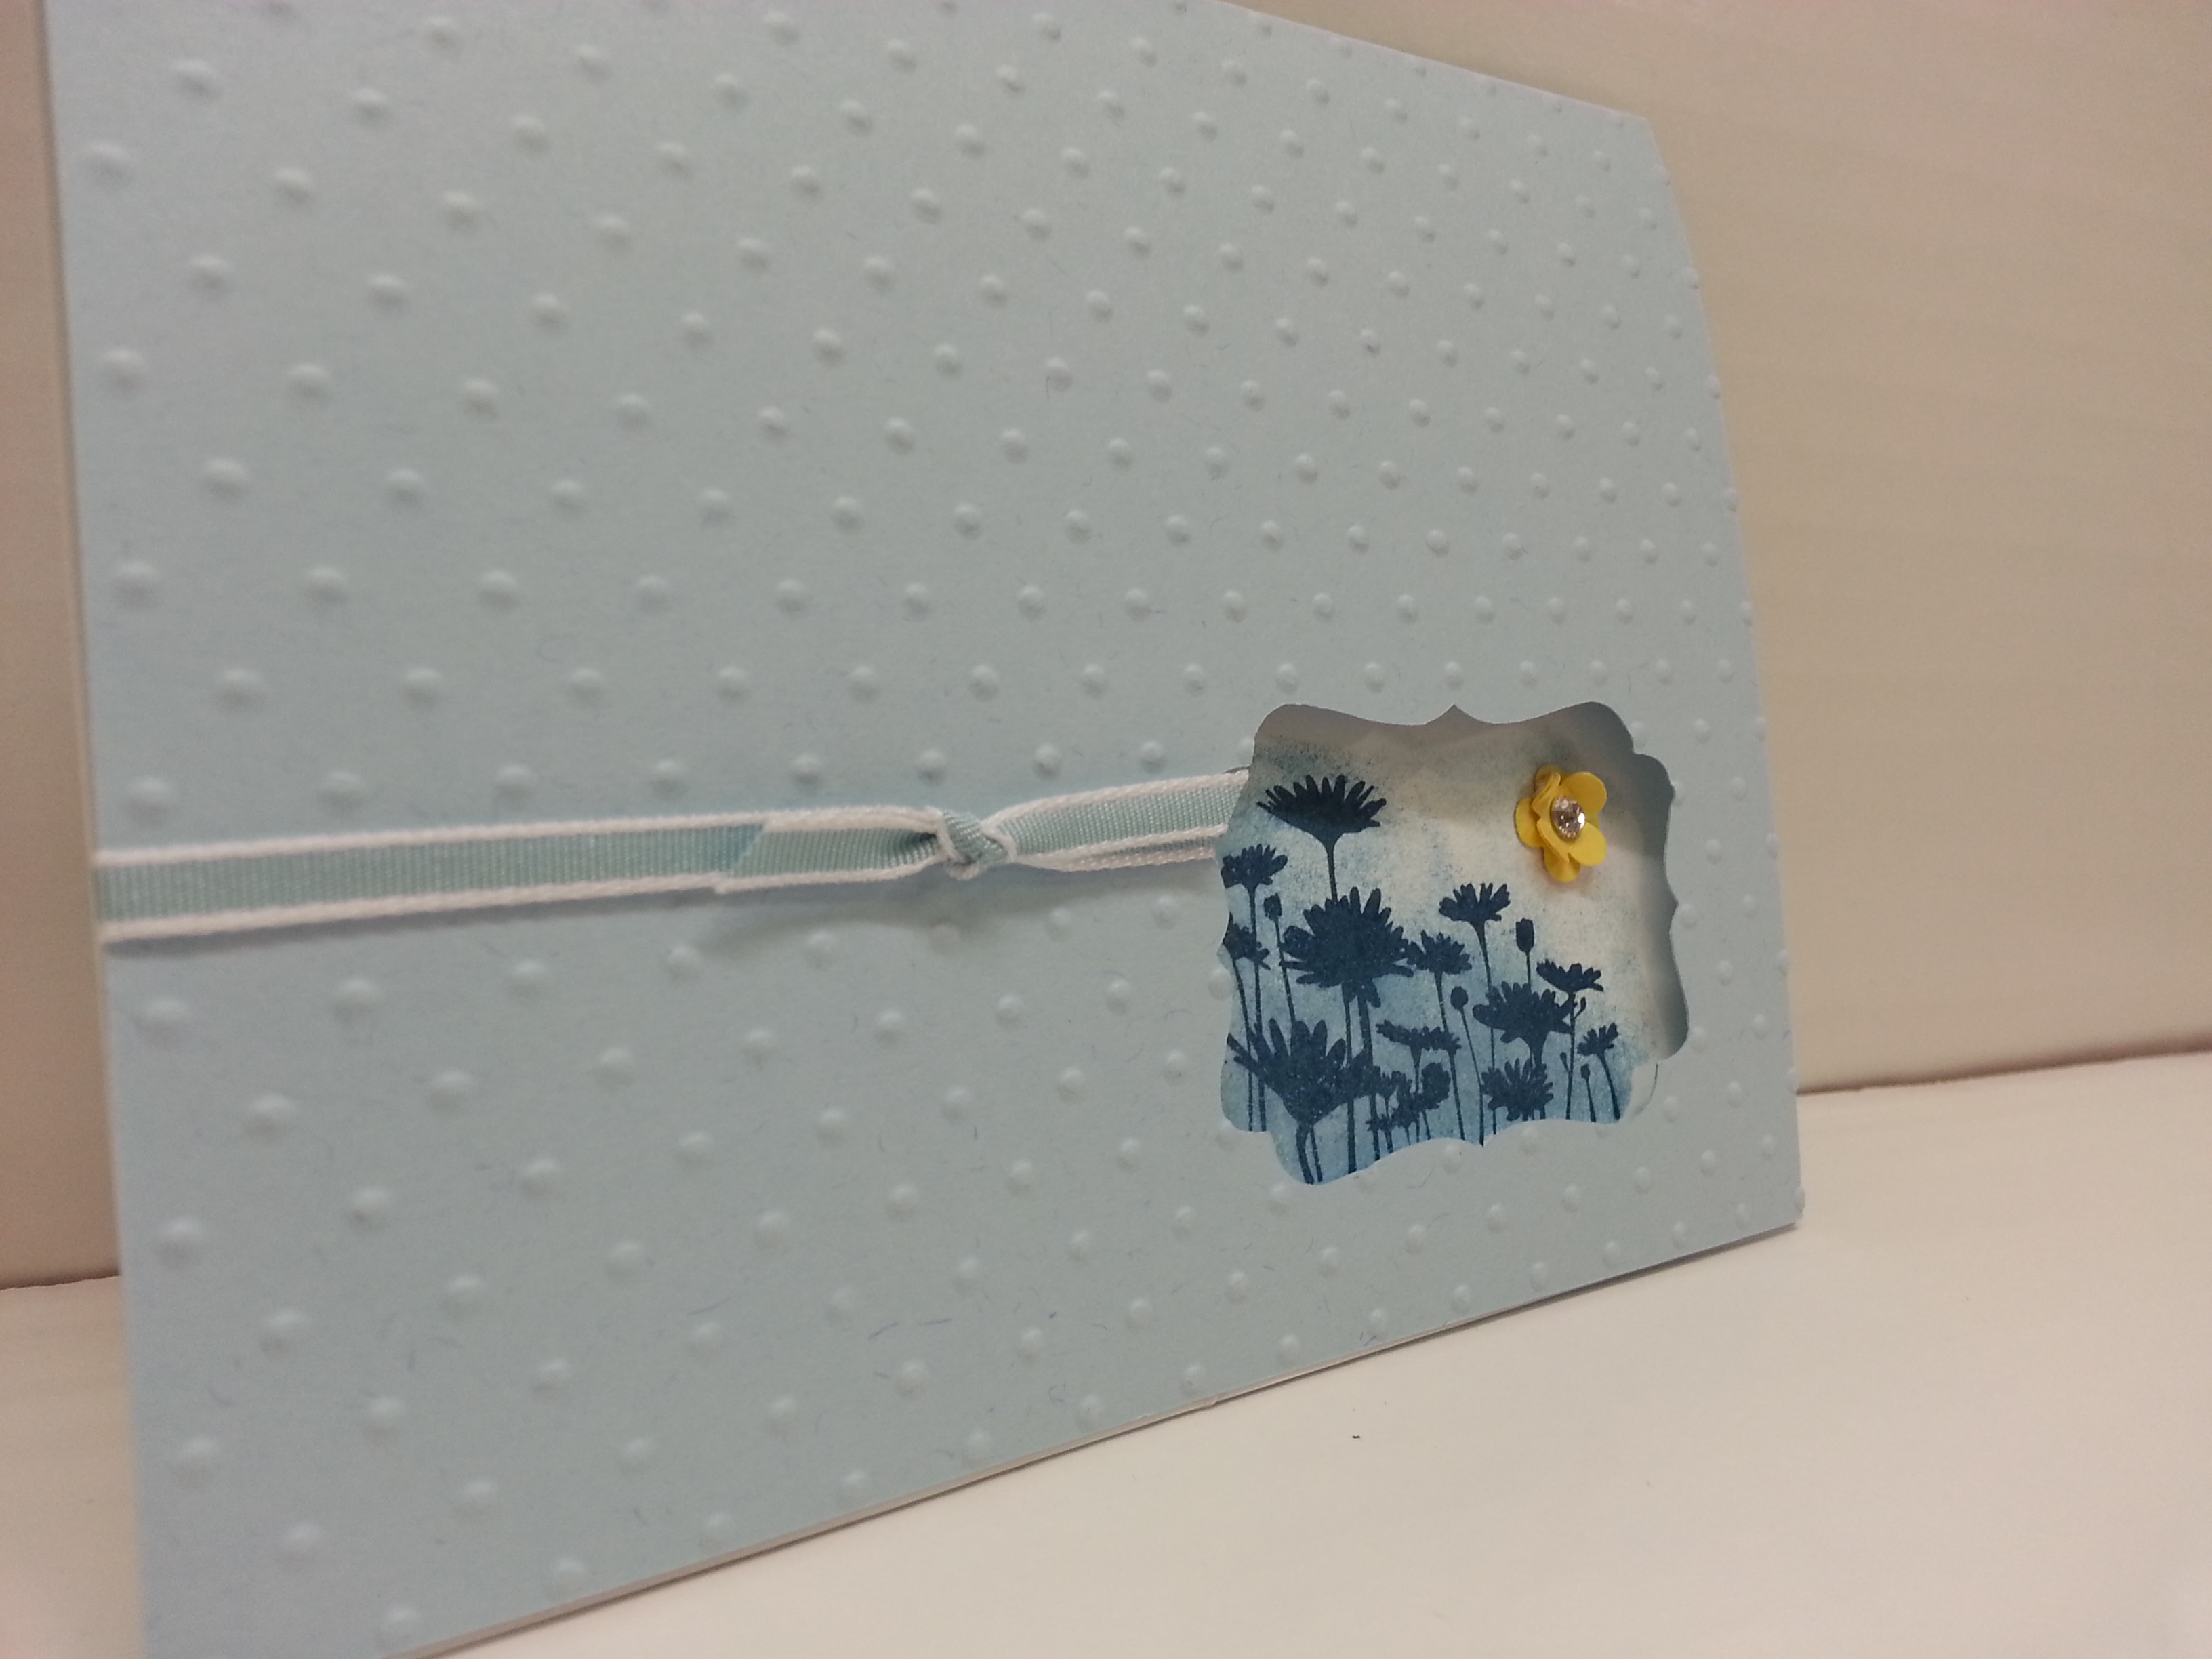
Anyway, I wanted something simple and serene, so this is what it is:

wpid-20131214_110250.jpg

I love the new Smoke Slate color.  And I’m finding that I use it ALL THE TIME.  I especially love the textured 12×12 paper…which is what used here…

image

The Frosted Finishes embellishment is perfect for this card… I think it was made for the best of snow…  It does make it a bit bulky to mail, but it is so totally worth the bling it adds to the card…

image

So, there you have it!!  Thanks for stopping by!!  Now you are off to Deb to see what she has done… perhaps she has had the weather to help inspire her…

blogtour-25years-next (1)

Nancy Amato          http://stampinallnight.blogspot.com
Melissa Bolinger      http://www.stampinup.net/blog/2089191
Jackie Bottomley     http://www.jackiebottomley.blogspot.com
Susan Carlson         http://www.stampinmomoffour.blogspot.com
Tamra Davis             http://www.thecardladies.com
Sherri Eddleblute      http://www.sweetestdesigns.blogspot.com
Lynn Embrey            http://www.possibilitiestamperstudio.com
Kathy Hamrick          http://www.countryroads.typepad.com
Crystal Kondo           http://www.card-ed.com
Deb Lehigh               http://thestampinhut.typepad.com
Anne Matasci            http://www.MauiStamper.wordpress.com
Andi Potler                 http://www.absolutekreations.com
Michele Reynolds      http://www.inspirationink.typepad.com
Sharon Tisdale          http://www.stampinup.net/esuite/home/coveredbridgesstamper/blog
Janet Wakeland        http://www.remarkablycreated.com

Spread a Little More Joy….

Standard

Welcome back to the LAST installment of the Best of Blog Tour….  In January, the tour will change to a PIN-Worthy tour…  It will be fun.

This month’s tour focuses of Spread the Joy and Monster Maniacs.  Both sets were drawn and submitted by demonstrators (well, Spread the Joy was an SU employee, but not a designer).  They are fun to see and I’ve had tons of fun playing with them.

So, if you’ve read my blog in the past, you will know that I have an infatuation with Spread the Love.  Did a whole series.  For this posts, I recycled an idea that I had made in cards… and formatted them for gifts!!  And, what perfect timing… you can whip up several of these and they are perfect for teachers… friends… and they come together as fast as a card does.


20131206_194630

These are just the 5×8 junior legal lpads and a postit that have been decorated with paper.  The post-it includes a velcro closure.  The cardstock just attaches to the back of the junior pad and folds around to the front.  I included a pen to make it a gift-set.

20131206_194646

My participation in craft shows has taught me that cellophane goes a long way in selling items.  So, I make it a point to try to package all my gifts.  Even though it is nothing big, having the items in cellophane is the icing on the cake when it comes to creating gifts…  People seem to really like it.

For my nod to the Monster Maniacs, I used it to create the “FEBRUARY” in my little easel calendar.  These are also very popular gifts for people…  And, they are FUN to make…

20131206_194740


I generally don’t like to buy line-art stamps cause it takes time and energy to get them colored.  And, the solid images are just so much faster when doing multiple cards.  However, coloring these monsters was a BLAST.  I do enjoy coloring…

So, for December, I thought it fun to show  you some little ‘gifties’ for your Christmas List.  And, receiving a thoughtful, hand-created gift is just a wonderful treat.

Now you are off to see what Deb has for you:


blogtour-stampmonth-next


Nancy Amato           http://stampinallnight.blogspot.com
Melissa Bolinger      http://www.stampinup.net/blog/2089191
Susan Carlson         http://stampinmomoffour.blogspot.com
Crystal Kondo           http://www.card-ed.com
Deb Lehigh               http://thestampinhut.typepad.com
Anne Matasci            http://www.MauiStamper.wordpress.com
Audra Monk              http://thecraftyyogi.blogspot.com
Maria Pane               http://www.stampinandscrappinwithriri.blogspot.com
Andi Potler                http://www.absolutekreations.com
Michele Reynolds     http://www.inspirationink.typepad.com
Pam Staples             http://www.sunnygirlscraps.com
Janet Wakeland        http://www.remarkablycreated.com

Spreading Joy

Standard

At convention, we were introduced to a new card set designed by Emily Montoya. SU! had a contest that people could submit artwork that could possibly be turned into a stamp set. The first set chosen (I believe there will be more) was Spread the Joy created by Emily. When I saw it, I knew I needed it.

image

I just LOVE the hand-drawn line art look. And I love this particular image with all these words of encouragement. 

image

She commented on the SU blog (see Sept. 16) that her husband was the inspiration for the set. And how perfect because the images make just wonderful little notes to pass around to people who just need a little note!!

And of course, I had to make a matching envelope…

image

I just love the toast image. I think it’s my favorite.

Stay tuned for more from this fabulous set…

Best of…. Shelli

Standard

So, welcome back for the next installment of the BEST OF tour.  This month is Best of Shelli….  This stamp set was hand picked by co-founder Shelli Gardner as some of her favorite images.  One look at the set will tell you why…

And, I’ve been on a 3×3 kick lately, so the project I have for you is this little 3×3 note card set housed in one of those FABULOUS muslin bags from the Holiday Catalog.  Have a look-see:

20130809_215411


So, you probably already know that I’m in love with this year’s In-Colors.  This set of cards features two:  Baked Brown Sugar and Strawberry Slush.  And, it has that incredible stretch ruffled ribbon.  Just a small piece, but that’s all it needs.  I stamped the image in baked brown sugar and used the sentiment from the stamp set “Six Sided Sampler”.  And, I copied that same image on both the envelope and INSIDE the envelope with those awesome framelit envelope liner.  JUST LOVE THOSE.


20130809_215452


Close up of the card so you can see the little flag of ribbon I stapled on.  I covered it with the faceted buttons and put one of those GIGANTIC rhinestones inside to cover the holes.  It adds the perfect amount  of bling and covers the staple…  🙂

20130809_215604


These are those muslin bags.  AND THEY’RE STAMP-ABLE.  I put a thin piece of cardboard inside just to make it rigid and keep color from bleeding through and just had at it.  I copied the same embellishment on the bag, but instead of the staple I used the hot glue gun…

I love these bags because of the drawstring.  It gives a nice little ruffle on the top and the string is long enough to tie in a knot or a bow.  And, it has cute little tassels on the end.  These are 8 for $9.95.  (4×5.5″)  I can TOTALLY see these for gift cards at Christmas.  Or jewelry bags.  or…or… or…

OR… 3×3 note cards!!

20130809_215511

Here is an upclose of the envelopes.  And, the envie insert.  These will SPICE UP ANY envelope and make it the NOT BORING WHITE ENVELOPE.  I used card stock I stamped as the liner… but, probably better would be to use DSP.  Just cause card stock is a little thick.  But, it still works.

20130809_215427


Final product…  It’s SO fun making 3×3 cards….

Next, you are on to Deb Leigh.  Enjoy the tour!!

blogtour-25years-next (1)

If you need to click through the list old-school style, here you go…

Nancy Amato          http://stampinallnight.blogspot.com
Melissa Bolinger      http://www.stampinup.net/blog/2089191
Jackie Bottomley     http://www.jackiebottomley.blogspot.com
Susan Carlson         http://www.stampinmomoffour.blogspot.com
Tamra Davis             http://www.thecardladies.com
Sherri Eddleblute      http://www.sweetestdesigns.blogspot.com
Lynn Embrey            http://www.possibilitiestamperstudio.com
Kathy Hamrick          http://www.countryroads.typepad.com
Crystal Kondo           http://www.card-ed.com
Deb Lehigh               http://thestampinhut.typepad.com
Anne Matasci            http://www.MauiStamper.wordpress.com
Robin Merriman        http://www.trinitydesignstudio.blogspot.com
Andi Potler                 http://www.absolutekreations.com
Michele Reynolds      http://www.inspirationink.typepad.com
Sharon Tisdale          http://www.stampinup.net/esuite/home/coveredbridgesstamper/blog
Janet Wakeland        http://www.remarkablycreated.com


Best of…Greeting!

Standard

As you read this, I’m winding down the convention madness. Which is sad cause I love convention madness. But this is a lovely little stamp set to help my hafta-go-home-and-join-the-real-world blues. Hum.

Anyway, this set brings back a little nostalgia cause that “you made my day” stamp….was in one of the very first SU! sets I bought. Back when you could choose foam mount or wood mount. I got foam mount cause I was cheap. Cause I was just outta college and no mo’ money.

Anyway, being that this super cute greeting set is, well, greetings and no images, I decided to pair it with Flower Shop. Cause it is a cute  set. Six flowers with a matching punch. (SU! is offering these as a bundle, so they are 15% off if you buy the bundle.)  The flowers are great cause they are all the same shape. They each just have a different feel depending on their style. So. I thought they’d go perfect with the greeting set to make a super cute little pack of 3×3 note cards. And. Just a tip. If you purchase the Flower Shop bundle (stamps and punch), I might suggest that you head over to Maui Stamper to look at her post at how to line up the stamps with the punch. The stamps aren’t symmetrical so they do take a little fussing to figure out how to stamp them so you can punch them.  Maui Stamper will show you how to mark them so it will be easy.

Anyway… here you go…

image

Again, excuse the improvising. Made these while I was in Kansas and didn’t have all my stamp supplies or photographing accoutrements. So these are very dark.  On a floral background.  Cause this is what my mom, Quilter Extraordinaire, had in the way of white fabric.  (???? a table cloth????)  (BTW… I have a new idea for a photo booth I am very excited about so hopefully pics will get even better.)

image

I think this is my favorite greeting stamp. Cause it reminds me of the good ole’ days….

image

Brown sugar flowers. Yeah, I know…strange. But it works. And wouldn’t this be nice tucked in as a surprise in your husband’s wallet or kid’s lunch?

image

Washi! My first time using it on a card. Love it! And the stamp inks and stamps on it beautifully.  And this thank you is a perfectly good all around thank you. You need it.

image

For a wedding gift…

image

Memory lane aside… this happy day image is the new addition to the set and I love it. So cute.

image

And who wouldn’t want a cheery note telling them they are in someone’s thoughts.

So. That’s my take on the best of greetings. I think it is a super easy to use, great universal set. And a steal at $14.95…

Now you are headed over to Deb Lehigh to see her vision for this awesomely versatile set…

blogtour-25years-next (1)

If that link doesn’t work, here are all the stops:

So… I know…. it’s an addiction

Standard

BUT I LOVE BAGS.

All kinds of bags.  Cool paper sacks.  I’ve not met a tote I didn’t like.  Hand bags.  ALL OF IT.  In college, my roommate and I decorated our dorm room with different kind of shopping bags from every store we liked.  The entire room.  It was awesome.

Anyway, what does this have to do with today’s blog tour???

STAMPIN’ UP has just introduced the absolute most coolest, bestest, little packaging bag.  And, yes, I should be excited about the stamp set we are using… Chalk Talk (and, I AM. We’ll get to that in a second.) But I nearly fainted from delight when I saw these little chevron printed bags in the catalog.  And, they are a steal at 10 for 3.95.

Here it IS:

20130712_085905


(Ignore the fancy background…  we were having to improvise)


Anyway, I LOVE THESE BAGS.  And, when Chalk Talk was chosen as the set, I knew immediately what I had to do.  I also LOVE this set.  And the coordinating framelits.  The framelits are what make the set AMAZING too… cause they all cut out perfect tags.  Christmas is going to be amazing this year with these sets and accessories  AND BAGS.

I digress…

The stamp was SCREAMING to do the chalkboard technique (get it… Chalk Talk??)  Black background, white embossing powder.  Or you can do white ink and clear embossing powder if you are into improvising…  which I have had to be, as of late…

And, the chevron bag pairs PERFECTLY with the new chevron ribbon.  Which is a DREAM….  This one is Calypso Coral.

20130712_085911


I also used the framelits for a mask.  See the orange splotch in the bottom right corner?  I used a framelit from the tags framelit set to be a mask for a sponging the calypso ink (you can see where I screwed up and some of the sponging got outside the mask–some people may find this a flaw… I prefer to think of it as my humanity…)  To prevent this, you could use a post-it note on the sides of the framelit so the sponging doesn’t get where you don’t want it.  ANYWAY, I stamped over the sponged portion with another stamp from the Chalk Talk set.  I’m telling you, this is the perfect gift-giving combo.  Wouldn’t you love a pair of earrings, a nail polish, or a Stampin’ Up! gift certificate given in this package??


20130712_085920


A close up of the masking…


20130712_085959


And, some tissue tops it off!!  I am head over heels….  🙂


Now, off you go to see what Deb Leigh did with this fabulous stamp set….  Enjoy!!

blogtour-stampmonth-next


If that icon doesn’t work, click on Deb Leigh’s link below:

BEST of Butterflies

Standard

Welcome BACK!!  For the next installment of the Best-OF tour.

Best of Butterflies.  And, I gotta say, it’s the BEST OF.  There are so many nice butterflies in this set it’s unbelievable…  And, I am now kicking myself now cause I had lots of things I wanted to show you with that I’ve made previously…  but, due to my compulsiveness to not keep things after they retire, I no longer have the samples.  But, the take away from this is that you need the stamps.  Cause they are great.

When I first saw these butterflies, I was instantly drawn to the Monarch one…  And, thinking it needed to be bold.  And stand out.  So, this is what I came up with:

20130517_202432 - Copy


I love square cards.  Now, I now they cost more to mail… yada yada….  BUT… WOULDN’T YOU LOVE GETTING THIS IN THE MAIL??  WITH THE ORANGE (correction, tangerine tango) POLKADOT ENVELOPE???  It would make my WEEK.

Since we are nearing the end of this current catalog, I figured it should be a tribute to more things retiring…  like the Scallop Square die (Can you see it, behind the basic gray square panel, layered on a solid black… it’s the whole tone-on-tone thing…)  The Designer Series Paper Stacks (used for the tangerine envelope AND for the basic gray background on the card).  AND, I used the retiring square punches, the 1 1/4″ and the 1 3/8″ punches.  Now, I know you are thinking that squares are easy to CUT.  but, they are even easier to PUNCH.  And, you need them to make an envelope (well, it makes making an envelope easier).   SEE:

20130517_202248


Okay… so… back up a couple of steps.  The card is 4 1/2″ square.  So, I made the envelope 4 3/4″ square.  In order to do this, you cut a paper that is 8×8 and use the diagonal plate on your stampin’ score to score lines at every 3 3/8″  (do it on all sides).  This will leave you with a little place where your score lines intersect.  You are gonna wanna remove the paper from the area where they intersect.  The square punch works swimmingly.  Now I know you could use scissors and cut it.  But WHY??


20130517_202312 - Copy

And, you need the punches to punch out the pieces for the front of the card.  Well, I suppose you can cut it, but punching is faster.   And, for the butterfly, I decided to use the aqua painter.  Cause I wanted to be able to layer the color.  Okay.  JUST had a brainstorm…  I need to research this, but perhaps some of you know…  now, copic markers are alcohol based.  I wonder what would happen if you used alcohol in the aqua painter??  I’ve never tried.  Always done water…  HUM…  Anyway, that is beside the point.  I know lots of people prefer the blender pen to the aqua painter, but… gotta say… I love the aqua painter.  Admittedly, there is a learning curve with using it, but once you figure it out, it is EXCELLENT for adding color to specific places.  Perfect for shading, adding depth…etc…

20130517_202540


And of course, I had to add some rhinestones cause, well DIAMONDS should be on everything.    See in the butterfly that it looks like a few colors?  It’s not.  Just tangerine tango… layered on with the aqua painter…


20130517_202616


Just another perspective…  My favorite is the butterfly busting out of the box.  Cause why be conformed to a box??  Why be limited by a white envelope??  To a NORMAL sized card???  There is NO NEED TO LIMIT.  🙂


Anyway, I hope you enjoy the rest of the tour… You are now headed over to Deb Leigh.  You can click on the button below.  Or use the list of links if you need….


blogtour-25years-next (1)


Best of …PEEK-A-Boo…

Standard

So Hello!!  And welcome back to the BEST OF blog tour…

(and for those of you who have been following me, I survived the hazardous stamping incident from a few days ago…  and, it must have been REAL bad cause the following  morning, I went to school with two different pairs of shoes on…)  HUM.

ANYWAY…  BEST OF FLOWERS!!  Lots of nice flowers here…  And, the flower I use from this stamp set was one of my favorites, until it went into the great stamp beyond…  Glad to see it back!!

20130418_214201

This little flower stamp fits perfectly into the Decorative Label punch..  Makes a nice peek-a-boo window!!

So, it is a little tricky to get it lined up all right, but it’s not too hard to master.  What I did was make a template where I could line up the punch on the front of card with the place I wanted to put a mask for the inside.  I used the corner of the paper to line up the punch…

20130418_212756

When I had the template put on top of the card stock (Oh, which is Bashful Blue… one of the ones we are losing… so sad).  I just traced the inside top of the template with a pencil.  This way, I could see where to punch…

20130418_211840

So, I just put the pencil mark on just the inside of the punch and that will make sure the hole on the front of the card is punched in the right place.

I also made an INK template… It’s same as the punch template, but I didn’t wanna risk transferring ink to the front of the card.  SO…  You glue a white panel inside the card, and line the template up on the corners.  Stamp THROUGH the template hole and sponge.. (I used Midnight Muse for the flowers and bashful blue for the sponging.  Ignore the daffodil on the template… I changed my mind..

20130418_211956

This is what you get:

20130418_212556

And, here it is when it is closed…  Your flowers peek through the window you  made.

20130418_212606

Embellish it up a little bit…I used the bashful blue taffeta ribbon, I used the little four petal flower punch from the Itty Bitty Shapes Punch Pack.  I LOVE that punch.  I put a little DIAMOND (my friend likes to spell it DI-HU-MUNDS…) and WHO DOESN’T LOVE THOSE??  (I suppose legal requirements would propel me to explain that they are not really diamonds, but rhinestones).  STILL BEAUTIFUL.

And, this is what you get!!20130418_214229

and here is a close up of the flower window…

20130418_214212

Oh… I embossed the front of the card with the polka-dot embossing folder!!

Anyway… Hope you enjoyed it…

Click below for the link to the next blogs…  And ENJOY your tour!!

blogtour-25years-next (1)

If that link doesn’t work, here is the list:

How to you give a handmade card to a stamper extraordinaire?

Standard

It’s a daunting task…. I tell ya… my friend, themauistamper, had a birthday. And so… I needed a card. But. Not just any card. Had to be a good one. Couldn’t just be out of the ol’ card box. And I’m not saying that she wouldn’t appreciate whatever I sent… she’s not like that. But as a friend and fellow stamper… I needed something nice.  Now… my sister asked me once… that why to my family I often send store bought cards (gasp….I know) but then she answered her own question… “oh, cause store bought cards tells me I really matter… cause you didn’t just get it out of your box… you had to put effort into getting it.”  Yeah. We go with that. And now I’m paranoid that everyone thinks that when I send them a card.  But oh well…And, for my family,  I’m usually looking for something really funny…which I’ve not mastered. Anyway. Store-bought wouldn’t work for mauistamper… CAUSE SHE IS A STAMPER. I really procrastinated on this cause I didn’t know what to do…. but, pinterest saved the day again… and this is what I came up with…

image

The original idea was the normal card size (4.25×5.5) but I wanted to be different. So I did square.  I like it when the card stands out in the mail. And, of course…. I wanted to make the envelope so it’d be really special. I’m sure the USPS isn’t  all that excited about my special cards (square cards require extra postage…and you should use a white label on dark dsp so the address could be clearly read)… but some times special people call for special circumstances. And with all thanks to the USPS for humoring me… (and it is still the best purchasing value…. if I wanted…I could send a card to my family…which is about 5000 miles… for only 48¢. I sure can’t get there for that…)  anyway…  here is another view…

image

And for a super special person… I decided to go crazy with rhinestones… who doesn’t like diamonds??  I used summer starfruit and raspberry ripple for the colors…and my favorite, the tasteful trim die to make the scallop border…

image

So… that’s it. Thats what I got for mauistamper extraordinaire.

Ciao, BABY!!

Standard

Welcome Back to the “Stamp of the Month” Blog tour.  March’s installment uses Ciao, Baby from the Spring Occasions catalog.  I ordered this set as soon as I saw it.  Wanna know why…  It fits the petite curly label punch available in SAB… and the tiny scallop circle in the Occasions catalog.  And, I’m a sucker for little tags.  You can use them on everything.  Now, this set would make gorgeous cards in it’s own right…3×3 cards, tags, etc… but, when we get to March, I know the Stampin’ Up catalog is in it’s, hum, shall we say, last few moments (don’t get alarmed, you still got a couple of months…) But, as a demonstrator, with the new catalog coming in June, I have to start looking at the stamps I have and seeing what have I used, what has gotten ‘hidden’ behind something else on the shelf…  and I did… and found Baby Boutique.  It kinda got stuck back behind some other stamps, and I realized this WHOLE year has passed and I’ve not really made anything with it.  SO….  I’m paring Ciao, Baby with Baby Botique.

I wanted to do a few quick and simple cards, cause these images really are nice and bold…  for both sets…

Here is what I did:

20130308_203749

Simple colors, easy lines, fun and fast to make.


20130308_203925

Though it doesn’t specifically say it, This one would make a perfect Easter card.  I love the little detailing in the bird.  And, the Happy Day stamp from Ciao Baby looks like the bird chirped it.  I used the border from the Tasteful Trim die (I use that for EVERYTHING….not just on this blog post).  I used so saffron paper and the polkadot textured impressions embossing folder to add just a little detail…  Oh, I used crumb cake for the scallop punch and very vanilla for the card…


20130308_204029

This one makes a great card for someone who you need to give a note of encouragement or thanks!  Island Indigo ink makes a very cheerful greeting.


20130308_204055 (2)

And, the baby pajamas.  That’s what made me want to by the Baby Boutique stamp set in the first place.  This one uses pool party, but it could easily be made in any color for either gender baby… and, you can take the ‘Thank you’ stamp from the Pretty Petites (another SAB freebie) and make a set of thank you cards for the new-to-be mom.  Thank you cards… that’s what I started giving as gifts to baby and wedding showers….  a set of cards, pretty pen, stamps, and return address labels…  A perfect, hand-made gift…

Anyway, thanks for stopping by!!  Off to your next stop!  See what Deb Leigh has for you…

blogtour-stampmonth-next


And if that link doesn’t work, here is the full list of people in the tour: