Tag Archives: Mixed Media

Remarkably Pin-able Valentines!!

Image

Hello!!

Welcome to the first installment of the Remarkably Pin-able Blog Tour!!  The Stamp-of-the-Month Blog tour has morphed into this one.  And, I think you will enjoy it.  It has a bit of a different focus.  Instead of focusing on ONE stamp set, it will be thematic.  So, I think it will expand the creativity! I am excited.

This month, we are focusing on Valentines, love, or anything related to that avenue… (just in time, I might add…)

So, I have for you a Monster Maniac Valentines!  I love these cute, little monsters!!

wpid-20140107_205030.jpg
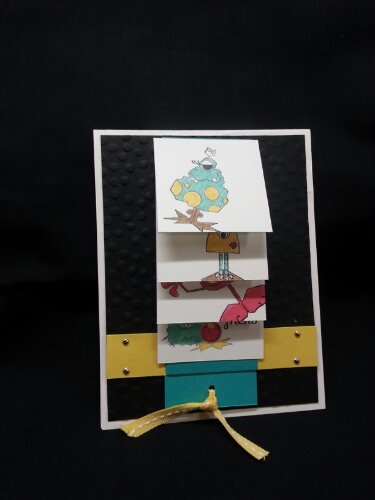
This month, I chose to make a waterfall card.  I’ve not done one of these in a LONG time, and my club members were asking to make one.  So, I thought this would be a good opportunity.  I have a quick little photo-tutorial to show you how to do it.

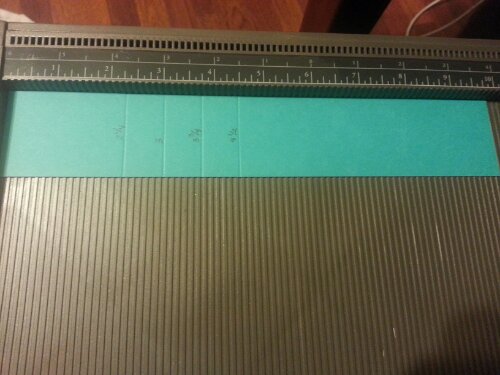
First, you need a strip of paper that is 1.75 by 9.75 inches (I started out at 10 inches but then took it apart and cut it down)  Score it at 2 1/4; 3; 3 3/4; 4 1/2.  For this strip, I’m suing Bermuda Bay.

wpid-20140106_213754.jpg

Then, add adhesive in the scored sections.  I tried to take a picture… hopefully you can see the adhesive…

wpid-20140106_215654.jpg

Next, you need 4 pieces of card stock that are 2×2.  I chose to use Whisper White so that I could stamp and color my little monsters.  Go ahead and stamp whatever you like with the understanding they will be displayed in order.  So you may want to know that you want seen first, second, third, etc…

wpid-20140106_215450.jpg

Then, you attach these little squares to your long strip that you just cut and scored.  Decide which square will be on bottom.  you will need to put adhesive on the back of this one (keep to the center of the back of the 2×2 square) to glue onto the (Bermuda Bay) strip.  This goes on the ‘shortest’ end of the strip.

wpid-20140106_215733.jpg

Then, you will ad the next cards on top… lining them each up with the score marks you made.  Remember, you’ve already added adhesive to the strip so that now you are just placing the cards on.  The bottom half of each card will be ‘unattached’.  This is important.

Next, you will glue the back of the ‘bottom’ of the Bermuda Bay strip (the same one in the photo above.) to a horizontal piece of paper… I am using Daffodil Delight and chose to make my paper 3/4″ x 4″.  This is what will anchor the waterfall card.

wpid-20140106_220034.jpg

Here are a couple of pictures from the side so that maybe you can see the layers.  It seems odd that we aren’t using adhesive here.  But, we cannot if we want the card to move.  I attach the Daffodil strip with brads.

wpid-20140106_220122.jpg

wpid-20140106_220126.jpg

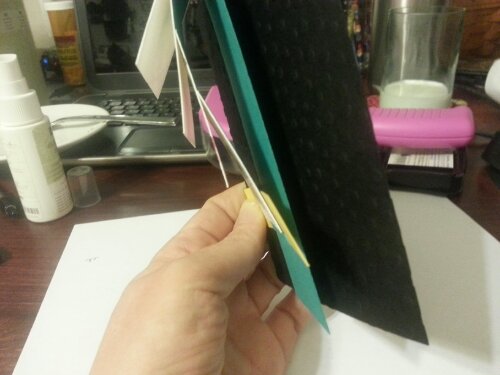
My black backing is 4×5.25″ and I am going to attach it to a white cardstock base.  You can’t really tell in the pictures, but I embossed it with the new Sale-A-Bration embossing folder!! (SNEAK PEEK…)  Attach the entire apparatus (the Daffodil c.s. and the Bermuda Bay c.s.) to the black with brads on the ends of the Daffodil c.s.

wpid-20140106_220610.jpg

Oh, the Bermuda Bay c.s. folds at the top and comes behind itself and sticks out below the daffodil.  It needs to be a little longer so you can attach a ‘pull’ (I used ribbon I tied in a punched out hole).  I also stamped “Happy Valentine’s Day” on this.  You can’t see it in the picture, but it is a ‘hidden message’ that is revealed when you pull the strings.

wpid-20140107_205030.jpgThen, I just glued the black c.s. onto the white card base.  Easy Peasy.  Here is a picture of where I have partially pulled the string to reveal the waterfall.

wpid-20140107_205043.jpg

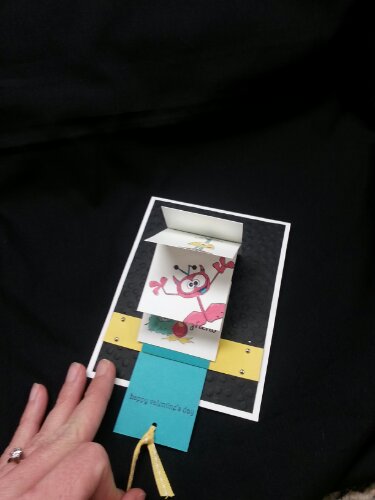
And, because of all the cutting and scoring we did, the cards ‘flip’ through themselves–revealing all the precious monsters just WAITING to wish you a Happy Valentines…

I even made a little video, but apparently I don’t pay for the version of word-press that allows for videos.  Who knew…

I hope you enjoyed your little Monster Valentine!!  Now you are off to Anne Matasci!

Click on the button below to go to Anne’s site, or use the list provided at the end of the post.

blog-tour-pinworthy-next

Below is a list of all the participants and the links to their direct post.

Nancy Amato:  http://stampinallnight.blogspot.com/2014/01/remarkable-stampers-pinworthy-blog-tour.html

Missy Bolinger
Tamra Davis
Connie Diebler http://www.conniestamps.com/2014/01/whatsnottolove.html 
Sherrie Eddleblute:   http://sweetestdesigns.blogspot.com/2014/01/lovey-dovey.html

Crystal Kondo:  http://wp.me/p2l6Qe-fb  (YOU ARE HERE)

Anne Matasci:  http://wp.me/pCcBw-1tG
Audra Monk:  http://thecraftyyogi.blogspot.com/2014/01/remarkables-lovey-dovey-blog-tour.html
Maria Pane
Andi Potler:   http://www.absolutekreations.com/2014/01/09/remarkable-pinworthy-blog-tour-lovey-dovey/
Michele Reynolds:  http://inspirationink.typepad.com/inspiration-ink/2014/01/lovey-dovey-pinworthy-blog-tour.html

Pam Staples

Jeannette Swain: http://www.StampsNWhatnot.com/my_weblog/2014/01/crazy-mixed-up-love.html

Janet Wakeland:  http://wp.me/pHIQD-5Y7

Spread a Little More Joy….

Standard

Welcome back to the LAST installment of the Best of Blog Tour….  In January, the tour will change to a PIN-Worthy tour…  It will be fun.

This month’s tour focuses of Spread the Joy and Monster Maniacs.  Both sets were drawn and submitted by demonstrators (well, Spread the Joy was an SU employee, but not a designer).  They are fun to see and I’ve had tons of fun playing with them.

So, if you’ve read my blog in the past, you will know that I have an infatuation with Spread the Love.  Did a whole series.  For this posts, I recycled an idea that I had made in cards… and formatted them for gifts!!  And, what perfect timing… you can whip up several of these and they are perfect for teachers… friends… and they come together as fast as a card does.


20131206_194630

These are just the 5×8 junior legal lpads and a postit that have been decorated with paper.  The post-it includes a velcro closure.  The cardstock just attaches to the back of the junior pad and folds around to the front.  I included a pen to make it a gift-set.

20131206_194646

My participation in craft shows has taught me that cellophane goes a long way in selling items.  So, I make it a point to try to package all my gifts.  Even though it is nothing big, having the items in cellophane is the icing on the cake when it comes to creating gifts…  People seem to really like it.

For my nod to the Monster Maniacs, I used it to create the “FEBRUARY” in my little easel calendar.  These are also very popular gifts for people…  And, they are FUN to make…

20131206_194740


I generally don’t like to buy line-art stamps cause it takes time and energy to get them colored.  And, the solid images are just so much faster when doing multiple cards.  However, coloring these monsters was a BLAST.  I do enjoy coloring…

So, for December, I thought it fun to show  you some little ‘gifties’ for your Christmas List.  And, receiving a thoughtful, hand-created gift is just a wonderful treat.

Now you are off to see what Deb has for you:


blogtour-stampmonth-next


Nancy Amato           http://stampinallnight.blogspot.com
Melissa Bolinger      http://www.stampinup.net/blog/2089191
Susan Carlson         http://stampinmomoffour.blogspot.com
Crystal Kondo           http://www.card-ed.com
Deb Lehigh               http://thestampinhut.typepad.com
Anne Matasci            http://www.MauiStamper.wordpress.com
Audra Monk              http://thecraftyyogi.blogspot.com
Maria Pane               http://www.stampinandscrappinwithriri.blogspot.com
Andi Potler                http://www.absolutekreations.com
Michele Reynolds     http://www.inspirationink.typepad.com
Pam Staples             http://www.sunnygirlscraps.com
Janet Wakeland        http://www.remarkablycreated.com

Christmas Goodies

Standard

I wanted to share with you some goodies I made for my next craft fair… little M&M sleeves. With an ornament topper. I love those skinny cello bags.

image

A couple of options to choose from. Makes it fun. These are perfect for the kid’s Christmas party. Cause why make only a few when you can make a ton?

image

And, if you are bored on Sunday, swing by the Maui High School gym. Between 9-2.  Finish up your Christmas shopping. 

Believe

Standard

Here is another item that will be at the Maui Stampers Craft Fair. (This Sunday.). The believe banner. Just perfect for he Christmas Season.

image

I love the neutral look and the combination of burlap and bling. I love it so much I think I’m gonna redesign my Christmas decor this year. (I needed to do something different anyway…)

image

I only have a couple of these, so shop early! It will come with the jute to hang it. I just couldn’t get a nice picture with it hanging.

I think I’m gonna hang mine with a garland in the entry way to the kitchen. Where are you gonna put yours?

Christmas Collectibles

Standard

Hello Again!!  Welcome to the next stop on the next Stamp of the Month Blog Tour…

This month, I have for you a few projects for your Christmas gift needs…  A card, goodie box, and a goodie bag tag!  All perfect for your gift giving needs.  And, take my advice (and this is totally a “do as I say and not as I do” piece of unsolicited Christmas prepping advice).  START NOW.  then you don’t get overwhelmed in December.  (check back in with me in December and see how well I heeded my own advice).

So, here it is:

First up is the Christmas Card.  And I must confess, I got the color scheme from Pinterest.  The polka-dots from the Christmas paper (Season of Style) and the Coastal Cabana (just fyi, I love this color so much I’m thinking of painting my kitchen a shade of it…).

20131011_184906

Very simple layout.  One of my favorite styles of cards (i.e. the 3×6).  Tag is cut from the Chalk Talk framelits set.  And, a piece of washi…  And, of course, after I made this and was so proud of myself, I realized that silver cord is retired.  But, we do have the perfect silver ribbon that would totally work.  I didn’t wanna take it off cause it’d never look quite right for me to re-do… and I didn’t feel like remaking everything… SORRY.  My apologies.

20131011_184900


And, next up is a little gift tag.  This would go wonderfully on a gift, a cello bag of goodies, or you could even layer it up and put it on the front of a card:

20131011_184915

I love how the coordinating punch works so well with this set.  And, you can punch a bazillion ornaments for all your ornament needs…  You could even make cute ornaments for your own tree.  The children would love to make it…

20131011_184920


Just another view…

And, last up, is the little goodie box.  SU has expanded their packaging line, to my utter joy and excitement.  I LOVE PACKAGES.  And, the best gift, given in a junk package is not nearly as brilliant as if it were packaged well…  so, there is NO excuse for ugly packages this year…

ANYWAY… these boxes are super cute.  They have a clear slide that allows a peek at what is inside.  Don’t get too excited.  I had no idea what to put inside at this point (It’s October, and I’ve already alluded to my procrastination problem…) So, all I have inside this one is the brown crinkle paper.  Which makes it look cute, but the gift receiver may not be very excited about the gift…

20131011_184837


The nice thing about this box is that you can put belly bands ALL the way around the plastic sleeve and its FINE.  Cause the plastic sleeve slides off the box.  So your design stays nice and you can still get into the box.   BRILLIANCE I TELL YOU…. PURE BRILLIANCE.

Here is the set together:

20131011_184828


Hope you enjoyed this installment!  Next, you are off to see Deb Leigh.  Click on the button below.  And, below that is the entire list of those in the blog… If you need…

blogtour-25years-next (1)


Nancy Amato           http://stampinallnight.blogspot.com
Melissa Bolinger      http://www.stampinup.net/blog/2089191
Jackie Bottomley     http://www.jackiebottomley.blogspot.com
Susan Carlson         http://stampinmomoffour.blogspot.com
Tamra Davis            http://www.thecardladies.com
Connie Deibler         http://www.conniestamps.com
Sherri Eddleblute      http://www.sweetestdesigns.blogspot.com
Crystal Kondo           http://www.card-ed.com
Deb Lehigh               http://thestampinhut.typepad.com
Anne Matasci            http://www.MauiStamper.wordpress.com
Robin Merriman        http://www.trinitydesignstudio.blogspot.com
Audra Monk              http://thecraftyyogi.blogspot.com
Maria Pane               http://www.stampinandscrappinwithriri.blogspot.com
Andi Potler                http://www.absolutekreations.com
Michele Reynolds     http://www.inspirationink.typepad.com
Pam Staples             http://www.sunnygirlscraps.com
Jeri St. John             https://jerrisgemtastics.blogspot.com
Jeannette Swain       http://www.stampsnwhatnot.com
Janet Wakeland        http://www.remarkablycreated.com

Defying Gravity

Standard

So the title really has nothing to do with this post except this month’s Best Of set…Best of Halloween…reminds me of the musical, Wicked. Well, the hat does. And I absolutely love the musical. And the song. I think it has something to do with the whole Kansas upbringing.  (For those of you who don’t know, Wicked is the true story of the Witches of Oz.)  I even just bought the most fabulous pair of red shoes…

Anyway… Wicked inspired the first card I made with this set. Though the stamps are super cute, I really wish the retired stamp we had with the legs in boots had made the cut…then I really could have a musically inspired card… but we can’t all have our druthers…

image

This year’s Halloween DSP, Witches Brew, is absolutely fabulous. This is a Summer Starfruit piece from the pack. The I wanted the girlie-ness from that piece of paper to liven up the card. Its 4.5″ square… but I trimmed off a portion of the front and scalloped the edge. I textured with chevron and stamped with the Gorgeous Grunge stamp set And the Illuminate ink. On the eggplant, it comes out a pretty silver. Thus the hint of brushed silver paper.

image

Now, I knew I wanted to glitter the hat with our black glitter. And I swear I had some of the heat and stick powder. But I think in efforts to simplify my life, I must have gotten rid of it. So. I had to stamp the image and then trace over it with crystal effects. But the result is still the same.

image

A few rhinestones and we are all “off to see the wizard”.

Card #2
When I saw the owl in the tree in this set, I just knew I had to make a window card with the sponging and all that business. So… off to figure that out.

Here is the finished product

image

I used the window framelits die and cut the window out of the layer of DSP that is on the front.  Then I placed it where I wanted it to be on the card and marked the insides so I knew where to line it all up.

image

Remove the DSP and with the help of the exceptionally wonderful magnetic platform, my window got cut out of the card base exactly where I needed it to be.

image

I put a piece of vanilla paper on the inside and then marked the window from the front of the card. This is so I would know where to line up the mask for my stamping and sponging.  I cut then same size window out of a scrap of paper and used it to mask the area. I stamped the owl/tree stamp and then sponged summer start fruit for the moon.

image

After stmping and sponging summer start fruit, I used the 1″ c ircle to make a mask to keep the start fruit clean as I sponged smokey slate, basic gray, and black.

image

Like my piece of Washi as a way to hold the mask down?? Its perfect for that cause it is removable.  And here is the finished sponge job.

image

Now, I couldn’t keep the insides that plain… and we have all that glorious Halloween washi. So…

image

Here’s another look at the front again :

image

And the whole thing…

image

Well. Thanks for stopping by for this month’s Best Of… you’re off to see what Deb Leigh has in store.  And here’s to a day of defying gravity. Plug that song in and go around singing it. I dare ya….

Click the box to go to Deb’s blog:

blogtour-25years-next (1)

Nancy Amato          http://stampinallnight.blogspot.com
Melissa Bolinger      http://www.stampinup.net/blog/2089191
Jackie Bottomley     http://www.jackiebottomley.blogspot.com
Susan Carlson         http://www.stampinmomoffour.blogspot.com
Tamra Davis             http://www.thecardladies.com
Sherri Eddleblute      http://www.sweetestdesigns.blogspot.com
Lynn Embrey            http://www.possibilitiestamperstudio.com
Kathy Hamrick          http://www.countryroads.typepad.com
Crystal Kondo           http://www.card-ed.com
Deb Lehigh               http://thestampinhut.typepad.com
Anne Matasci            http://www.MauiStamper.wordpress.com
Robin Merriman        http://www.trinitydesignstudio.blogspot.com
Andi Potler                 http://www.absolutekreations.com
Michele Reynolds      http://www.inspirationink.typepad.com
Sharon Tisdale          http://www.stampinup.net/esuite/home/coveredbridgesstamper/blog
Janet Wakeland        http://www.remarkablycreated.com

Stamp of the Month Tour

Standard

Hello!!  Welcome back to our stamp of the month tour.  This month actually features a choice between TWO stamp sets.  And, I could not choose so I did a couple of projects with both sets…

First off, I chose to use Halloween Bash to make a couple cute 3×3 cards.  I was in a 3×3 swap at convention, a little birthday card, that used the lattice die to make a pop up in the middle.  I apologize, but the card didn’t have a name in it.  I’d love to give credit to the brilliantly talented demo who made it… but anyway…

20130904_190712

The chevron embossing folder and LOADS of the awesome Halloween Washi tape makes the front (and all of the card) so fun.  All these images come from the same stamp set ($15.95) and I used the coordinating punches to punch them out.

Here is a look at the inside:

20130904_190658

You can see that there are panels covering the top and bottom of the card.  This is attaching the top and bottom of the lattice die to the card which then holds the pop out in the center…

20130904_190500

I had to score this one to get it to fit in the card.

You can kind of see how the lattice works here:

20130904_190627

I cut the lattice die in half, and scored it at every intersection… then glued the end pieces behind the panels and left the center to fold out…

20130901_151420

Lattice die, that I cut in half…

20130901_151425

and scored.

20130901_151517

I glued the ends to the panels that hold them to the card (3×2.25)

20130901_151616

So, this is what the final inside panel looks like.  Then, you glue the ends of the black panels to the card (top and bottom) and you get this…

20130901_151709

This is what you stick the pop up on.  And, you can use this for ANYTHING.  Not just Halloween.  What a fun surprise!!

AND, when I was making these, I received my envelope board.  So, I had to make matching envelopes.  Though these are 3×3 cards, I decided to make envies for 3.5 cards (which is a little big) because I was worried that the thickness of the card would not let the card fit into the envelope.

One last look:

20130907_164838

20130907_164825

Now… On to Thanksgiving!!

This card uses Magnificent Maple.  For this Thanksgiving card, I really wanted to focus on TEXTURE.  So, I chose to use the burlap ribbon, and the canvas paper…

20130904_190733

The canvas paper is a pretty stark….well…not quite white, but certainly not cream.  So, I spritzed it with a mix of Baked Brown Sugar and alcohol.  I stamped the maple leaf in Cherry Cobbler, Summer Starfruit, and Early Espresso.  I used an espresso card base and starfruit panel under the canvas.  I distressed the edges of the canvas and burlap just to add more texture.

20130904_190745

I used the Tags For You stamp set and coordinating Label Bracket Punch.  And, just a note… I actually stamped the label with versamark and embossed it with the Espresso powder.  If you notice the Espresso leaf, how it isn’t very bold…  this is a property of the canvas.  It kind of soaks the ink.  That’s why I embossed it.  But, Be prepared, it doesn’t make the nice, smooth, glossy embossed texture because it’s on the canvas.  I just did it to make the color stronger.  Remember…I’m going for texture….

20130904_190805

That button is from the Naturals Designer Buttons.  It nice cause it looks like wood.

And, of course, I had to make a matching envelope:

20130907_164808

Well, I hope that got you in the mood for the upcoming “HALL OF HOLIDAYS”.   It seems like it comes quick and goes fast….  You are off to see what Deb Leigh has for you.  Click the button below.  Or, use the list if you need.

blogtour-stampmonth-next

Nancy Amato           http://stampinallnight.blogspot.com
Melissa Bolinger      http://www.stampinup.net/blog/2089191
Jackie Bottomley     http://www.jackiebottomley.blogspot.com
Susan Carlson         http://stampinmomoffour.blogspot.com
Tamra Davis            http://www.thecardladies.com
Connie Deibler         http://www.conniestamps.com
Sherri Eddleblute      http://www.sweetestdesigns.blogspot.com
Crystal Kondo           http://www.card-ed.com
Deb Lehigh               http://thestampinhut.typepad.com
Anne Matasci            http://www.MauiStamper.wordpress.com
Robin Merriman        http://www.trinitydesignstudio.blogspot.com
Audra Monk              http://thecraftyyogi.blogspot.com
Maria Pane               http://www.stampinandscrappinwithriri.blogspot.com
Andi Potler                http://www.absolutekreations.com
Michele Reynolds     http://www.inspirationink.typepad.com
Vicki Soni                  http://www.paperinkle.com
Pam Staples             http://www.sunnygirlscraps.com
Jeri St. John             https://jerrisgemtastics.blogspot.com
Jeannette Swain       http://www.stampsnwhatnot.com
Janet Wakeland        http://www.remarkablycreated.com

Wow for a little one.

Standard

The second swap I was part of for convention was a wow card swap.  And the rule for this is that the card was supposed to wow.  So. That’s a tall order. And…. I had signed up for a children’s card swap that got cancelled…. but I had already cut the paper for the card…  so, I decided to have a wow children’s card.  Smaht, yeah me…. (that is Hawaii speak for “brilliant idea… you go girl”).

image

So, this card uses zoo babies stamp set. I had to buy this one cause I was so sad when they retired fox and friends. But… SU! always comes through and replaced it with this cute set. But, looking at the picture… you must be saying… that’s not wow worthy.  Just wait…

image

Before we get to the wow, I want to show you some of the details on the front. I was also sad when the tiny key tag punch retired. But never fear… the little bitty labels punch worked perfectly. And I love those safety pins. They are perfect on baby cards.  That is the crumb cake taffeta.  The colors are so saffron, costal cabana (love it) and baked brown sugar.  I embossed the bottom panel with the polka dots. What did we do with ourselves before embossing??

Okay. Now for the wow. And this wow is so easy that anyone can do.

image

It’s an easel card!  All you gotta do is make sure something on the inside is bumped up so it can hold the paper back.

image

Here’s a view from the side. You cut your card base like normal (5.5x 8.5).  Fold in half.  Then on the front of the card score again at the half way. ( score at 2 1/8).  You will then create the front of the card on another panel and then adhere it to the BOTTOM portion of that scored front.  And it’s that easy.

image

You can see how the top of the giraffe is what holds the card hope.   I love the giraffe and rhino.  It was a little mental cutting them out but it goes fast. Do it while watching TV and it breezes by. I did it while watching Isaac dig in the sand.

What is nice about the easel card is that it can be a nice little decoration for the recipient.

image

And. I love the toucan. 

Since they are so easy… everyone can make a wow card!

image

My “top-notch swap.

Standard

I just realized I haven’t shared MY convention swaps….  so here goes.

So. This year my travel plans were extremely tight before convention. I returned from Kansas just 24 hours before leaving again for Salt Lake. Knowing this, I decided to just sign up for a couple of organized swaps just so I could sign up for things I was interested in. This swap was called “Top-Notch and what I liked about this one is that we had to specify the stamp set we were gonna use. That way we we got 20 cards using 20 different sets!  I signed up to use the Happy Flowers hostess set. Cause it is happy, happy! 

image

I am in love with the new in colors. They are so…. I don’t even know how to describe it. Anyway. I made this with Crisp Cantaloupe embossed with the polka dot embossing folder. I added the pool party trim embossed with chevron. The strip of paper is crumb cake. And whisper white for the scallop trim. I love the crisp whiteness with the crisp cantelouoness.  I cut out the stamped image with the floral framelits die. Then added the flower in the center. For this, I punched the 1 1/4″ scallop 3 times. Put a mini brad through all 3 and misted with water. Scrunch, smooch, sploosh, crinkle…crinkle and you have a nice flower.

image

Then of course rhinestones. Can’t do without rhinestones.

image

So… that’s it! My top notch convention swap. And I gotta say. I thoroughly enjoyed the seal too. Well planned and ran. And got lots of great samples.

Best of…. Shelli

Standard

So, welcome back for the next installment of the BEST OF tour.  This month is Best of Shelli….  This stamp set was hand picked by co-founder Shelli Gardner as some of her favorite images.  One look at the set will tell you why…

And, I’ve been on a 3×3 kick lately, so the project I have for you is this little 3×3 note card set housed in one of those FABULOUS muslin bags from the Holiday Catalog.  Have a look-see:

20130809_215411


So, you probably already know that I’m in love with this year’s In-Colors.  This set of cards features two:  Baked Brown Sugar and Strawberry Slush.  And, it has that incredible stretch ruffled ribbon.  Just a small piece, but that’s all it needs.  I stamped the image in baked brown sugar and used the sentiment from the stamp set “Six Sided Sampler”.  And, I copied that same image on both the envelope and INSIDE the envelope with those awesome framelit envelope liner.  JUST LOVE THOSE.


20130809_215452


Close up of the card so you can see the little flag of ribbon I stapled on.  I covered it with the faceted buttons and put one of those GIGANTIC rhinestones inside to cover the holes.  It adds the perfect amount  of bling and covers the staple…  🙂

20130809_215604


These are those muslin bags.  AND THEY’RE STAMP-ABLE.  I put a thin piece of cardboard inside just to make it rigid and keep color from bleeding through and just had at it.  I copied the same embellishment on the bag, but instead of the staple I used the hot glue gun…

I love these bags because of the drawstring.  It gives a nice little ruffle on the top and the string is long enough to tie in a knot or a bow.  And, it has cute little tassels on the end.  These are 8 for $9.95.  (4×5.5″)  I can TOTALLY see these for gift cards at Christmas.  Or jewelry bags.  or…or… or…

OR… 3×3 note cards!!

20130809_215511

Here is an upclose of the envelopes.  And, the envie insert.  These will SPICE UP ANY envelope and make it the NOT BORING WHITE ENVELOPE.  I used card stock I stamped as the liner… but, probably better would be to use DSP.  Just cause card stock is a little thick.  But, it still works.

20130809_215427


Final product…  It’s SO fun making 3×3 cards….

Next, you are on to Deb Leigh.  Enjoy the tour!!

blogtour-25years-next (1)

If you need to click through the list old-school style, here you go…

Nancy Amato          http://stampinallnight.blogspot.com
Melissa Bolinger      http://www.stampinup.net/blog/2089191
Jackie Bottomley     http://www.jackiebottomley.blogspot.com
Susan Carlson         http://www.stampinmomoffour.blogspot.com
Tamra Davis             http://www.thecardladies.com
Sherri Eddleblute      http://www.sweetestdesigns.blogspot.com
Lynn Embrey            http://www.possibilitiestamperstudio.com
Kathy Hamrick          http://www.countryroads.typepad.com
Crystal Kondo           http://www.card-ed.com
Deb Lehigh               http://thestampinhut.typepad.com
Anne Matasci            http://www.MauiStamper.wordpress.com
Robin Merriman        http://www.trinitydesignstudio.blogspot.com
Andi Potler                 http://www.absolutekreations.com
Michele Reynolds      http://www.inspirationink.typepad.com
Sharon Tisdale          http://www.stampinup.net/esuite/home/coveredbridgesstamper/blog
Janet Wakeland        http://www.remarkablycreated.com